For all the rebels' strategic acumen in selecting and fortifying such a tactically advantageous site, the battle itself was a relatively brief affair, with loyalist forces swiftly overrunning Kett's position and destroying his army in the ensuing rout. Nonetheless, understanding the historic terrain enables a greater level of detail to be discerned regarding the battle's key actions, informing assessments of how Tudor armies fought, and where areas of archaeological interest can be found within the modern landscape.
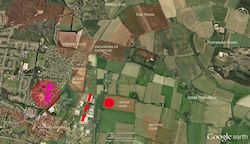
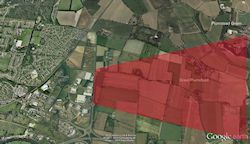
Having rejected Warwick's invitation to surrender, the insurgents initiated the battle, opening fire upon the advancing loyalists and killing their standard bearer 'with an iron bullet […] through the thigh, which struck also the horse he rode on through the shoulder, so as both died with the same shot' (Neville 1575, 63). Such accurate long-distance shooting, occurring far beyond the rebel archers' range, was attributed to a man named Miles, identified by Southerton as Kett's 'chief gunner' (1549-1559, 259), whose superlative skill was noted in accounts of the fighting within Norwich. Miles, however, was not the rebels' only gunner, and his marksmanship probably occurred within the context of a series of ranging shots from Kett's other artillerists. This would result in the potential depositing of stone or iron round-shot, depending on the type of guns used by the rebels, in the area surrounding the probable loyalist deployment in the 'King's Fould Course', although the existence of modern housing developments (Figure 18) would make such finds difficult to recover.
While ineffective opening salvoes were commonplace in Renaissance warfare, on account of the difficulties of engaging moving targets at long range, sustained bombardment could inflict heavy casualties once the gunners could correct their aim (Raymond 2007). This was proven by the costly artillery duel at Ravenna (1512), wherein over two thousand French and Spanish soldiers were killed (Oman 1937), and by battles such as Marignano (1515) and Pinkie, in which static armies were destroyed by concentrated firepower (Turnbull 2006). In recognition of the threat posed by the rebels' ordnance, Warwick's cavalry would have mounted an immediate attack and crossed the valley as rapidly as possible. Upon reaching the insurgents' front line the men at arms and demi-lances contained within each battle, may have launched charges against the enemy to screen the advance of their supporting infantry while masking Kett's guns. Although unlikely to break the enemy without assistance, such aggressive use of cavalry would serve to keep the rebels on the defensive and attract the shooting of their archers, the results of which were noted by Smythe, who recorded that Warwick's own horse 'was wounded under him […] with three or four arrows, whereof he died' (1589, 95).
As the loyalists began their attack, their own artillery opened fire 'with such a terrible volley of shot upon the enemies, as it broke their ranks' (Neville 1575, 64). In the context of the rebel bombardment, this is suggestive of counter-battery fire with the aim of silencing Kett's guns and protecting the advance of Warwick's forces. Although the insurgents possessed more ordnance than their adversaries, and so would theoretically enjoy an advantage in this contest, several crucial issues may have negated their numerical superiority. Firstly, with the notable exception of Miles, many of the rebel gunners would have been outclassed by their loyalist counterparts, who included Sir Edward Bray and potentially other skilled artillerists. Secondly, the insurgents' heterogeneous collection of artillery pieces, which probably encompassed different ranges and calibres of shot, may have hindered the co-ordination of accurate battery firing and made their gunnery less efficient than that of the loyalists. Finally, the loyalist cavalry attack may have also exerted an impact on the rebels' artillery capabilities, initially by drawing fire as they approached and subsequently by overrunning, masking or threatening guns stationed in or near the frontline. The combination of these factors may have enabled the rebels' ordnance to be swiftly neutralised, accounting for its apparent lack of influence on the remainder of the engagement.
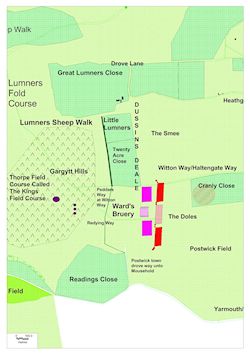
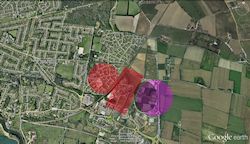
With the insurgents' guns out of action, Warwick's ordnance could switch targets to engage the enemy infantry, throwing their formations into disarray, as Neville described, and limiting the effectiveness of their archery. This was a vital prerequisite for the survival of the loyalist cavalry, which would have been dangerously exposed to the hail of arrows originating from the rebel forces, and also helped to prepare the way for the safe arrival of the infantry (Figure 19). Holinshed, potentially continuing Southerton's fragmentary narrative, related the role of the footmen in this phase of the battle, stating that they 'getting near to the enemies beset them with their harquebus shot […] and thrust forward upon them with their pikes so strongly, that they broke them in sunder' (1586, 1673). The practice of delivering close-ranged volleys of arquebus shot immediately preceding a pike charge had been devised to circumvent the limited accuracy of 16th-century firearms, and to maximise the shock and momentum of an infantry assault (Hall 1997). Although the arquebus lacked the precision and rate of shooting possible with the English longbow, these factors could be compensated for by deploying large numbers of firearms at close quarters, ideally within 50m of a massed target, allowing them to saturate an area with armour-piercing projectiles (McLachlan 2010). This phase of the action may thus have left an important archaeological signature, with the loyalists' bombardment and assault of the rebel line (Figure 20) depositing hundreds of lead balls across a relatively small area, in addition to larger cannonballs, which may have overshot their targets and landed in the fields of the Doles and Smee.
The resulting confrontation between the insurgents and Warwick's infantry would have proven brief and bloody, with the loyalists' pikes proving superior to the rebels' bills in the circumstances in which they were opposed. While bills and other short weapons were well suited to close-quarter fighting and had defeated pike-armed troops at the battles of Ravenna (Turnbull 2006) and Flodden (Barr 2001), such victories depended on negating the cohesion and momentum of pike formations, something that could only be achieved through firepower or terrain. Although the ditches, stakes, and captive gentry may have blunted the landsknechts' initial charge, the insurgents would have found themselves outmatched in a prolonged contest, particularly given their simultaneous attack by loyalist cavalry and the casualties and confusion caused by incoming artillery and small arms fire. Southerton laconically alluded to this psychological impact of the loyalists' firepower, stating that 'the army shot at them and break [sic] their courage' (1549-1559, 259). The confluence of these factors would have fatally weakened the rebel forces, leaving them vulnerable to the loyalist cavalry, with Neville relating how 'our horsemen, after they perceived the enemy to be scattered […] with the often shot of the gunners, and harquebusiers […] gave them a charge' from which 'they ran away headlong' (1575, 64).
Even during their retreat, however, the insurgents showed a surprising degree of resilience, apparently 'turning themselves speedily from their flight [and] withst[anding] our men a little while' (Neville 1575, 64). Nonetheless, this fighting withdrawal was ultimately unsuccessful because of an abrupt collapse of morale triggered by the breakdown of the rebels' command structure, transforming retreat into rout. As Neville put it, 'Kett himself […] when he saw all went against him: their ranks broken, their soldiers overthrown, our forces fiercely to invade […] secretly fled' (1575, 64), leaving his army leaderless at a critical stage of the action. While isolated parties of insurgents continued to resist, the majority of the rebel force turned and ran, occasioning a massacre at the hands of the loyalist cavalry who, according to Holinshed, 'slew them down in heaps […] for the space of three or four miles' (1586, 1673). The reconstructed terrain east of Dussindale (Figure 21) supports this claim, with the open ground of the Doles and Smee offering little shelter for fleeing troops, who would have been relentlessly harried by the many light horsemen accompanying Warwick's army. In this respect, the conclusion of the battle mirrored England's triumph at Pinkie, where the Scots' eventual rout resulted in a similarly prolonged 'execution' arising from the disparity in cavalry between victors and vanquished, and the open ground over which the pursuit took place (Caldwell 1991). As at Towton (1461), where battlefield artefacts and a mass grave have been discovered along the path of the Lancastrian retreat (Fiorato et al. 2007), the area between Dussindale and Great Plumstead, which has yet to be developed (Figure 22), may reward archaeological investigation.
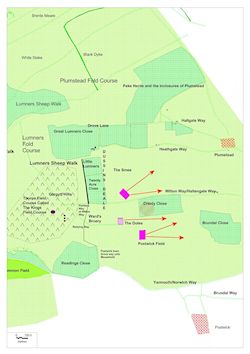
In the midst of this carnage, however, Holinshed noted that a small group of rebels 'that had not been assailed at the first onset' stood their ground 'by their ordnance […] enclosed with their carts, carriages, trenches […] and stakes', and were soon 'environed on every side' by the victorious loyalists (1586, 1673). Although this location was not delineated, an assessment of the reconstructed terrain suggests that the insurgents made their stand within Cranly Close, where the army's baggage and artillery was likely to have been placed. This position (shown on Figure 21) corresponds to the key features of Holinshed's account, lying to the rear of the rebel force where it could not be 'assailed at the first onset', but would subsequently be 'environed on every side' following a loyalist breakthrough. Rather than mount a costly cavalry assault on this well-defended site, Warwick apparently 'sent to the city and caused the most part of his footmen […] to come forth in battle array' (Holinshed 1586, 1673) and compel the rebels' surrender, providing a telling acknowledgement of the strength of the enemy fortifications. This decision to await infantry support would have resulted in a tense stand-off, lasting several hours, while Warwick's messengers reached Norwich and returned with the militia, before 'the battle ended about four of ye clock' (Southerton, 1549-1559, 259) following the surrender of the remaining rebels.
The comprehensive defeat of Kett's forces, coming immediately after the recapture of Norwich, sealed the insurgency's fate, with their shattered army proving unable to muster further resistance. Losses for the battle are difficult to assess accurately, although Edward VI's (1549) assertion that 2000 insurgents died at Dussindale suggests that other chronicles' larger estimates covered the entire campaign. The sole indication of loyalist casualties comes from Delft's report that 'the Earl of Warwick had defeated the peasants in Norfolk […] but with greater loss on his side than he cared to confess' (1549, 446). While this account implies that Warwick's losses were substantial, they were unlikely to have approached those of his enemies and would probably not have exceeded a few hundred, as a consequence of several factors. Firstly, the majority of insurgents killed in action would have died during their chaotic flight across the open fields east of Dussindale, whereas the loyalists retained their formations throughout the engagement, and so reduced the danger to which individual soldiers were exposed. Secondly, while many of Warwick's troops may have been wounded by rebel archery, their armour would have protected most of them from fatal injuries (Phillips 1999b). This is particularly apparent in Smythe's account which, despite his favourable bias toward the bow, emphasised the weapon's impact on lightly armoured horses rather than their riders. Instead loyalist soldiers were far more likely to have been killed by artillery fire in the battle's opening stages, rather than subsequently by the longbow. Finally, once the two armies met at close-quarters, the superior armament, armour, and weapon-handling abilities of the loyalists would have become apparent, with the insurgents proving decidedly outclassed by Warwick's professional mercenaries and personal retinues. The loyalists' losses may also have been inflated by members of the captive gentry, whose use as human shields led Neville to comment that 'many gentlemen […] were slain in this tumult […] although they have money and great rewards to the soldiers to spare their lives' (1575, 66).