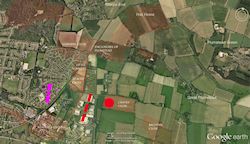
On the morning of 27 August, Warwick's army left Norwich in pursuit of Kett's forces, 'march[ing] against the enemy through Cosleny [now St Martin at Oak] Gate' (Neville 1575, 62) to the north of the city. This decision allowed the loyalists to avoid Norwich's eastern gates, which had been destroyed in the preceding days' fighting (Champion 2001), and the constricted, vulnerable Yarmouth Way, in preference for a two-mile march along Walsham Way to Dussindale (Figure 15). Taking this route ensured that Warwick's forces reached the valley rapidly and safely, with the road and gentle gradients proving especially useful for transporting artillery, which need only have travelled a short distance across country after leaving Walsham Way, or may have continued along the road before descending via the 'green way' further eastwards. Upon approaching the battlefield, a delegation, consisting of Sir Edmund Knevet and Sir Thomas Palmer, was sent in an unsuccessful attempt to induce the rebels to surrender, a gambit that Neville noted allowed Warwick's officers the chance to reconnoitre Kett's position 'before they came into the sight of the enemy' (1575, 62). The results of this scouting may well have determined the directness of the army's tactics, with Warwick's instructions to 'valiantly invade the enemy' (Neville 1575, 63) indicating the limited options available to his forces. While accounts of the action give little indication of where the loyalist army formed up before their attack, Cooke's map (Figure 2) provides a potential clue by alternatively labelling 'Thorpe fould course' as 'the King's Fould Course'. Although this designation cannot be conclusively related to the battle, the area's location west of Peddars/Witton Way and approximately 300m from the Old Ditch would seem a logical point at which to deploy in preparation for an advance between Readings Close and the Twenty Acre Close.
Assuming that Warwick's force followed the era's standard tactical precedents, a likely supposition given its inclusion of pike and shot infantry and a mixture of cavalry, the army's associated contingents would have been assembled into several large units known as battles (Eltis 1995). Infantry battles contained many thousands of soldiers equipped with a mixture of firearms, pikes, and shorter weapons, namely the halberd, two-handed sword, or bill, as well as integrated field guns, enabling them to operate self-sufficiently or with the support of missile-armed skirmishers (Turnbull 2006). Cavalry formations similarly used a combination of light, medium, and heavy horsemen to guarantee battlefield flexibility, although their component parts would often mount separate attacks upon the enemy in contrast to the collective nature of infantry tactics (Phillips 1999a). While the English armies that invaded France and Scotland in the 1540s differed slightly from the continental template, chiefly in their inclusion of archers and a higher proportion of bills to pikes (Oman 1937), Warwick's force demonstrated the degree to which the Tudor state could mirror European practices in smaller actions. At Dussindale the landsknechts and Drury's company would almost certainly have been amalgamated, containing just under 1200 soldiers, while the 3000 cavalry troopers would have been divided between two roughly equal units, each containing a mixture of foreign men at arms and native demi-lances and light horse.
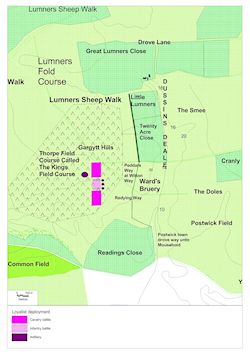
Warwick's army would thus form the standard configuration of battles, comprising a forward, mainward, and rearward, with each unit's designation corresponding to its position within a marching column, and the forward and rearward deploying for combat on either side of the main body (Oman 1937). Given that the loyalist force contained two cavalry battles and a single unit of infantry, the footmen would probably have formed the mainward, allowing the army's horsemen to shield their flanks during the engagement, a practice noted by Sir Thomas Audley, who counselled English generals to 'set all the horsemen on the two uttermost sides of all your battles' (c. 1550, 27). When arraying forces for battle, 16th-century commanders often sought to place their soldiers in 'just' or 'broad' squares, forming rectangular units with equal or greater numbers of files than ranks (Davies 2001). Such formations adhered to the long-established practice of allowing each infantryman 3 feet (0.9m) in width and 7 feet (2.1m) in depth, and each cavalryman 5x10 feet (1.5x3m), giving soldiers the necessary space to manoeuvre and handle their weapons during battle (Eltis 1995). When applied to Warwick's forces these criteria would result in the loyalist infantry deploying in a 'just square', containing thirty ranks of forty men with a depth of 203ft (60.9m) and a width of 117ft (35.1m), while each cavalry battle formed up as a 245x290ft (73.5x87m) 'broad square' of thirty ranks and fifty files. Figure 16 depicts the loyalist army, including its accompanying artillery, in relation to the rebel positions, while Figure 17 shows both forces within the modern landscape.