Cite this as: Tuck, A. and Rajic, M. 2021 Hollis Croft, Sheffield, South Yorkshire: Old site and new connections, Internet Archaeology 56. https://doi.org/10.11141/ia.56.4
The following section provides a summary of the information held in the site archive. A full list of all context numbers and context descriptions within each trench are contained in Appendix 1 of the archive report [PDF].

The remains encountered in Area A included 18th-century structures and pits. Evaluation Trench A (Wessex Archaeology 2017e) was expanded into strip, map and record Area A and was further expanded during the subsequent watching brief (Figures 2–7). Area A targeted a court off Hollis Croft with potential early activity.
Figures 2-7: Area A plans and sections


, Layers cut by drain 929 including layer 924 (bottom)")
The undisturbed natural geological substrate was seen at a depth of 0.5m below ground level and comprised light orange yellow sand. Overburden comprised a rubble deposit. The pottery recovered from this layer indicated that the material was imported, likely from one of the depots established in the city to accommodate domestic waste and to facilitate its re-use (see Artefactual Evidence). Layers of made ground had been built up around the structures described below and generally comprised dark sooty and ashy deposits. Various concrete footings from recently demolished buildings were also recorded.
Two residual sherds of medieval Coal Measures Fineware were recovered from overburden. Residual finds of 17th-century date were also recovered from later contexts (see Artefactual Evidence). These finds included pottery sherds from overburden likely imported to the site.
The Fairbank plan of 1787–9 shows a plot belonging to Thomas Lindley and William Gill partially occupied by buildings forming a courtyard in the north of the plot (Figure 4). Thomas Lindley was a hairdresser and librarian and Thomas Lindley and William Gill are candidates for historic LGBT representation. The excavation area covered the rear range of this courtyard along with part of the undeveloped ground to the south.
A small rubbish pit (904; Plate 4) was 1.4m by 1.3m in plan and 0.39m deep. This pit contained a group of sherds of 18th-century slipware and clay pipe fragments with a range of dates from the 17th century to early 19th century. This pit was situated within the rear range of buildings depicted on the Fairbank plan (Figure 4) and therefore likely pre-dates development, perhaps representing activity immediately prior to development.
A second small possible pit (908; Plate 9) may have been associated with pit 904. It was 0.5m in diameter and 0.57m deep with a dark fill. The feature did not contain any artefacts and it was not certain that it was a genuine anthropogenic feature.
During the evaluation, an unmortared wall comprising a sandstone foundation (913) overlaid with a course of handmade side-on headers(914) ran predominantly north to south with a return to the west at both ends (Plate 5). The structure correlates with the east end of the rear range of buildings depicted on the Fairbank Plan (Figure 4). By 1853, this building had been removed (Figure 5).
The 1853 Ordnance Survey map (Figure 5) shows three small properties, likely dwellings, fronting Hollis Croft, with a range of buildings extending down the west side of the plot and two small buildings against the east side of the plot (likely toilets, one of these was excavated). Counting properties along from The Cock public house suggests that the houses fronting the street may have been numbers 71, 73 and 75. According to the 1851 census, these were inhabited as follows. The head of the number 71 household was William Johnson, razor smith (59 years old) living with his wife Ann (61) along with six members of the Knight family, led by Francis Knight, national school master (36) who was William Johnson's nephew. Lizzy Knight (39) was Francis' wife and they had four children aged 2–11. The two families at least occupied a larger-than-average property with a rear offshoot. Number 73 was led by Betty Henderson, a married shopkeeper aged 69 years. There was no sign of Betty's husband and no indication that she was a widow. Living with Betty were her married daughter Jane Turton, Jane's husband Henry, a table knife hafter, and their son Henry (15). Number 75 housed William and Mary Thompson and their four children. William was a warehouseman and two of his sons were an errand boy and scissor smith's apprentice.
A foundation cut (c.1m wide) was recorded during the evaluation running east to west (906) before returning to the north at the west end (910). The foundation cut was filled with tightly packed rubble and industrial waste (907 and 911), forming a hardcore base, presumably to support a removed wall. Deposit 911 contained pottery dating to the mid- to late-19th century. Cut 910 was supported along its western edge by shoring comprising a narrow wooden beam or plank (912; Plate 6). Pottery and clay tobacco pipe indicate a mid- to late 19th-century date for made ground (916) through which these features were cut. These foundation trenches do not correlate with anything shown on any consulted historic map, although they are parallel with the boundaries of the plot which persisted from the 18th century throughout the 19th (Figures 4–6). Foundation trenches (906 and 910) are contained within the area of the rear range of buildings shown on the 1787–9 Fairbank Plan (Figure 4), however they do not correlate exactly with the walls of that building, and, on the strength of the artefacts recovered from associated made ground 916, are likely later in date.
The excavation also revealed a group of structures (923–928; Plate 7) to the east of wall 913/914. The structures occupied an area 2.6m by 2m, and continued beyond the limit of excavation to the east. Structures 926, 927 and 928 comprised sandstone and black ash mortar foundations each around 0.36m wide. In one place, an overlying handmade red brick and black ash mortar wall of headers (923) survived. A possible grindstone had been re-used as masonry in wall 926. A waste sewage pipe (929) 0.25–0.29m in diameter ran to the north-west and was built into sandstone foundation 927, although the pipe did not appear on the south-east side of foundation 927, perhaps suggesting an undetected phase of repair decommissioning the pipe. Made ground layer 924 (Figure 7, bottom) was stratigraphically earlier than sewer pipe 929 and contained a clay tobacco pipe dating between 1820 and 1860. Inside the area enclosed by foundations 927 and 926, a handmade brick and black ash mortar surface (925) was uncovered. The bricks were rough and may have been re-used.
Structures 923–928 closely correlate with a building first depicted on the 1853 Ordnance Survey map (Figure 5). The building was still present although reduced in size on the 1890 Ordnance Survey map (Figure 6). The form of the building is consistent with a toilet block, an interpretation which is supported by the location of the building in a court at the rear of properties and by a waste pipe (929). However, no sanitary wares or other features were identified to conclusively demonstrate that this was a toilet and the building may represent a shed or other structure. The mid-19th-century date suggested by the historic map is consistent with the materials used in construction (black ash mortar and handmade bricks).
During the watching brief, a wall was recorded running roughly north to south in the west of Area A (3006; Figure 2 inset). This wall (3006) comprised sandstone and handmade brick bonded with lime mortar in a haphazard scheme of coursing. Sockets for four floor joists were present in the wall, indicating the level of a former floor (Plate 8). The wall was 1.91m long and 0.19m wide. The wall may be associated with the extant building on the adjacent plot (the former Toledo Works) but was of very rough construction. The wall (3006) was built in a construction cut (3005) excavated through the natural (3002).
Area B successfully investigated remains relating to The Cock public house with some limited evidence of phased development.
Figures 8-12: Area B plans


Evaluation Trench B (Wessex Archaeology 2017e) was expanded into strip, map and record Area B (Figures 8–12). Area B targeted foundations and structures relating to the former Cock Public House. The plot containing Area B remained remarkably consistent on maps from the late 18th century until the early 20th century (Figures 10–12; and early 20th-century maps). By 1935 maps show the plot redeveloped (not reproduced). Although some of the structures excavated (in the north-east of Area B, e.g. 1017) had been incorporated into the expanded Cock public house by 1890 (Figure 12), when they were built they comprised separate buildings in the same range and may have been related to The Cock only by a shared leaseholder of the land. In 1787–9 this was John Wingfield, an agricultural gentleman from Norton, Sheffield. In 1851 the proprietor of The Cock public house was John Mucklow (a name perhaps derived from Irish McClain or similar), who along with three of his sons was also a file grinder. The household was six persons in total.
The undisturbed natural geological substrate (1003) was seen at a depth of 0.5m below ground level and comprised light orange yellow sand and mudstone. Overburden comprised a rubble deposit (1002), which was likely imported in the same manner as in Area A (902). Layers of made ground (1007, 1022, 1024, 1028, 1030, and 1038) had been built up around the structures described below and generally comprised grey or red silty deposits. One layer of made ground (1023) may represent a re-deposited soil however the stratigraphic position of this above a layer of rubble made ground (1024) suggests that 1023 does not represent an in-situ buried soil and may represent dumped material.
During the evaluation, a medieval penny was recovered from 19th-/20th-century made ground (1007). The recovery of this object from this context is remarkable. It is possible that the coin was lost from The Cock public house where it had been kept in the 19th-/20th-century as a curio or collectable. It may be that the coin was a find initially deposited on the site during, say, medieval agricultural activity and then redeposited as part of made ground 1007. It is also possible that the coin was imported to the site within material intended for use as a levelling deposit.
In the north-east of Area B, three courses of a 0.37m wide 'L'-shaped sandstone and lime mortar wall (1017, Plate 10), correlated with an exterior courtyard division at the rear of The Cock public house as depicted on the 1890 Ordnance Survey map (Figure 12). However, this building was initially distinct from the public house and was depicted as a separate dwelling or similar on the Fairbank plan (Figure 10) and on the Ordnance Survey map of 1853 (Figure 11). An adjacent deposit of small sandstone blocks formed a rough curvilinear shape and was likely rubble (1018). The north end of wall 1017 terminated at a large sandstone block returning to the west (1016; 0.75m by 0.29m in plan and 0.2m deep). West of sandstone block 1016 was a further handmade red brick and lime mortar structure (1015) probably forming some interior detail to the property. In 1853 this property was part of the large number 61 Hollis Croft, and the 1851 census records 14 individuals with three surnames living here, including William Smith (46) and his sons George (23) and Joseph (17), all file makers, and Charles Smith (19), brant [sic?] bit maker. Two sons-in-law, Matthew and Edmund Sellars (23 and 34) were 'inn makers' and Luke Hanson (41) was a stone grate fitter. In addition, Enoch Shipman (39), table knife cutter, and his wife Mary, and an 'assistant', lived in the court to the rear of number 61. This may have been in a small square building to the south of Area B.
In the south-west of Area B, the evaluation recorded a series of handmade brick and lime mortar walls (1004, 1008, 1012, 1013; Plate 11) enclosing small areas (e.g. 0.76m square) floored with sandstone flags (1005, 1010). The strip, map and record excavation expanded this area of archaeology to the south (Plate 12). Walls 1032, 1035, 1036, and 1037 formed a similar enclosed area to those to the north, again floored with sandstone flags (1031). These structures were located within a larger building depicted consistently from the late 18th century until the late 19th century (Figures 10–12). Speculatively, the structures might represent toilets or sheds associated with buildings, possibly dwellings, on the same plot as The Cock public house. An unstratified group of leather shoes (1014) was recovered from the general area of these structures and dated to the late 19th- to early 20th centuries. The shoes may relate to the use of the building rather than its construction. The shoes may represent domestic activity and there is nothing to suggest shoe manufacture (although this remains a possibility).
In the south of Area B, sandstone and black ash mortar foundation 1019 ran north to south topped by two courses of red brick (1020) bonded with black ash mortar. This wall corresponds with an exterior courtyard division first seen on the Fairbank Plan of 1787–9 (Figure 10) and depicted until at least 1890 (Figure 12).
Adjacent to wall 1019 was a sub-oval pit (1033) which, following hand excavation to a maximum safe depth, was machined to its base at 1.7m below ground level (Plate 12). This pit was filled by a single deposit of very dark waterlogged silt clay (1034) containing occasional rubble inclusions as well as pottery and clay pipe fragments. The latest dated pottery recovered from fill 1034 dated from 1840 or later, a date which is consistent with recovered clay tobacco pipe. A sample taken from this deposit contained no significant environmental material. It has been suggested that this feature represents a well, however the relatively shallow depth of the feature suggest that it is more likely a soakaway or waste pit.
Overlying pit 1033 was a short (0.52m long) single-skin red brick and ash mortar wall (1021). Wall 1021 ran east from wall 1020. South of 1021 and overlying pit 1033 was a single sandstone slab, possibly the remnant of a floor surface (1025). These structures (1021 and 1025) stratigraphically post-date pit 1033 and therefore must be mid-19th century or later in date.
Wall 1006 (recorded during the evaluation) comprised frogged machine brick, unfrogged machine bricks and handmade bricks and was bonded with black ash mortar (Plate 13). Wall 1006 did not correlate with any consulted 19th- or 20th-century map and may represent an minor development within a yard area.
A machine brick and modern cement inspection chamber (1011) and concrete slab (1009) overlay structures (e.g. 1004) in the west of Area B. The manhole and concrete relate to later development. Concrete footings associated with later development truncated the area. One of these (1027) was built on a bedding deposit (1029) and carried a small survival of a recent brick wall (1026).
Area C recorded a late 19th-century chimney and associated structures.
Figures 13-17: Area C plans


Area C was investigated by evaluation trench only (Wessex Archaeology 2017g). Trench C (Figures 13–17, Plate 14), measured 10m by 4m.
Deposits of demolition rubble (1602, 1637, 1639) and concrete (1601) overlay archaeological structures in Trench C. The undisturbed natural geological substrate (1632) comprised mid-yellow brown silt clay.
The earliest activity recorded in Trench C comprised two stone walls (1607 and 1608) surrounding a brick surface (1605/1606) located towards the western end of the trench (Plate 15). A fragment of a second possible sandstone wall (1609) may have run parallel with wall 1608, although it is possible that apparent wall 1609 may have comprised stones displaced from wall 1608. These structures were constructed on a layer of compressed natural clay (1641), possibly representing either a former working surface or a rammed foundation. The walls comprised two courses of rough unmortared sandstone blocks 0.40m wide and 0.05m high forming an 'L'-shape. Brick floor 1605/1606 comprised two courses of re-used handmade red brick bonded with lime mortar, 1.10m by 0.80m in plan. Context 1605 refers to the upper course of brick; context 1606 to the lower course.
Handmade red brick and lime mortar wall 1613 continued the alignment of wall 1607 to the east and was three skins wide (0.34m) and 1.4m long. Wall 1613 was built directly on natural 1632. Wall 1613 was bonded to earlier wall 1611 which was parallel and located immediately to the north. Wall 1611 comprised two skins of pinkish handmade bricks and white lime mortar. Only a small fragment of structure 1611 survived (0.27m long by 0.12m wide).
South of wall 1607, handmade red brick and grey lime mortar structure 1612 was poorly preserved but included an element that were east to west aligned and three skins thick, and a north to south part that was one skin thick.
These structures do not appear on any consulted historic map, and no artefacts were recovered to securely date them. It is thought that these features pre-date later development in Trench C; the materials used in their construction are consistent with an 18th-/19th-century date. The structures may have formed part of the works of John Harrison and Son or, more likely, W. Fearnehough.
In the west end of the trench, machine brick and black ash mortar wall 1604 overlay floor 1605 and was accompanied by a second parallel wall (1603). Walls 1603 and 1604 comprised two skins of headers in the west, but (where 1604 overlay surface 1605) wall 1604 instead comprised a single skin of stretchers in the east. Wall 1603 was built on an ash levelling layer (1634). Walls 1603 and 1604 ran approximately east to west, forming a narrow corridor or channel around 0.3–0.4m wide. Part of the floor of this channel was laid with concrete (1610); demolition rubble overburden was removed from the remainder of the area to reveal natural (1632).
The east end of wall 1603 was truncated by structure 1615. Structure 1615 formed a hollow sub-rectangle 2.8m long and 1.1m wide, three skins thick on the north and south sides and four to five skins thick on the west and east ends. Structure 1615 comprised machine bricks and black ash mortar. The centre of 1615 was filled with dirty redeposited natural clay (1640).
Made ground rubble deposit 1637 butted the south-east corner of structure 1615. Overlying deposit 1637 were minor walls 1616 and 1617. Wall 1616 ran north to south, comprising three machine bricks bonded with black ash mortar and laid as headers. The total size of wall 1616 was 0.35m long, 0.24m wide and 0.08m deep. Wall 1617 ran east to west and comprised four bricks and partial machine bricks bonded with black ash mortar and a total of 0.73m long, 0.13m wide and 0.08m deep.
The eastern end of the trench (Plate 16) contained a complex of brick structures representing the base of a chimney and associated structures. A machine brick and black ash mortar surface (1618) was 2.30m long by 1.60m wide and over three courses deep.
Structures overlying surface 1618 were on a slightly different alignment and together with surface 1618 represent the base of a chimney. Four frogged machine brick and black ash mortar walls 1625, 1626, 1627 and 1628 overlay surface 1618 and were four skins thick and three courses high. Wall 1626 was 1.76m long, 0.46m wide and 0.26m high. The four walls (1625, 1626, 1627 and 1628) surrounded a square heat-effected firebrick structure (1630), 1 skin thick, 5 courses high measuring 0.8m by 0.8m in plan with a maximum height of 0.39m.
A soot-stained firebrick structure (1631) ran approximately east from the south-east corner of structure 1630 (Plate 17). Structure 1631 was one skin wide and four courses high and was degraded due to exposure to heat. It is likely that structure 1631 represented the truncated remains of a flue carrying exhaust gases to a chimney formed by structures 1618, 1625–1638 and 1630. Machine brick and black ash mortar structures (1619, 1624) running roughly to the east likely formed a foundation for the truncated continuation of flue 1631. Wall 1624 was 0.45m long and two courses (0.16m) high and contained a mixture of re-used machine brick types. Structures 1619 and 1624 were built on a foundation of a single course of firebricks (1621, not illustrated).
Wall 1620 butted structures 1619 and 1624 and ran roughly north to south. Wall 1620 survived for three courses and was 1.60m long, 0.32m wide and 0.24m high.
The chimney (1630 etc.) is first depicted on the 1890 Ordnance Survey map (Figure 17). The materials used in the construction of the chimney are consistent with a late 19th-century date. At this time, W. Fearnehough Ltd operated the works on this plot.
A later structure (1623) at the east end of the trench post-dated the partial demolition of structures 1624 and 1620 was constructed from bricks randomly positioned in all three dimensions in a matrix of modern cement.
Remnants of a machine brick and modern cement structure (1614) were present in the south of the trench. Structure 1614 was bonded to earlier structure 1613. Most of structure 1614 had been truncated, however the surviving elements were arranged in a hollow square or rectangle around 1m square.
These alterations were probably undertaken by W. Fearnehough in the 20th century and may relate to modifications recorded in documents held by Sheffield Archives.
Work in Area D was unsuccessful in identifying remains related to a circular structure shown on the Fairbank plan relating to Harrison's steel works. However, two crucible furnaces were recorded, and were related to the later W. Fearnehough Ltd.
Evaluation Trench D (Wessex Archaeology 2017g) was expanded into strip, map and record Area D (Figures 18–22). Area D targeted the former Harrison's steel works (later occupied by W. Fearnehough Ltd.) and in particular a circular structure (perhaps a cementation furnace), indicated on the Fairbank plan of 1781 (Figure 20). No archaeological evidence relating to this circular structure was identified.
Figures 18-22: Area D plans


The undisturbed natural geological substrate (1719) was seen beneath the surviving archaeological structures at a depth of 1.8m below ground level and comprised yellow sandy clay. The overburden varied across Area D and is discussed alongside the archaeological results below.
The evaluation recorded a series of handmade red brick and lime mortar structures that partially correlate with an outbuilding or extension to the easternmost block of buildings within the John Harrison and Son holding on Garden Street (Figure 20) suggesting that they were in place by the late 18th century. By the time of the 1853 Ordnance Survey map (Figure 21) the buildings had been replaced. Further structures south of those depicted on the Fairbank plan presumably represent either structures demolished prior to the Fairbank plan or a development or series of developments that was in place between the dates of the two maps.
Two-skin handmade red brick and lime mortar walls 1705, 1707, 1712–1715, 1718 and 1722 (Plate 18) survived to a depth of around 0.8m and enclosed four small areas (for example the north-west area was 0.96m by 0.6m in area). Access to the eastern two areas, if present, could have been located outside the area of excavation; these eastern two enclosed areas were surfaced with sandstone slabs (1716, 1717). Sandstone floor 1716 was bedded on 1721, a thin (0.12m thick) layer of dark grey brown silt clay with green veins. Bedding layer 1721 directly overlay natural 1719. No sandstone slabs were recorded in the two western small areas, perhaps indicating that these areas were not intended for access. A two-skin wall of slightly different handmade bricks and lime mortar (1710) had been built along the south side of the south-eastern small area (Plate 18).
South of wall 1718 and east of wall 1722 and at a deeper level, was a single course of an east to west aligned wall (1723) of identical construction to the surrounding walls (Plate 19). Wall 1723 appeared to cut a small north to south aligned gully (1728) although safe excavation of this gully was not possible. Gully 1728 was cut directly into the natural (1719) and was 0.2m wide and filled with mid grey black sand with lime mortar inclusions. It is possible that the gully represents a small levelling deposit laid down prior to the construction of the structures, or it may be that gully 1728 was an early feature relating to land use (such as agriculture) prior to development on site.
An interpretation of these structures as toilets is consistent with their small form, although there was no evidence of sanitary provision. The western two small areas appear not to have been designed for human access and may have primarily been intended to carry removed higher-level structures.
Structures 1705 etc. were overlain by a layer of black silty sand (1704), overlain by dirty redeposited natural (1703) and rubble (1702). A cross-context join was found between pottery sherds from layers 1703 and 1704; this implies that these layers may have been laid down contemporaneously. Layer 1704 produced 31 pottery sherds and 121 clay pipe fragments mostly dating to the mid-19th century (although with a small quantity of residual 18th-century material). The clay pipe fragments provide a 30-year window for deposition between 1830 and 1860, suggesting that the structures in this area went out of use in the mid-19th century.
Wall 1723 was overlain by a series of made ground deposits (1724–1726) comprising dark silts and sands. Deposit 1724 contained a clay tobacco pipe bowl with masonic decoration that was likely deposited between 1830 and 1860, alongside mid–late 19th century pottery. This is consistent with the date of overburden 1704, supporting a mid-19th-century decommissioning of these structures. The absence of these structures from the Ordnance Survey map of 1853 (Figure 21) further supports this.
Overlaying walls 1718, 1722 and decommissioning made ground 1724 was a surface of sandstone setts (1709; Plate 18). These setts appear to represent a mid-19th-century (or later) repurposing of the area, perhaps as an external surface extending across a wider area. Sandstone wall 1727 provided a southern limit to setts 1709 and does not correlate with any consulted historic map.
An 'L'-shaped frogged brick and modern cement wall (1711, not illustrated) overlay sandstone setts 1709. A ceramic drain encased in concrete (1706) and an associated minor machine brick and black ash mortar structure (1708) overlay wall 1705. These structures relate to later 20th-century development (all Plate 18).
A series of structures were recorded in the centre-west of Area D (Plate 20 and Plate 21). A small part of a substantial north to south aligned wall (1732) was recorded. Wall 1732 comprised four skins of handmade brick and white lime mortar and was pierced by an opening formed with brick surrounds. Wall 1732 correlates with the exterior wall of W. Fearnehough's Machine Knife Works as depicted on the Ordnance Survey map of 1890 (Figure 22). The wall was not depicted in 1853 (Figure 21).
Running west from wall 1732 was a brick vault (1734) unusually comprised of headers so that in the centre of the vault the bricks would have been vertical. The materials used in vault 1734 were handmade bricks with a light grey lime mortar of different character to wall 1732, suggesting that vault 1734 may have been built during a different phase of activity. Vaulting 1734 intersected vault 1735 which ran perpendicularly to it (north to south). Vault 1735 was built in the same materials as vault 1734 although the bricks were arranged conventionally as stretchers. The vaults likely represent the ceilings of cellars or similar accessible underground spaces. The vaults were unlikely to have enclosed flues due to their large diameter and soot-free interiors.
Vault 1735 survived over only a length of 1m; its south end marked with bull-nosed bricks (Plate 21). South of this vault, the line of the wall from which 1735 would have sprung continued as 1736. Wall 1736 was one skin thick and turned to the east after 0.5m, again with the corner finished with bull-nosed bricks (Plate 21). Excavation to a deeper depth revealed that this wall had been reinforced by the construction from within the vaulted cellars of two-skin grey machine brick and modern cement walls (1753 and 1754; Plate 21). This repair demonstrates the continued importance and use of the cellars well into the 20th century.
A further structure (1733) was constructed in handmade brick and an atypical mid–dark grey ash mortar rich in lime inclusions (10% unreacted lime). The difference between this mortar and the other structures suggests that 1733 belongs to a different (probably later) phase of construction. Structure 1733 comprises a four-skin wall running adjacent to the west side of major wall 1732, with springers leading to the west to support a missing brick vault. It is hard to reconcile the arrangement of brick vault of 1733 and brick vault 1735 which appears as though it was a smaller interior vault within 1733. Perhaps 1733 represented a larger, later construction intended to carry the vaulting further south than had been originally built.
No reliable dating evidence for these structures is available; no finds were recovered that can be stratigraphically related to the cellars and the cellars themselves do not correlate with any consulted historic map. Given their subterranean nature these features may have escaped the attention of map makers. Wall 1732 associated with the cellars appear to have been of late 19th-century date. An 18th- or 19th-century date is consistent with the materials used in the earliest phase of their construction. The cellars formed part of W. Fearnehough's works. Further work was not possible in this area due to concerns relating to the safe working distance from the boundary wall.
Elements of a crucible furnace (1757–1764) were recorded during the watching brief in the west of Area D (Plate 22). A limited view was afforded by the constraints of the watching brief and only two charging holes were exposed. It could be seen that there were at least two more charging holes to the south (Plate 23), however these could not be investigated within the scope of the watching brief. Further crucible holes may or may not have existed to the north. The furnace would have been positioned at the west end of the former steel works with its back towards the Chapel on Garden Street.
Wall 1760 situated between the charging holes and the chimney flues of the crucible furnace comprised firebricks and lime mortar and was built on sandstone and lime mortar foundation 1761. The charging holes themselves (1757 and 1758) were formed from firebrick and lime mortar and were extremely heat affected and slaggy on the interior surface. The holes were circular, around 0.75m in diameter. Two iron bars ran across each hole to support the crucibles, and an iron fitting in front of the crucible holes formed a step or ledge (1763) which appeared to sit on top of a handmade brick and lime mortar wall forming the original front of the furnace. A machine brick and black ash mortar wall two skins thick (1764) had later been added in front of the handmade brick wall. The later wall (1764) possibly constitutes a repair or enhancement to the existing furnace and may indicate the continued importance of the structure over time.
Evidence for the decommissioning of the furnace included construction of a rough masonry blockage within the fire pit which was observed by suspending a camera in the charging hole. A plate of metal in front of later wall 1764 may also be related to the decommissioning of the furnace.
The fill of both crucible pits comprised pink orange sand and clay possibly derived from heat affected firebricks (1764).
The crucible furnace did not correlate with any structure depicted on historic maps, but was situated within buildings associated with John Harrison and Son and W. Fearnehough's works depicted on maps in the late 18th to 20th centuries (Figure 20 and Figure 22; 20th century maps not reproduced). Demolition or made ground material comprising dark brown sand (1762) overlay the remains of the crucible furnace.
A single ash pit or fire pit belonging to a second crucible furnace cellar (contexts 1746–1750; Plate 24) was recorded in the south of Area D. The crucible furnace backed on to Garden Street and probably extended to the west but was truncated by a concrete footing. Although early examples of single-hole crucible furnaces are known (e.g. at Riverside Exchange; Andrews 2015) it is likely that furnace 1757–1764 is later in date and that the hole is an end hole on the left side (east) of a larger furnace. The structure was built of handmade brick and lime mortar with three skins on each side of the fire hole (1747 and 1750). The back wall of the crucible furnace (1746) and ash pit (1748) were constructed in the same materials. The bricks surrounding the ash pit (1752) were somewhat heat effected, exhibiting reddening and some degradation. The ash hole survived to a height of three courses with a large firebrick used as a lintel (1749; 0.39m long, 0.13m wide and 0.07m deep). The furnace had been demolished above the level of this lintel. However, no evidence for metal grates or other fittings survived. The ash pit was accessed by a long thin raking hole situated between two piers at the same level as the cellar floor. The ends of the pier were decorated with bull-nosed bricks on both sides. The ash pit closely resembled other known examples (e.g. Powell 2014; Wessex Archaeology 2012).
In the area of crucible furnace 1746–1750, the overburden comprised two layers of rubble (1743 and 1744) and was of a different character to the rest of Area D. A very small pottery assemblage from layer 1743 was of mid–late 19th century date and together with the materials used for construction provided a tentative date for the decommissioning of crucible furnace 1746–1750. Dating of this crucible furnace is not conclusive; an 18th- or 19th-century date is consistent with the materials used and with historic maps, which depict the area of the furnace inside a building or buildings (Figures 20–22).
To the east of crucible furnace was a north to south aligned substantial four-skin (0.52m wide) wall (1745) built in the same materials as the furnace: handmade red brick and lime mortar (Plate 24 and Plate 25).
Further north, wall 1745 had been pierced and 20th-century structures had been constructed in the opening (1740, 1742; Plate 25). Structures 1740 and 1742 did not appear to have been constructed in an original opening in wall 1745 due to the rough truncation of wall 1745 and the continuation of wall 1745 to the east of structures 1740 and 1742. Beneath structures 1740 and 1742, the surviving foundation courses of wall 1745 were recorded as 1751. A series of sandstone and lime mortar foundations (1737, 1738 and 1739) enclosed an area of 1.3m by 0.6m to the east of wall 1745/1751. Sandstone walls 1734, 1737 and 1738 were of uniform construction between 0.28m and 0.36m wide. Wall 1737 contained an iron fitting or tie protruding to the west into the enclosed space. Later rubble overburden was removed between 1737, 1738, 1739 and 1745/1751 to reveal undisturbed natural (1719). These sandstone foundations correlate with a staircase depicted on the 1890 Ordnance Survey map (Figure 22). This perhaps provides an indication of the date of the associated crucible furnace. The staircase would likely have accessed the first floor as no opening appears to have pierced the full width of wall 1745.
The modern structures within the opening in wall 1745 comprised a 0.7m square grey machine brick and modern cement pier with seven courses extant (1742). On either side of pier 1742, the line of wall 1745 had been reinstated as a two-skin red machine brick and modern cement wall (1740) with weeping joints to the east, suggesting that the space enclosed by sandstone walls 1734, 1737 and 1738 was not accessible at this time.
The presence of these 20th-century structures suggests that the crucible cellar may have been in use well into the 20th century, presumably long after the furnace had ceased to operate. The arrangement of structures surrounding modern pier 1742 is hard to interpret, but may represent a crucial point in the structure of the building that was largely replaced at a late date.
Two circular structures, first evident on the 1853 Ordnance Survey map and which represented cementation furnaces, were extensively recorded in Area E/F with boundaries defined. Contemporary ancillary structures and areas of undisturbed natural strongly suggest that a third cementation chest had not existed in close association with the excavated cementation furnaces. No evidence directly related to the 18th-century Kenyon Works were identified.
Evaluation Trenches E and F (Wessex Archaeology 2017g) was expanded into strip, map and record Area E/F (Figures 23–33) which targeted the site of the John Kenyon and Co. steel works, later occupied by Burgin and Wells and Footprint Tools. Two adjacent circular structures first evident on the 1853 Ordnance Survey map (Figure 30) were targeted. The expanded strip, map and record area sought to find the boundaries and limits of the two cementation furnaces as well as defining the limit and extent of the walls relating to the Fairbank 1787–9 plan of the Kenyon Works (Plot no. 40; Figure 29) and to confirm the possible presence of a third cementation chest.
Figures 23-33: Area E/F plans and sections


 and outer (2039) structures of cementation furnace; 4. Section through north chest of south cementation furnace showing early crozzle 1545")

The undisturbed natural geological substrate was seen in some undisturbed locations, for example to the south-east of the southern cementation furnace, and also during the watching brief. The natural comprised yellow brown silt clay with sandstone. The upper layer of overburden comprised a demolition rubble deposit derived from recent demolition of buildings on site. Other made ground and overburden deposits generally comprised dirty silts, ash or rubble.
Dateable finds were recovered from layers of overburden; these deposits may represent demolition or imported material and cannot be relied upon to date any structures. Overburden deposits 1503 and 2115 contained pottery and clay pipe dating to the mid- to late 19th-century, as did deposit 2030 which overlay the outer wall (2019) of a cementation furnace chest described below. Overburden 2115 contained a significant assemblage of clay tobacco pipe discussed in Artefactual Evidence.
A layer of light brown yellow silt sand (2164; Plate 26) may be the oldest context encountered in Area E/F. No artefacts or dating evidence were described from this layer. Excavation in this location halted on safety grounds.
A small rectangular stakehole void (2166; Plate 26) cut layer 2164 and was 0.1m by 0.08m in plan and 0.76m deep. The stakehole contained no fill (context 2167 was assigned to allow entry of the cut into an Access database).
Structure 2162 overlaid stakehole 2166 and was part of a series of structures (2024, 2026, 2037 and 2162; Figure 24; Plate 27). These structures were preserved at a low level in the space between the outer structures of the cementation furnace chest (1533), the outer conical chimney of the cementation furnace (1537) and the furnace stoke hole entrance (1539; all described below). Structures 2024 and 2162 comprised sandstone and lime mortar, and structures 2026 and 2027 were built of handmade brick and lime mortar. Sandstone structure 2162 formed a foundation for brick structure 2026. Only fragments of these structures were preserved, having been truncated by construction of the cementation furnace. These structures appear to correlate with the north wall of the rear range of properties depicted on the John Kenyon and Co. plot in 1787–9 (Figure 29).
Wall 2163
At the eastern limit of excavation, a single skin handmade brick and lime mortar wall ran north to south (2163; Plate 47). Wall 2163 contained CBM constituents which are rather thicker than normal tile but thinner than most bricks (around 0.03/0.04m thick). Parliament fixed brick sizes at 2.5 inches (0.63m) thick in 1776 (Brunskill 1997, 38; Cunnington 2002, 147; Iredale and Barrett 2002, 22). These constituents may therefore have been manufactured prior to 1776. It is possible that the material was re-used and that wall 2163 is later in date. At the south end, 2163 was tied in to the north-east corner of the outer conical chimney of the cementation furnaces (2037). At the north end, wall 2163 was truncated by later brick flue 2154 described below. This wall may have been an unmapped exterior division in a yard associated with the John Kenyon works (Figure 29).
The remains of two adjacent cementation furnaces were excavated (Figures 24-25; Plate 28). These furnaces were located in an area mapped as belonging to the 'Hollis Croft Steel Works' (in 1853; Figure 30) and later the 'Globe Forge and Rolling Mills' (in 1890; Figure 31). In the mid-19th century, the works were operated by Burgin and Wells, and in the late-19th century by Thomas R. Ellin (Footprint Tools).
Cementation furnace outer chimneys
The outer conical chimneys of the cementation furnaces were represented by a series of three-skin handmade red brick and lime mortar structures (Plate 29). In the west and east of each furnace, the foundations were curving structures following the conical shape of the upper parts of the outer chimneys. The west curve of the south cementation furnace was formed by walls 2002 and 2014=2114. Wall 2014=2114 was seen to have been built in a construction cut (2110; Figure 33, section 8) dug through the natural (2006); the backfill of this cut (2111) did not contain any dating evidence. The east curve of the south furnace comprised contexts 1537 and 2025. The west wall of the north furnace was represented by wall 2008, although the north end was truncated. The east wall of the north furnace comprised walls 1538 and 2037. Sandstone rather than brick had been used to construct wall 2037. The interior diameters of the outer conical chimneys were both about 7.7m (roughly 8 yards, 1 foot and 2 inches) at the approximate level of the refractory chambers.
In the north and south, and between the two furnaces, the walls of the outer chimney were straight and ran approximately east to west. The surviving cementation furnace at Doncaster Street exhibits this same form, with the full circuit of the conical shape developing only at a higher level (this form can also be seen in other scars of cementation furnaces across the city e.g. at Nursery Street and at Bower Spring). The wall dividing the two furnaces was recorded as 1519, 1529 and 2007. Wall 1529 was built on a sandstone and lime mortar foundation (2165). Part of the south wall of the furnaces survived as wall 2003 although the wall had been truncated by the construction of a later wall on the same alignment (2020), and by later concrete footings. The north wall comprised contexts 2035 and 2040. The lower courses of 2040 were recorded as 2070; these courses curved out to the north towards the west (Plate 30).
Cementation furnace stoke hole entrances
The stoke hole entrances (Plate 31 and Plate 32) were the below-ground access points for introducing fuel to the fire pits below the furnaces. Two entrances were present for each furnace, one in the west and one in the east. The entrances were formed by curving walls forming concave chambers within the convex shape of the outer conical chimneys. All four entrances were truncated to different degrees by later concrete footings. The west entrance to the south furnace could by identified by fragments of wall 2001 (not visible in plan) and 2015. The east entrance to the south furnace comprised structures 1539 and 2023. The west entrance of the north furnace was delineated by 2009 and 2038. The east entrance of the north furnace was formed by wall 2122. The west entrance to the northern furnace was particularly well preserved (Figure 32); the original steel door to the fire pit was still in situ (2047; Plate 31 and Plate 32; also Plate 50). Door 2047 was only 0.52m high and 0.42m wide; access to the fire pit would have been limited. There was a lintel or arch (2051; Figure 32; Plate 31) comprising end-on (soldier bond) firebricks above the steel door.
Cementation furnace ash pits
The ash pits of each cementation furnace were recorded during the watching brief (not drawn; Plate 33, Plate 34, Plate 35). The walls of both ash pits (north ash pit 3007; south ash pit 3011) were lime mortared and comprised, from the base up, three courses of header bonded handmade brick, two courses of stretcher bonded handmade brick and two courses of sandstone blocks. Overlying the sandstone blocks were at least five courses of firebricks, the upper course of these were very slaggy and heat transformed; the fire may have been set at this level (Plate 33). Toothed 'fire bars' (Figure 60) were seen to run across the fire pits and are discussed at length in Artefactual Evidence. The fire bars shown to be slightly below the level of the stoke hole entrance (Plate 34). Different iron bars also ran longitudinally along small recessed shelves cut in to the sandstone (Plate 35). The width of the ash pits was 0.56m.
The fills of the two ash pits each comprised two layers, a lower layer (3009 and 3013) of black charcoal and clay; deposit 3009 in the north furnace contained a glass bottle fragment which was not closely dateable. The charcoal layers were likely related to the last use of the furnaces. The upper layers (3008 and 3012) were 0.4m and 0.46m deep respectively and comprised heat affected red brown mixed clay. Layers 3008 and 3012 may represent deliberate backfill or may represent material degraded from firebrick and other structures above. Upper fill 3008 produced four sherds of pottery of 19th- or early-20th-century date, including two sherds from a child's alphabet mug, an unusual object for this context which might suggest meaningful deposition. A single small sandstone block (3010; 0.66m by 0.5m by 0.1m) appeared to have been placed in the northern ash pit to decommission the furnace (rear of Plate 35).
The east stoke hole entrance of the southern cementation furnace was re-recorded during the watching brief as 3014 (during the evaluation and strip, map and record excavations this was recorded as 1539 and 2023). The stoke hole entrance door (3015; Plate 34) was recorded and was 0.76m high and 0.83m wide, larger than the door to the western stoke hole of the north furnace recorded during the strip, map and record excavation (2047).
Gap between inner and outer structures of cementation furnaces
Within the outer red brick structures, the inner chests of the furnaces were contained within rectangular brick structures 5.7m (roughly 6 yards, 8 inches) by 4m (roughly 4 yards, 1 foot and 1.5 inches) in plan. Except for at the stoke hole entrances and low-level foundations, there was no masonry bridge between the inner and outer brick structures. This arrangement was likely for insulation, both to promote the efficiency of the furnace and to protect the surrounding works from the heat. The gap between the firebrick structures and the red brick structures (Figure 32) was filled with sand or clay (1513, 1518, 1520, 1528, 1530, 2004, 2011, 2012, 2016, 2017, 2018, 2022, 2028, 2029, 2042, 2043, 2044, 2124 and 2135). Close to the furnaces, these deposits strongly exhibited heat transformation in the form of colour change and a fired or baked appearance (e.g. 2124). Further away from the furnaces the same deposits were not heat transformed (e.g. 2125). The heat transformation indicates that these fills were contemporary with the furnaces rather than later demolition or imported material.
Deposit 2011 was laid down against the outer wall of the northern cementation furnace chest (2010) and contained pottery dating from the mid- to late 19th-century alongside other sherds dating back to the 17th century. A clay tobacco pipe bowl found in deposit 2011 was probably deposited between 1870 and 1920, and a pipe from 2016 against the outer chimney wall (2014) in the west of the southern furnace was probably deposited between 1830 and 1860. Deposit 2017 was laid down between chimney wall 2014 and chest wall 2013 and contained a sherd of 19th-century or early-20th-century pottery, consistent with a mid- to late 19th-century date for the furnaces.
A slot was excavated to the north-east of the cementation furnace chests between the outer conical chimney (2037 and 2035) and the outer structures of the chest (2031). The north wall of the outer chimney (2035) was built on a wider foundation (2036; Plate 36) which also supported the chest (2031). Foundation 2036 extended 0.42m south of wall 2031 and was built of handmade red brick and lime mortar.
Cementation furnace outer chest structures
The chests of each furnace (Plate 36, Plate 37, Plate 38, Plate 39, Plate 40) were enclosed within two outer skins of handmade red brick and lime mortar and two inner skins of firebricks and lime mortar. In the case of the south furnace, these structures were generally poorly preserved. The west end of the outer red brick walls of the southern furnace were contexts 2000 and 2013. A fragment of the south side of this wall was preserved (2019). The north and east sides of the red brick wall were not preserved; here excavation proceeded to a lower level beneath the base of the chests and comprised a single firebrick structure four skins wide but with some red brick haphazardly mixed in (1517, 1527 and 1533). A small part of the inner firebrick wall was seen in the north-west of the southern furnace (2168; not illustrated). The outer walls of the north furnace chest were better preserved: the outer red brick structures comprised (clockwise from north-west) 2039, 2031, 1534, 1531, 1521 and 2010; and the inner firebrick walls were (clockwise from north-west) 2057, 2069, 2170, 1535, 1532 and 1522. In one location (below 2031), the outer brick structures of the chests were seen to be built on a sandstone foundation (2032 and 2034).
Pottery and clay tobacco pipe were recovered from within the outer red brick structure of the north furnace chest (2031). The four sherds of pottery indicate a mid- to late 19th-century date for the construction of the cementation furnaces, supported by a slightly earlier date of 1800–1850 for the clay pipe.
Cementation furnace chests
Each furnace (Plate 37 and Plate 38) followed the typical arrangement of two parallel chests, each containing a 'coffin' or refractory chamber. The structures were aligned approximately east to west. The south furnace chest comprised context 1514 and, on the far side of truncation by concrete footing 1508, context 1525. The north furnace chest comprised contexts 1524, 1536 and 2033. The chests were built of ganister, a refractory grade of sandstone obtainable in the Sheffield area. The ganister was somewhat purple, indicating that it had been intensely heated. The joints between the blocks of ganister were sealed with material which appeared to be identical to the overlying crozzle (described below). It is unclear if this sealing was obtained by intentionally applying a matrix material between the ganister blocks or if melted material had penetrated the gaps from above. In either case, the bonding of the blocks was probably desirable and would have helped restrict the flow of hot gases through the flues and prevent contamination of the steel.
Each furnace had a central line of vertical flues running between the two chests. These were observed as a series of square openings around 0.22m in width (roughly 8.5 inches). A maximum of five of these openings were preserved; before truncation there would have been nine. These vertical flues were mirrored by a vertical space at the north and south of the chests of both furnaces; in these areas gas could freely travel through an open space between the chests and the enclosing firebrick walls. Here the firebrick was heavily heat transformed and was obscured by a surface layer of slag-like deposit, presumably derived from material deposited out of the hot gases from the underlying fire, mixed with the degraded firebricks. A similar arrangement appears to have been in place at the east and west ends of the structures, although preservation was poorer. The firebricks at the west end of the southern furnace (2168) and north side of the northern furnace (2169) appear to have been more heavily heat transformed with more substantial slag-like deposits than other comparable structures, possibly indicating minor differences in gas flow.
The eastern parts of the north furnace were truncated, providing a view of the flues underlying the refractory chambers (1524, 1536). These flues ran perpendicular to the refractory chambers (north to south) and matched the arrangement of the central flues: prior to truncation there would have been nine flues beneath each side of the chest. The flues were once again around 0.22m (8.5 inches) square. Slaggy deposits had started to form within the flues; in the northern side of the southern furnace (1514) this slag (1541; Figure 32) was recorded as white, dark grey and purple ashy grit and was sampled (see Artefactual Evidence).
Overlying the ganister flues were layers of crozzle (1515 and 2139) forming the base of each of four chests or refractory chambers. This slag-like material formed a gas-tight refractory lining for the chests and is discussed at length under Artefactual Evidence and in Appendix 6 of the archive report [PDF]. The impression of ferrous bars from the firing of the furnace was preserved in the upper surface of the crozzle (Plate 38; discussed in detail under Artefactual Evidence).
The furnaces were truncated above the level of the crozzle, however it could be seen that the crozzle originally continued up the inside walls of the refractory chamber, suggesting that the chambers were completely lined in this way.
Phased development
A section was obtained through the north refractory chamber of the south furnace (Figure 32; Plate 40). At the base of the section, a structure (1547) had been constructed to support the overlying furnace. Structure 1547 was comprised of a mixture of firebrick and handmade red brick and was probably originally bonded with lime mortar, although the matrix had been heavily heat transformed. Above this, a second similar structure was three courses high (1516). Gaps in structure 1516 were filled with degraded masonry; it is unclear if structure 1516 was originally intended to contain flues or gaps for the passage of hot gas. Structure 1516 was overlain by a layer of ganister blocks 0.1m (roughly 4 inches) thick (1544). These ganister blocks supported a layer of crozzle (1545) which is interpreted as being the base of a refractory chamber belonging to an earlier phase of furnace activity (Rod Mackenzie pers. comm.). It is possible that this earlier version of the cementation furnace was rebuilt due to the unsatisfactory provision of flues though the chest; heat would have had to conduct directly from the fire pit to the refractory chamber through the structures. The periodic replacement of cementation furnace chests may have been standard practice, a view shared by Belford (1998). It is likely that this earlier layer of crozzle was left in situ because it was tenacious and difficult to remove. The chest flues associated with the main phase of activity (1514) were built directly on top of crozzle 1545, and the sequence was finished with the main layer of crozzle (1515) above the chests.
No further evidence of phased activity at the cementation furnaces was detected. The other three chests were not investigated to determine if evidence of the earlier phase of activity was preserved below them. It is likely that the majority of structures associated with the cementation furnaces belong to the earlier phase and that the chests themselves were the focus of redevelopment during the later phase.
Cellars accessing the cementation furnace stoke holes
The immediate access to the cementation furnace fire pits was by the stoke hole entrances described above. These entranceways were accessed by handmade brick and lime mortar vaulted cellars described in this section (Plate 41).
The west entrance to the south furnace was accessed through a vaulted cellar 2127 which extended for 0.6m beyond the outer conical chimney of the cementation furnace (2014). This feature (2127) then intersected with a north to south aligned cellar (2112). Redeposited clay 2109 had been laid over the top of vaulting 2112, probably as part of the original construction. To the west of cellar 2112, a handmade brick and lime mortar two-skin wall (2104) ran north to south at the edge of the area of excavation. These structures were truncated to the south and west by concrete footings. To the north, later wall 2105 (described below) had been built over deposit 2109 and excavation did not continue beyond this point. Where vaulting 2112 had been breached, the cellar below had been backfilled with demolition material or made ground 2113.
The cellar accessing the east stoke hole entrance of the south furnace had been removed by truncation by later concrete footings. The cellar accessing the east entrance of the north furnace was represented by a small surviving fragment of vaulting (2123; Figure 33). The cellar had been backfilled with later demolition/made ground deposits 2120 and 2121.
The west entrance to the north furnace was the best preserved (with metal stoke hole door 2047 described above). The stoke hole entrance had been decommissioned by inserting a pile of un-mortared sandstone slabs and blocks to prevent access (2048). Behind these, brick vaulted cellar 2046 extended west for 1.8m before passing out of the area of excavation. Later black ash mortar structures (described below) were built directly on top of the vaulting at the edge of the excavation area.
Further north, two structures (Plate 42; Figure 23 and Figure 33) were seen in section below machine bases 2100 (described below). Heat-affected firebrick structure 2103 was seen in section only and was bonded with lime mortar. This structure was situated far to the north of the two cementation furnaces described above and it indicates the presence of some hot process. It is possible that heat affected structure 2103 represents part of another cementation furnace, a boiler (perhaps associated with a power supply or similar), some other type of furnace or any other hot process associated with a steel works. No further evidence was recorded to support these possibilities.
On top of the truncated remains of 2103, a red brick and grey sandy lime mortar wall had been roughly built (2098). It is possible that 2098 represents a repair to 2103; however it is more likely that 2098 was constructed after the decommissioning of 2103 and opportunistically used the remains of 2103 as a foundation.
Structures 2103 and 2098 were overlain by later structures (2097 and 2100) described below. Structures 2103 and 2098 represent survivals of 18th- or 19th-century structures in a part of Area E/F containing mostly later structures.
Far north of Area E/F
In the far north of Area E/F close to the Hollis Croft frontage, a patch of structural remains was investigated that were stratigraphically detached from remains in the rest of the area. Lime mortar and handmade brick walls 2130 (Plate 43) were generally four skins thick and partially enclosed two rooms. Three skins (of four) of part of wall 2130 were at a slightly different level but in identical materials and may represent an earlier event within the same phase of construction (2131). The southern of the two rooms was floored with sandstone flags (2129) and was roughly 4 metres square although later drains had truncated the floor in the centre and south. A further fragment of handmade brick and lime mortar wall (2138) formed the north-west corner of this room.
A series of fragmentary structures were intermittently preserved in the far north-west of Area E/F (Plate 44). Walls 2062 and 2063 represent lime mortared sandstone foundations and were associated with single skin handmade brick and lime mortar wall 2061. The fragmentary preservation of the features hampers further interpretation. Historic maps from the 18th century show this area within the Hollis Croft street frontage range. By the 19th century, this area was situated within a large built-up expanse without any interior detail depicted in the area of these features (Figure 30, Figure 31).
Cellar
During the watching brief, a handmade brick and lime mortar cellar (3017) was recorded to the north of Area E/F. The north-west corner contained evidence of a quarter-turn staircase including remnants of brick risers and sandstone treads (3017; Plate 45). The floor of the cellar had not survived demolition.
Garden Street plot
Wall 2091 (Figure 25; Plate 46) was two skins wide and ran east to west. Wall 2091 butted against the south wall of the southern cementation furnace (2003). Wall 2091 comprised handmade red bricks with a matrix of brown sand clay that may have been derived from lime mortar. This wall divided the Hollis Croft and Garden Street plots that made up the works. There would have been little more than 30 years left on the term of at least the Garden Street plot and it is likely that this was kept in mind during construction of the cementation furnaces. Later, the Garden Street plot would be held separately to the Hollis Croft plot; for example in 1890 (Figure 31) the Garden Street plot was operated by the British Works (Electro Plate).
South of wall 2091 within the Garden Street plot was a large (4.5m by 3.5m) surface comprising two courses of brick (Plate 46). The centre of the surface had been truncated by a later concrete footing, and most of the upper course of brick was missing, probably lost during insertion of the footing. The lower course (2089) comprised handmade red brick and opportunistically used firebrick in a matrix of dirty silt. The upper course (2090) may have been an attempt to repair the floor and comprised clearly re-used handmade brick with traces of mortar and paint. At least one frogged machine brick was present in floor 2090, possibly as the result of a later repair. A concrete surface had been poured over floor 2090 which partially survived.
A complex of machine brick and black ash mortar vaulted cellars extended across the area north of the cementation furnaces (Plate 48). In 1853, the Ordnance Survey map (Figure 30) showed the area occupied by these cellars was partly inside buildings associated with the Hollis Croft Steel Works, and partly in an undeveloped yard area. By 1890 (Figure 31) these cellars were entirely within the built-up area of the works. The cellars therefore likely post-date 1853.
Cellar 2041 ran north from close to the west stoke hole entrance to the northern furnace. During the subsequent watching brief the south end of cellar 2041 (Figure 25) was seen to be connected to earlier cellar 2046 via an opening inserted in the side of 2046 (Plate 49). During the watching brief, the cellars were seen to have been floored with sandstone flagstones laid directly on natural clay. A continuous length of 6.2m of vaulting 2041 was preserved; the north end (Figure 23) was truncated by a concrete footing. Dark brown mixed clay had been deposited over 2041 as part of the original construction of the cellars (2045). West and above cellar 2041, the area above the curve of the vaulting was filled with masonry infill 2087 in the same materials as the vaulting.
A partly blank or blocked opening leading to an east to west aligned cellar at a lower level than the other cellars was photographed during the subsequent watching brief (Plate 50; not drawn). This led west from cellar 2041 out of Area E/F.
Two east to west aligned cellars (2074, 2077; Plate 48; Figure 32) ran east from vaulting 2041; the vaulting at the junctions of these features was shaped to allow access between them. The space between the vaulting had been filled with machine brick and black ash mortar masonry (2076). Similar infill masonry was present north and south of the cellars (2093 and 2171; Figure 32). Where vaulting 2074 had been breached, the underlying cellar had been backfilled with demolition rubble or made ground 2075. Similarly, the cellar below vaulting 2077 was backfilled with 2078. During the subsequent watching brief, an opening was photographed (Plate 51) showing a small communication between these two cellars under a low arch.
North of structure 2093 there was a space where another east to west aligned vaulted cellar might have been expected. In this area there was instead a partially preserved unmortared firebrick surface (2095; Plate 52). The firebricks were dirty but did not appear to have been reused and showed no signs of having been heated. They had been laid on a deposit of mid- to dark grey brown sand loam with brick fragments, stone, ash, clinker etc. (2094=2140) which contained a button dating to the 18th century or later. Levelling layer 2094=2140 overlay another levelling layer, 2144. Beneath these deposits, a north to south aligned wall (2142; not illustrated) formed the foundation for wall 2141, the west west wall of a further cellar below vaulting 2088 (described below). Two truncated machine brick and firebrick piers were also present (2143). Made ground deposit 2145 continued below the base of excavation. It did not appear that surface 2095 had replaced earlier removed vaulting; no evidence of springers or of repair to removed springers was identified. To the north of firebrick floor 2095 a structure (2096; Figure 32) resembled the infill masonry associated with the cellars to the south. Structure 2096 comprised black ash mortar and machine bricks, reused handmade bricks and firebricks, suggesting opportunistic use of materials. Structure 2096 overlay a major east to west wall defining the northern limit of these structures.
Cellars 2074 and 2077 were truncated in the east by concrete footing 1508. This footing had destroyed the intersection of cellars 2074 and 2077 with a further north to south aligned cellar roofed by vaulting 2088. Cellar vaulting 2088 was mainly preserved only north of concrete footing 1508. The west wall from which vaulting 2088 may have sprung (2141 and 2142) comprised two skins of machine brick and black ash mortar and was seen at low level below unmortared firebrick surface 2095. The north end of 2088 disappeared into infill masonry 2096 and was not pursued; cellar 2088 may have terminated at wall 2097.
Major east to west aligned wall
A substantial wall (2097; Plate 42; Figure 32, Figure 33) defined the northern limit of the cellars. Wall 2097 divided two plots or areas within the Hollis Croft Steelworks/Globe Forge and Rolling Mills. Wall 2097 was three to nine skins thick (0.36–1.08m) and comprised machine bricks and black ash mortar. Context 2102 likely represented part of wall 2097 in an area disturbed by later footings. Four sandstone machine bases (2100) were inserted through the west end of wall 2097. Earlier structures 2103 and 2098 (described above) were located below machine bases 2100.
A small fragment of a black ash mortar and machine brick structure (2099) was situated near the west end of 2097 and was 0.69m by 0.47m in plan although it was somewhat displaced. Structure 2099 might represent a fragment of wall or possibly a base for a machine or some other activity. Context 2099 might also represent nothing more than a large piece of rubble.
Ground level flues above cellars north of cementation furnaces
West of cellar 2041, wall 2086 (Plate 53) was built directly on top of infill masonry 2087. Wall 2086 was aligned north to south and comprised a mixture of machine brick, re-used handmade brick and opportunistically used firebrick, bonded with black ash mortar. Wall 2086 was three skins thick.
A large curving flue (2080–2083; Plate 53) mainly ran north to south to the west of wall 2086, but curved to the east at both ends, where it was built through wall 2086. The turn to the east had a smaller radius at the north end than at the south end. The floor of the flue comprised 2081, a machine brick and black ash mortar structure with some machine bricks exhibiting a very small frog. The side walls (2080 and 2082/2083) were built on top of the floor of the flue. The interior wall (2082/2083) comprised firebricks (some possibly heat affected; the heat transformation may have occurred prior to re-use) and black ash mortar. Some of the firebricks in 2082/2083 were curved radial bricks. The exterior wall (2080) was similar but contained some red machine brick and did not use radial bricks. This structure most likely represents a flue for the movement of gas. No soot was present on the interior of the flue, suggesting that it was not intended to carry exhaust gases. There were generally few signs of heat transformation, and it is possible that the few bricks that did exhibit heat transformation had been transformed prior to re-use. The flue likely did not carry very hot gases. Interpretation of the flues is an open matter and is covered in Discussion. The north end of the flue appeared to run towards the area above unmortared firebrick surface 2095. The relationship between these structures is unknown as a result of later disturbance, but it is possible that some process related to the flues occurred above unmortared firebrick floor 2095.
Between flue 2080–2083 and wall 2086 was an area of disturbance which afforded a view of the underlying deposits. A dark brown silt clay made ground (2092) was present under flue floor 2081. A single ganister 'sleeper' (2084; Plate 53) 0.2m wide was seen within made ground 2092. This ganister block was identical to those used to form the flues under the cementation furnace chests (e.g. 1514). In this context the ganister 'sleeper' likely represents rubble rather than a structural element, but its presence does indicate that a further cementation furnace was likely formerly present somewhere in the immediate area. This hypothetical demolished cementation furnace must have been decommissioned prior to the construction of the machine brick and black ash mortar structures.
Also in this area, a small fragment of a former brick surface comprising machine bricks and black ash mortar was seen at a lower level (2085; Plate 53). Surface 2085 was on a different alignment (north-east to south-west) compared to the rest of the structures in Area E/F and must represent a phase of development prior to the construction of the cellars and flues in the area to the north of the cementation furnace remains. A late 19th century date is possible for feature 2085 on the basis of materials and stratigraphy.
To the west of flue 2080–2083, the end of a two-skin black ash mortar and firebrick wall (2079) was seen to extend to the west out of the area of excavation. The top course of 2079 comprised red machine brick instead of firebrick. It is unclear if wall 2079 was truncated by flue 2080–2083 and is therefore earlier than the flue, or if the structures are contemporary.
The south end of flue 2080–2083 curved to the east but was not preserved in the area above vaulted cellar 2041. On the east side of cellar 2041, the flue continued. The floor of the flue (2072) was built directly on masonry infill (2171) and again comprised machine bricks, some with small frogs, and black ash mortar. The two side walls of the flue (2071 and 2073) comprised firebricks and black ash mortar but were not this time built on the floor (2072) but next to it.
The east end of flue 2071–2073 was at a concrete base lined with machine bricks (2172; Plate 54; Figure 24). Here, the base of flue wall 2071 was recorded as 2116 and was three skins thick. The lower stepped courses of masonry infill 2171 were recorded as 2117. Beyond this, concrete footing 1508 further truncated the flue.
On the east side of concrete footing 1508 the flue continued (2154; Plate 55) and began to curve to the north although it was narrower (0.5m wide externally compared to 0.6m externally elsewhere). In the east as the flue left the area of excavation the entire vaulted structure of it was preserved (Plate 55). Flue 2154 comprised firebricks with some red brick and sandstone and was bonded with a heat transformed sandy pink mortar. Flue 2154 therefore likely transported hot gases, but not exhaust gases as the interior was not sooty. The vault was 0.7m high externally, demonstrating that these structures were flues rather than cellars and were not intended for human access. Immediately east of the truncation by concrete footing 1508, flue 2154 contained 'guillotine'-style metal gates or sluices (2175; visible at bottom of Plate 55) that could be used to cut off the flow of the flue. Up to three layers of metal were present forming the blockage. This metalwork appeared to be part of the original structure of flue 2154 rather than shoring associated with concrete footing 1508.
A second flue (2149; Plate 55; Figure 33) was present north and west of 2154. Unlike the others, flue 2149 had a sooty interior indicating that it carried exhaust gases. Flue 2149 was built of firebricks and ash mortar. A steel 'guillotine'-style steel door (2148; Plate 55) was present at the easternmost point of flue 2149. The presence of this door may be the reason the flue curved so far to the east. North of the gate, the floor of flue 2149 was formed of bricks (2151); south of the gate the floor was largely absent save for three bricks (2152, also 2150 north of the gate) designed to secure the door in place. Underneath flue 2149 was a layer of heat affected natural clay (2146) indicating that the contents of the flue were hot, consistent with an interpretation as an exhaust flue. Flue 2149 was filled with dark ashy material (2147) which was probably a post-demolition made ground deposit rather than having been derived from activity associated with the flue.
At the south end, flue 2149 was situated within the interior arc of flue 2154 and shared a wall with it. However, the curve of flue 2149 was sharper than the interior curve of 2154 and the structure came around 180° to pass back to the west, where it was again truncated by concrete footing 1508. The interior wall opposite wall 2149 had also been removed by this truncation. On the far side of the footing, the flue continued, with the walls formed as part of larger structures 2076 and 2171. This part of the flue occupied the space that would otherwise have contained cellar 2074; the cellar terminated at the west end of the flue. The flue therefore returned to the opposite side (north) of concrete footing (2172) which may have supported some machinery or structure critical to the operation of the flues.
Surface 2156 and associated contexts
North of flue 2149 on the east side of concrete footing 1508 was a machine brick and black ash mortar surface (2156). This surface likely represents the ground floor level above the cellars on the same level as the flue complex. Surface 2156 was built on levelling layers 2157–2161, which did not contain dateable artefacts. In the east, towards flue 2154, surface 2149 was missing and a deposit of heat affected natural (2155) was observed beneath the extant structures. The observed heat transformation may have been due to proximity to flue 2154. The heat transformation of natural 2155 may indicate the former presence of some otherwise unrecorded hot process, such as a furnace or a boiler.
Walls built over earlier cementation furnace access cellars
A series of walls (2067, 2069 and 2105; Figure 25; Plate 56) likely represented later ground floor division or redevelopment of buildings situated above the cementation furnace access cellars to the west of the cementation furnaces.
Wall 2105 was located to the west of the cementation furnaces and was built in a construction cut (2107) through deposit 2109 which in turn overlay vaulted cellar 2112 (Figure 33). Wall 2105 was built of unfrogged machine brick and black ash mortar two skins thick. Wall 2067 was a continuation of wall 2105 and formed the east and north sides of a space enclosed by wall 2105 in the south. Wall 2067 was built directly on to cellar vaulting 2046 and on stoke hole entranceway wall 2009. It appears that at ground level structure 2067/2105 would have directly abutted the outer conical chimney of the north cementation furnace. The space between walls 2067 and 2105 was mainly filled with a later concrete footing, but also partly with backfill material 2106 associated with wall 2105. North-east of wall 2067 were 2068 and 2069, similar two skin machine brick and black ash mortar walls forming an 'L' shape at the edge of the area of excavation, with a small buttress directly above the apex of earlier vaulting 2046. Wall 2068 was on approximately the same alignment as earlier wall 2104 to the south, which indicates that these black ash mortar walls likely represent division or renovation of earlier structures. It is likely that these structures may have been associated with the later use of the cementation furnaces due to their location adjacent to, and respecting, the furnaces. Speculatively, these may have been store rooms for iron, steel or coke. Alternatively some other process may have occurred here, perhaps associated with the output of the furnaces.
Sandstone surfaces east of the cementation furnaces
A deposit (1513) had been used to backfill the area around the east entrance to the north cementation furnace. Deposit 1513 comprised clean dark yellow clay with sandstone and must have been anthropogenically deposited as it abutted structures 1538 and 2122 (Plate 57). This deposit was cut by a construction cut (1540) for the insertion of sandstone floors 1512 (blocks), 1509 (setts) and 1510 (setts) (all Plate 57). Sandstone blocks 1512 were truncated by later wall 1504 so these structures have been assigned to Phase 5, being later than the cementation furnaces but earlier than the truncating frogged machine brick walls of Phase 6.
Area of cementation furnaces: Concrete footing 1508 ran north to south across most of Area E/F truncating both cementation furnaces as well as the cellars and flue system in the north. Footing 1508 originally carried a four-skin frogged machine brick and black ash mortar wall which was preserved in some locations (1502, 1503 and 2020). Occasionally these walls (e.g. 1502) widened to four skins; these areas may have acted as stanchions or piers. Wall 1504 was keyed in to wall 1502 and ran on a machine brick foundation to the east, truncating the east entrance to the northern cementation furnace.
Far north of Areas E/F
Concrete footings (2174) to the west of walls 2130 and east of structures 2061–2063 in the extreme north of Area E/F carried a series of frogged machine brick and black ash mortar walls (2060), which were generally three skins wide although preservation was variable. East of walls 2130, a short length of a two-skin north to south aligned frogged machine brick and black ash mortar wall (2134) was uncovered.
Other
Further concrete footings were present across Area E/F but were not assigned context numbers. A three-skin brick inspection chamber (3018) was recorded to the east of cellar 3017 in the far north of Area E/F. Inspection chamber 3018 was constructed from machine brick and black ash mortar and was roofed with iron bars and concrete.
A drain inspection chamber south of sandstone floor 2129 in the extreme north of Area E/F comprised machine bricks and modern cement, although traces of black ash mortar were prominent on the bricks indicating re-use. It appears that some units of masonry bonded with ash mortar had been included within the cement bonded structure. The outer walls of the inspection chamber comprised two-skin walls (2053, 2133). The interior surface was made of smooth concrete shaped to contain drainage channels (2052). A fragment of leather shoe was recovered from these drainage channels. A large piece of sandstone (2132), likely an element of former machine base, had been positioned to help support the inspection chamber. Running north from the inspection chamber was a cut (2135) truncating surface 2129 and walls 2130, and containing a concrete drain (2137).
North of sandstone wall 2062, a machine brick, sandstone and modern cement structure (2126) might represent a drain.
Area G recorded industrial structures of unknown function.
Area G was investigated by evaluation trench only (Wessex Archaeology 2017g) and did not proceed to strip, map and record excavation. Trench G (Figure 34, Figure 35, Plate 58, Plate 59), was parallel to Garden Street and measured 10m by 4m. Archaeological preservation was confined to a single, well defined, rectangular area 6m long by 2.6m wide and was located in the west of the trench. This correlates with a structure forming part of the Exchange Works (cutlery) as depicted on the 1890 Ordnance Survey map (Figure 35).
Demolition rubble (1401) overlay the preserved archaeological structures. The undisturbed natural geological substrate comprised light grey yellow sand clay (1402) and was seen across most of Trench G.
A building or structure over 6m long and 1.7m wide was enclosed by unfrogged machine brick and black ash mortar walls with somewhat irregular bonding: walls 1406/1407 (north side), 1408 (south side), and the partially preserved 1417 (east side). The west side of the building or structure lay outside of the excavation area. Wall 1406 was four skins wide (0.5m), but doubled in thickness to eight skins (1m) in the west, with the additional thickness located inside the building and recorded as 1407. Wall (1408) mirrored this arrangement, generally two skins thick (0.24m) but widening to four or five skins (0.54m) in the west. A maximum of four or five courses of these walls were preserved.
The constriction of the building or structure in the west formed a narrow bay approximately 0.6m wide (Plate 59). Bull-nosed bricks built into walls 1406 and 1408 marked the corners of the bay. The bay was floored with machine bricks (1410) with a slight gradient angled down to the east.
The shape of the bay is reminiscent of an ash pit of a crucible furnace such as those identified at Hoyle Street (Powell 2014) and elsewhere at Hollis Croft (Area D). However, it would be extremely unusual to see an isolated crucible hole of late 19th-century date (as the machine brick constituents of the structure suggest). The narrow bay showed no signs that it was associated with a hot process. Identification of the bay with a crucible furnace cannot be supported by the results of the evaluation. The function of the bay is unknown.
The remainder of the interior of the building or structure was 3.1m long and 1.4m wide and was floored with sandstone flags (1405). The south-west corner of the floor exhibited signs of intense wear. A frogged machine brick drain (1414) was built into the south-west corner of floor 1405 and drained south under wall 1408. Drain 1414 comprised a single skin forming a sub-square approximately 0.5m square.
In the opposite corner to drain 1414 (the north-east corner), was a similar machine brick structure (1404) although structure 1404 did not appear to be a drain. The interior of structure 1404 was floored with sandstone flags. Structure 1414 was one skin thick, three courses high, 0.62m long and 0.59m wide.
A two-skin 'zig-zag' shaped frogged machine brick and black ash mortar wall (1412) ran across the area floored by 1405 (Figure 34). The function of structure 1412 is unknown.
The end of the bay enclosed by walls 1406/1407 and 1408 was bricked up using black ash mortar and a variety of re-used bricks including frogged machine brick (1411). Structure 1411 was 0.60m long, 0.40m wide and 0.30m high and consisted of three courses; the bottom course comprised side-on headers, and the upper courses were stretcher bond. The surviving uppermost course of zig-zag wall 1412 and drain 1404 were capped with cement.
Concrete floor 1403 was then poured over sandstone floor 1405 and structures 1404, 1412 and 1414, and was 0.35m thick. The concrete surface sloped from east to west. Long, thin rods of iron and a large wooden beam were found on top of concrete floor 1403. The iron rods and wooden beam had adhered to the surface, probably as a result of a post-demolition process such as pressure and/or wetting. These items may indicate the late use of the structure as a storeroom.
The materials used suggest a late 19th-century or 20th-century date consistent with their appearance on the 1890 Ordnance Survey map (Figure 35). The function of the archaeological structures in Trench G is unknown. A staircase is depicted in this location on the 1890 map (Figure 35); the excavated structures do not appear to have formed part of a staircase. It is possible that the staircase was at a higher level, with the excavated structures perhaps at cellar height.
Two truncated flues and a later machine base were investigated in Area H.
Area H was investigated with an evaluation trench only (Wessex Archaeology 2017g) and did not proceed to strip, map and record excavation. Trench H (Figures 36–40, Plate 60, Plate 61, Plate 62), was located towards the north-east of the site. Trench H targeted a cutlers' works belonging to John ?Pier evident on the 1787-9 Fairbank town plan (Figure 38). In 1853 (Figure 39), Area H occupied an area of back-to-back housing, perhaps in the area of number 11 Hollis Croft, although no census records of a house of that number were made in 1851. The houses may perhaps have instead been referred to by a court number. It is unknown what court number that may have been. Court 1 was located to the east in 1890 (Figure 40), although by that time the area had changed significantly since the 1850s. In 1890, the 'Globe Forge and Rolling Mill' (likely to be Thomas R. Ellin/Footprint Tools) had expanded to encompass Area H. It is likely that the archaeological remains recorded in Area H relate to this late 19th-century expansion. The materials used (including black ash mortar) are consistent with this date.
Figures 36-40: Area H plans


Layers of rubble made ground (1301 and 1302) and dirty redeposited natural (1303) overlay the preserved archaeological structures.
Parts of two brick vaulted flues (1304/1305 and 1306) were preserved in the centre of the trench. Two flues were evident in the centre of the trench. The most easterly flue ran approximately north-east to south-west and comprised two elements on slightly different alignments: 1304 ran more towards north to south and 1305 ran more east to west. Flue 1304 was 1.40m long and 0.70m wide. Flue 1305 was 1.07m long and 0.62m wide. The northern end of flue 1304 was heavily damaged and consisted of a firebrick-lined convex aperture ten courses wide. Flue 1305 was constructed from a mixture of handmade red brick and firebrick. The roof vault, seven courses wide and two skins thick, was removed to investigate the flue's depth (Plate 61) which proved to be 0.6m. Blackish red soot lined the inner facing of the flues. The flues contained a lower fill of slag and ash (1319) and an upper fill of demolition rubble rich in degraded firebrick (1318).
A second flue (1306) ran parallel to flue 1304 and was 1.11m long and 0.75m wide. The firebrick vaulting of the flue was twelve courses wide and one skin thick and was sooty on its inner surface. The floor of the flue comprised handmade red bricks. Ash again lined the inner skin of the flue. The flue was filled with rubble (30%) in a matrix of dark reddish brown sooty sand (1317).
A structure comprising firebricks and sandstone (1307) was present at the south limit of excavation and may have been related to the flues. The soot on the interior of the flues indicates that they carried dirty exhaust gases, most likely towards some chimney.
A series of walls truncated the earlier flues. Wall 1311 truncated the north end of flue 1306 and formed an 'L'-shape in plan. One part of wall 1311 ran roughly east to west immediately north of the surviving part of flue 1306 and was 1.52m long and three skins (0.36m wide), with poorly applied ash mortar. The east end of wall 1311 turned to the north, continuing beyond the area of excavation. At the limit of excavation, wall 1312 was bonded to wall 1311 and ran roughly west to east for 2.6m before returning to the south. Three courses (0.34m) of wall 1312 survived.
Wall 1309 (Plate 62) was parallel to the east to west aligned portion of wall 1313 and was bonded to the south side of 1313. Wall 1309 comprised two courses of firebricks 0.55m long and 0.23m wide and partially overlay truncated flue 1306. The former continuation of wall 1309 to the east could be seen due to the survival of the bedding mortar for the wall (recorded as 1308). Mortar 1308 partly overlay flue 1304.
To the west of the flues, machine brick and black ash mortar wall 1310 ran north to south and was 3m long and 0.73m wide.
At the most westerly end of the trench was a large sandstone block (1314) with grooves and two iron pins indicating that it was a machine base. Machine base 1314 measured 1.06m long by 0.8m in plan and 0.66m high. It sat on a machine brick and black ash mortar foundation (1315) with bricks aligned east to west and opportunistically including occasional firebricks. Surface 1316 was keyed into foundation 1315 and extended over an area 1.10m by 1.0m in plan with a square stone slab (possibly a minor base) in the centre.
Area I was successfully expanded to further investigate White Croft Court 1. The nature of the activity here is uncertain, but may have been industrial on the basis of structures 1117/1118 which do not appear to be consistent with standard domestic forms.
Evaluation Trench I (Wessex Archaeology 2017f) was expanded into strip, map and record Area I (Figure 41–46). Area I targeted a court to the north of Hollis Croft (Nos. 6 and 8 on the 1890 Ordnance Survey map), first shown on the 1787–9 Fairbank town plan as belonging to John Wilde (Figure 43).
Figures 41-46: Area I plans and sections


The undisturbed natural geological substrate (1115) was seen below archaeological structures and comprised orange yellow silt sand with mudstone and siltstone inclusions.
Overburden comprised layers of dirty redeposited natural (1103 and 1132) and rubble (1102). Pottery recovered from 1102 dated to the mid- to late 19th-century and clay tobacco pipe was probably deposited between 1800 and 1860; neither can be relied on to date activity on site as the deposit may represent demolition material or imported made ground.
Two early layers of made ground (1131 and 1136; Figure 46, 1) comprised dirty silt clays. These layers did not contain dateable artefacts but likely represent ground preparation prior to development of the site in the 18th or 19th centuries.
The archaeological remains preserved in Area I closely generally correlate with structures mapped in 1890 (Figure 45). These structures were arranged around Court No. 1 accessed from White Croft rather than from Hollis Croft. This court was situated between Hollis Croft Courts 12 and 14. Some of the boundaries, particularly a north to south aligned division (1121), had been inherited from previous arrangements of the plot (Figure 43, Figure 44). Although this boundary probably had origins in the 18th century, the earliest preserved structure on this alignment (1112/1113) appears to date from the early 19th century.
In the south of Area I, a wall (1112/1113) ran approximately north to south and was exposed for a length of 2.8m. The foundation of this wall (1113) comprised unmortared sandstone and the upper part of the wall was handmade brick and lime mortar two skins thick (0.4m) and with two courses extant (1112). Wall 1112/1113 correlates with the exterior wall of a range or ranges of buildings facing a courtyard to the east on historic maps from the 18th and 19th centuries (Figures 43–45). Finds recovered from within foundation 1113 include two sherds of early 19th century pottery (alongside six sherds from the 18th century) and two clay tobacco pipe fragments of late-18th-century date. On the basis of these finds it seems likely that the excavated wall had been rebuilt in the early 19th century or later.
In the north of Area I, some of the walls of a group of buildings were investigated (1111, 1120 and 1121; Figure 42 and Figure 45). The buildings were about the same size as other mapped dwellings, however they were atypical in layout. Structure 1117/1118 was not consistent with a standard dwelling layout and may suggest that the buildings were industrial in nature.
Wall 1111 (Plate 63) formed three sides of an enclosed space. Wall 1111 had been constructed in a construction cut (1133; Figure 46, 1) truncating earlier layers 1131 and 1136 (described above). Construction cut 1133 was filled with dirty ashy deposit 1114 which also filled the interior of the area enclosed by Wall 1111. Enclosed by wall 1111 was a further handmade red brick and black ash mortar structure (1117 and 1118; Plate 63). Structure 1117/1118 enclosed an area of 1.12m by over 1.2m, which was floored with flagstones that had become cracked and damaged (1119). These structures (1117/1118 and 1119) likely represent a feature such as a base for industrial equipment and are not consistent with a typical dwelling.
Bonded to the north side of structure 1111 and most likely contemporary with it, east to west aligned sandstone wall 1120 (Plate 63), survived for three courses. Wall 1120 represents part of the same general division as the north side of structure 1111.
Less than 2m to the east of wall 1111, and therefore perhaps enclosing a corridor or passage, was a north to south aligned handmade brick and black ash mortar wall (1121) Wall 1121 continued the alignment of earlier wall 1112/1113 and was built on a sandstone and black ash mortar foundation (1128) in a construction cut (1134; Figure 46, 1) truncating earlier layers 1131 and 1136. Wall 1121 was likely of late 19th-century date but was built on the alignment of earlier walls dating back to the 18th century (Figure 43 and Figure 44).
A 3.4m by 2.15m surface (1109) was present on both sides of wall 1121 and continued through a gap in the wall. Surface 1109 comprised mainly handmade bricks with some sandstone flags and was bonded with black ash mortar (1109) and was bedded on clinker and ash 1116 which contained pottery dating from the late 19th to early 20th century (alongside earlier pieces) and a clay tobacco pipe bowl likely to have been deposited between 1870 and 1920. The floor likely formed the interior surface of two adjacent rooms. Floor 1109 was removed to reveal a drain culvert (1128). Drain 1128 comprised two parallel runs of handmade red brick bonded with black ash mortar with a sandstone cap.
Returning to the south of Area I, an east to west aligned drain (1110/1125; Plate 64) passed through wall 1112/1113. The drain comprised two parallel rows of handmade brick bonded with black ash mortar (1125) overlaid with sandstone slabs (1110). Late-19th-century drain 1110/1125 was likely inserted underneath early-19th-century wall 1113 without disturbing the upper parts of the wall. Pottery recovered from the drain was of 18th-century date, however only three sherds were recovered and may have been residual.
Two structures were visible in the east facing section of the trench (Plate 65; Figure 46). Three courses of a sandstone wall (1108) survived; finds assigned to this context include 23 sherds of pottery, the latest of which date from the mid-19th century or early-20th century. A clay tobacco pipe bowl suggests a date of deposition from 1830–1860. Structure 1108 was somewhat disturbed and it is likely that these artefacts originate from the surrounding overburden (1101) rather than from within the structure itself. A second structure (1107) consisted of three courses of handmade brick and lime mortar. The two structures (1107 and 1108) were parallel and butted up against each other but the stratigraphic relationship could not be determined. A further three course wall (1111) was seen in the trench edge to the south of walls 1107 and 1108 and consisted of handmade red brick and black ash mortar. Nearby, a further three bricks bonded together were part of the rubble deposit 1103. None of these three structures (1106–1108) correlate closely with any consulted historic map and on the basis of the available evidence it is difficult to assign a date or phase to them.
South of walls 1107 and 1108 was a single surviving course of a small (0.72m wide) three-sided handmade red brick and lime mortar structure (1104; Figure 41). Structure 1104 represents some kind of brick lined pit, possibly associated with drains. The ashy fill (1105) was removed revealing clean natural. Nearby, pit 1127 was 1.9m by 1.2m in plan and 1.2m deep. The pit (1127) was cut from the upper horizon of redeposited natural 1132 and was filled with typical rubble material (1126).
There was no archaeological preservation in Area J.
An evaluation trench was opened in Area J towards the north of the site (Figure 1). Area J investigated the former area of the Diamond Works operated by the Beardshaw family. There was no archaeological preservation in this area and no further work was undertaken. Demolition rubble overlay undisturbed natural geology comprising mid-yellow orange clay. No context numbers were assigned. Former structures in this area had likely been removed by demolition.
Area K contained remains of The Orange Branch public house. Walls west of the cobbled yard were shown to be the upper parts of a series of cellars which had been maintained and rebuilt over time. In the 20th century, a cart-way or entrance was installed in the east of the area, reducing the size of the former buildings, although the fabric of the earlier buildings was partially retained.
In Area K (Figures 47–54), work proceeded directly to strip, map and record excavation without the completion of the planned evaluation trench. Area K targeted the location of the former public house The Orange Branch. In 1787–9, The Orange Branch was operated by John Harrison, perhaps as part of the truck system used to exploit workers at his steel works on the other side of the road. By 1853 The Orange Branch was at number 28 and was operated by Joseph Allen, joiner and victualler, and inhabited by his wife Sarah, three children and 20-year-old servant Alice Wardley.
Figures 47-54: Area K plans and sections


The undisturbed natural geological substrate (1226) seen below the archaeological structures comprised yellow brown silt clay. Overburden comprised a widespread rubble deposit (1229), hardcore (1202) and tarmac (1201). A layer of compact greenish brown silt clay (1203) may have been associated with construction of the 18th-century structures in the south of the area.
A series of structures were seen relating to the interiors of The Orange Branch public house and to back-to-back sized houses to the rear of the public house. These structures can be most clearly identified on the Ordnance Survey map of 1853 (Figure 52) but are likely the same structures depicted on the Fairbank plan of 1787–9 (Figure 51).
Sandstone and lime mortar wall 1212 ran east to west across the centre of Area K (Plate 66 and Plate 67). Wall 1212 was 0.45m wide with three surviving courses (0.32m high) and correlates with an exterior wall of the building belonging to John Harrison as indicated on Fairbank's 1787-9 plan (Figure 51). Wall 1212 persisted on historic maps throughout the 19th century (Figure 52 and Figure 53).
A cellar (1218–1221, 1239, 1240, 1244; Plate 68) was recorded in the south of Area K. The stairs were accessed from the south-east, with the steps (1221) running first north and then making a quarter-turn to the west. The treads were shaped sandstone flags exhibiting use wear and were supported on handmade brick and lime mortar risers, each two courses high. The main cellar led south from the bottom of the cellar steps and was enclosed by handmade brick and lime mortar walls two skins thick (1218 and 1219). At the north end, wall 1220 was instead built from sandstone. The base of the cellar was sandstone flags (1244) and the interior had been finished with plaster and white distemper. The west wall of the cellar (1220) was angled to the west at the north end, originally to allow access to another cellar located to the north. However, access to this cellar had been bricked up with machine bricks bonded with black ash mortar (1239). The rest of the north wall of the cellar, although distinct from the blockage, had also been rebuilt with machine bricks and black ash mortar (1218). From ground level, the east wall enclosing the cellar steps had been rebuilt in frogged machine brick and black ash mortar (1240). The cellar appears to be associated with the southernmost building of the John Harrison property, as indicated on the 1787-9 Fairbank plan.
A sandstone and lime mortar wall (1224) running north from 1218 likely formed the east wall of the former north cellar. Wall 1224 was 1.75m long, 0.3m wide and was observed only in plan. The continuation of the line of wall 1224 correlated with the east wall of the houses at the rear of the public house. As well as forming the east wall of a cellar, wall 1224 likely served as foundation for an interior division of The Orange Branch public house.
The north end of angled cellar wall 1220 was observed in plan to form the west wall of the former north cellar before returning to the west as 1223. Wall 1223 comprised unmortared sandstone 0.5m wide; six courses were revealed. Handmade red brick and lime mortar springers (1217) rising from wall 1223 indicated the former location of a brick vault likely enclosing another cellar running east to west to the north of 1223. Wall 1223 was constructed in a cut (1238, not illustrated) excavated through the natural (1126).
To the west of wall 1223, in the west section of the area of excavation another wall may indicate the west end of this brick vaulted east to west aligned cellar (1236). A further wall (1237) unusually comprised a base of handmade red brick and lime mortar overlain by a sandstone wall bonded with black ash mortar, possibly indicating a later repair or rebuild.
Sandstone wall 1230 formed the north side of the cellar and ran east to west. Wall 1230 comprised unmortared sandstone 0.3m wide and ran from yard surface 1214 in the east, to the edge of excavation in the west, forming a major division correlating with the back wall of The Orange Branch public house, with small dwellings continuing to the north. A small part of the handmade brick and lime mortar wall overlying sandstone wall 1230 was preserved (1231).
Immediately to the north of wall 1230 was an interior sandstone flag surface covering 1.6m by 1.12m (1215). Surface 1215 was laid on top of a series of levelling layers (1228, 1235, 1234, 1233 and 1232). Layer 1234 included three sherds from the same 19th century vessel, indicating a 19th century or later date for surface 1215. The surface fills the ground floor area of the first dwelling behind the public house as shown on the 1853 Ordnance Survey Map (Figure 52). It is likely that the dwelling was first constructed in the 18th century as the area is depicted as built-up on the Fairbank plan (Figure 51). Nineteenth-century surface 1215 is therefore likely a replacement floor in an earlier building. Deposits 1228, 1235, 1234, 1233 and 1232 might represent the backfill of an earlier cellar belonging to the earlier building.
The north of Area K (Plate 66) contained two stamped, patterned concrete floor surfaces (1204 and 1205). A drain built in to concrete surfaces 1204 and 1205 may indicate that the two surfaces were once joined.
The southern edges of the concrete surfaces were delineated by two-skin frogged machine brick and black ash mortar wall 1206. Wall 1206 correlates with a wall shown on the 1890 Ordnance Survey map (Figure 53). A boundary on the same alignment was present in part in 1853 (Figure 52); wall 1206 likely represents a consolidation of an earlier boundary. Three courses of wall 1206 survived; the lower two courses stepped out with the bottom course comprising edge-on stretchers (rowlock bond). A sandstone threshold (1210) provided access through wall 1206. A further two skin frogged brick and black ash mortar wall extended from 1206 to the north; the relationship between this and concrete surfaces 1204 and 1205 was unclear. Away from threshold 1210, the footprint of a small room was enclosed to the south of wall 1206 by walls 1207 and 1209, which were built of identical materials to 1206 (frogged machine brick and black ash mortar). Walls 1207 and 1209 correlate with a building first depicted on the map of 1890 (Figure 53). An unstamped concrete floor (1208) had been poured as the surface of this small room. A second room existed west of the room floored with 1208, and was partially enclosed by wall 1209. No finds were recovered from any of these structures or their associated contexts.
Elsewhere, an isolated survival of a frogged machine brick and black ash mortar structure was 0.85m by around 0.5m in plan and cannot be interpreted further (1213). Structure 1213 may be late 19th/early 20th century on the basis of the constituent materials.
A large sandstone sett courtyard surface (1214; Plate 67) was 12m long and 4m wide and ran north to south along the east side of Area K. Surface 1214 was bedded on sand and clinker (1227). The sett surface occupies the area of buildings depicted on the Ordnance Survey map of 1890 (Figure 53) and correlates with a yard area depicted in 1954 (not illustrated), although the surface is likely older than this, probably early 20th century.
It is likely that the 18th-century building which had been The Orange Branch public house was reduced in width to install surface 1214. When the building was reduced in width the cellar with steps 1221 became the eastern limit of the building. This is consistent with the rebuilding of the east wall of the cellar in frogged brick (1240). North of wall 1240, a sandstone wall (1241) formed the new east side of the building. Sandstone wall 1241 was seen only in plan and appeared to be unmortared. A later low concrete curb (1216) had been added to the edge of the surface 1214 adjacent to wall 1241.
In the west of the centre of the area, a further sandstone flag surface (1211) was 1.45m by 1.58m in plan. The edge of surface 1211 was delineated by a sandstone kerb (1222) at the same level as the main floor. Floor 1211/1222 was built directly on to natural and all surrounding structures had been removed by demolition or other truncation; it is not possible to stratigraphically relate this surface to any other feature or deposit other than the natural. The surface occupies an area inside buildings which had been present since the 18th century (Figures 51–53). However, with the exception of the southern limit of the surface, the kerbed edges of surface 1222 do not correlate with mapped internal divisions. The surface may therefore be of any date.
After the conclusion of the strip, map and record excavation, a watching brief was maintained on the excavation of footings associated with the new development on site. This work included the monitoring of 31 interventions recorded as 'Test Pits' (Test Pits 1–30 and 3A). The Test Pits containing archaeology are shown on Figure 1 and are described below.
The undisturbed natural geological substrate was recorded in most of the Test Pits, with multiple layers of natural recorded in many locations. The layers of natural generally comprised compact yellow grey clay or similar (e.g. 10102) overlying sandstone bedrock (e.g. 10103) although in some locations only one of either clay or bedrock was observed.
Rubble overburden (e.g. 10101) may have been related to demolition of buildings on site or may have comprised imported material. The overburden in Test Pits 6, 7 and 9 was a compact mixture of soils and redeposited natural (10601, 10701 and 10901). A layer of imported hardcore sealed Test Pit 8 (10801). A recent concrete footing was recorded in Test Pit 15 (11502) while tarmac sealed Test Pit 20 (12001). A deposit of imported orange clay was recorded in Test Pit 21 (12102). Test Pits 23–26 were sealed with concrete (4008, 12401, 12501 and 12601).
A modern wall representing the recently demolished exterior wall fronting on to Hollis Croft was recorded in several locations (e.g. Test Pits 10, 11 and 12; 10403, 11401, 12002).
Test Pit 3A (Plate 69) contained structures relating to former cellars in its south and west sections. The southern limit of the test pit was also the southern limit of the site and corresponds to the former southern boundary between the Globe Forge and Rolling Mills and back-to-back housing (Ordnance Survey map of 1890; Figure 57). Wall 4110 ran along this boundary, comprising 30 uninterrupted courses of machine brick and black ash mortar. A modern wall had been built on top of wall 4110 using 4110 as a foundation. The north face of 4110 had been painted with white distemper but was now sooty, possibly as a result of contamination from the overburden backfill. The west side of the cellar enclosed by wall 4110 was supported by an iron pier (4104) which was built on a low brick wall base (4105). The iron pier presumably supported an iron frame although this was not observed. Machine brick and black ash mortar springers (4103) formed the west end of former brick vaulting which would have roofed the large cellar. There was no scar from the brick vaulting on wall 4110; it appears that they may have been a gap of roughly half a metre between the vault and the end wall. The north end of this cellar was defined by east to west aligned machine brick (with some firebrick) and black ash mortar wall 4106, which was largely truncated.
North of wall 4106 a firebrick arch extended above an entranceway allowing access from east to west. This arch was built into single-skin brick wall 4108 and also into wall 4109 immediately behind (to the west of) wall 4108. It is possible that wall 4108 formed one skin of wall 4109 although it appears that the two structures were separate with a small air gap between them. The base of wall 4108 curved into the entrance spanned by arch 4107. Wall 4109 was comprised of both machine brick and handmade brick and bonded with black ash mortar.
The Ordnance Survey map of 1890 (Figure 57) shows a chimney and a room within the wider Globe Forge and Rolling Mills close to the location of Test Pit 3A. It is uncertain how these mapped structures relate to the recorded cellars.
Test Pit 14 (not illustrated) contained an east to west aligned sandstone and lime mortar wall (11403) which was too unsafe to record fully. A north to south aligned handmade red brick and lime mortar wall (11404) was keyed into sandstone wall 11403; the two walls together may have formed two sides of a former cellar.
Test Pit 18 (Figure 55) contained a series of wall foundations and thresholds indicating the layout of a complex boundary (Plate 70). At the eastern end of the excavation area, 1804 comprised an east to west aligned unmortared sandstone wall 0.45m wide. At the west end of 1804, handmade red brick and black ash mortar structures (11805 and 11807) enclosed three sides of an area projecting north from the main line of the structures; this area was 1m from east to west and 0.8m from north to south. Walls 1805 (comprising the east and north side of the enclosed area) were one skin thick and contained some bricks painted white on one face indicating re-use of the bricks. Wall 11807 (the west side of the enclosed area) was two skins thick. A large sandstone block comprised the south end of wall 11807, and projected south of the main line of the structures. The area enclosed by walls 11805 and 11807 was surfaced with crazy paving sandstone fragments (11806). There was a gap in the main line of the structures to the west of 11807, however scattered surviving sandstone flags (11808) indicated the former presence of a floor surface to the north. After a gap of 0.92m, the main line of the structures resumed as lime mortared sandstone wall 1809, which was similar to wall 11804 except that it was mortared. Wall 1809 was 0.54m wide and 3.4m long. A very wide (0.82m) sandstone and lime mortar wall (11813) ran south from11804 out of the area of excavation. A lime mortar dump 0.6m north of wall 11809 might be associated with the removed floor attested by scattered flags 11808. At the west end of wall 11809 was a gap of 0.95m, after which the wall resumed as 11810 for another 1.5m before leaving the area of excavation. A single brick built into wall 11810 might indicate the position of a keyed in single-skin brick wall extending to the south but this was not pursued. The gap between walls 11809 and 11810 was filled with silty material 11816 and was 1m north to south, extending to the north of the main line of the structures. Wall 11812 formed the west wall of this area north of the main line of the structures and comprised lime mortared sandstone and handmade brick 0.44m wide. Wall 11812 returned back to the east as 11811, which was mostly constructed of handmade brick but with some sandstone and was 0.44m wide and 1.2m long.
These structures correlate with the back wall of a range of back-to-back housing as depicted on historic maps (Ordnance Survey 1853 and 1890; Figure 56 and Figure 57). Two points of access incorporate porches or other complications possibly designed to cope with a change in level between the houses and the land to the rear. In 1890, the space to the rear of the back-to-backs is annotated as Garden Street 'Court No. 2'. The housing may have been associated with the British Works (Electro Plate) which existed between the housing and the cementation furnaces in Area E/F, which were part of the Globe Forge and Rolling Mills. The surface of Court No. 2 was smartly paved with flagstones (11808), whereas at least one part of the housing had been floored with ad hoc crazy paving (11806).
A sandstone and lime mortar wall (11802) likely comprising the former wall of a cellar was also seen a short distance to the south of the main sequence of structures. This may have been the foundation of the central dividing wall of the back-to-backs.
Two 0.4m wide unmortared sandstone foundations were present, although the surviving portions of the two walls did not intersect. Wall 11905 ran east to west and wall 11906 ran north to south. Two unrelated modern brick walls were also present in the Test Pit (11907 and 11908). It is possible that these structures related to the former Exchange Cutlery Works as depicted on the Ordnance Survey map of 1890 or its predecessors.
A cellar was recorded in Test Pit 23 (Plate 71). Initially the cellar was recorded as 12303 but was then re-cleaned and recorded with context numbers in the 4000s. Walls 4005, 4008 and 4002 formed three sides of a cellar and comprised handmade red brick and lime mortar. The east part of wall 4005 had been contaminated with soot post-demolition (4004) but was of identical construction to the other walls. In the north-east corner was a structure in the same materials (4001) which appeared to be part of the support for a set of stairs. Some fragments of possible sandstone treads were observed in the upper parts of 4001. The north and south walls of the cellar (4002 and 4005) contained springers to support a brick vault, and a small portion of the vault was preserved above 4005. Rough sandstone probably constituting a wall appeared to run parallel to and adjacent to the north side of wall 4002, forming the boundary of the next building or room to the north. The cellar was painted white on the inside. The floor of the cellar comprised sandstone flags (12304) which largely did not survive; the materials of the floor were probably robbed during demolition.
This cellar was located in an area mapped as containing back-to-back-sized housing and outbuildings associated with the eastern limit of works depicted as the Toledo works. Due to the size of the cellar it is more likely that it belonged to an outbuilding associated with the works.
A series of walls were built directly onto natural bedrock. Wall 12701 ran north to south and comprised machine brick and black ash mortar. Two keyed in walls would have extended north from 12701 but had been removed. A large block of iron-shuttered concrete (12702) was present south of the west end of 12701. A small handmade brick and lime mortar structure survived in section (12703). A substantial machine brick and black ash mortar wall ran east to west (12705) and contained the scars of walls and drains that formerly extended to the south. The southern face of wall 12705 stepped back above the former ground level and had been plastered and painted at this level.
Historic mapping suggests that these walls were related to the 'Globe Forge and Rolling Mill' (Thomas R. Ellin/Footprint Works), although no detail is depicted.
Two parallel two-skin machine brick and black ash mortar walls were seen in section (1290), possibly enclosing a rubbish pit or ash pit or constituting a drainage inspection chamber. The basal deposit between walls 12901 comprised dark ash with rubble inclusions (12903). Again, these structures were likely related to 'Globe Forge and Rolling Mill' (Thomas R. Ellin/Footprint Works).
View the comic online or use the navigation bar (top) to go to other sections of report.
Internet Archaeology is an open access journal based in the Department of Archaeology, University of York. Except where otherwise noted, content from this work may be used under the terms of the Creative Commons Attribution 3.0 (CC BY) Unported licence, which permits unrestricted use, distribution, and reproduction in any medium, provided that attribution to the author(s), the title of the work, the Internet Archaeology journal and the relevant URL/DOI are given.
Terms and Conditions | Legal Statements | Privacy Policy | Cookies Policy | Citing Internet Archaeology
Internet Archaeology content is preserved for the long term with the Archaeology Data Service (ROR). Help sustain and support open access publication by donating to our Open Access Archaeology Fund.
 Home
Home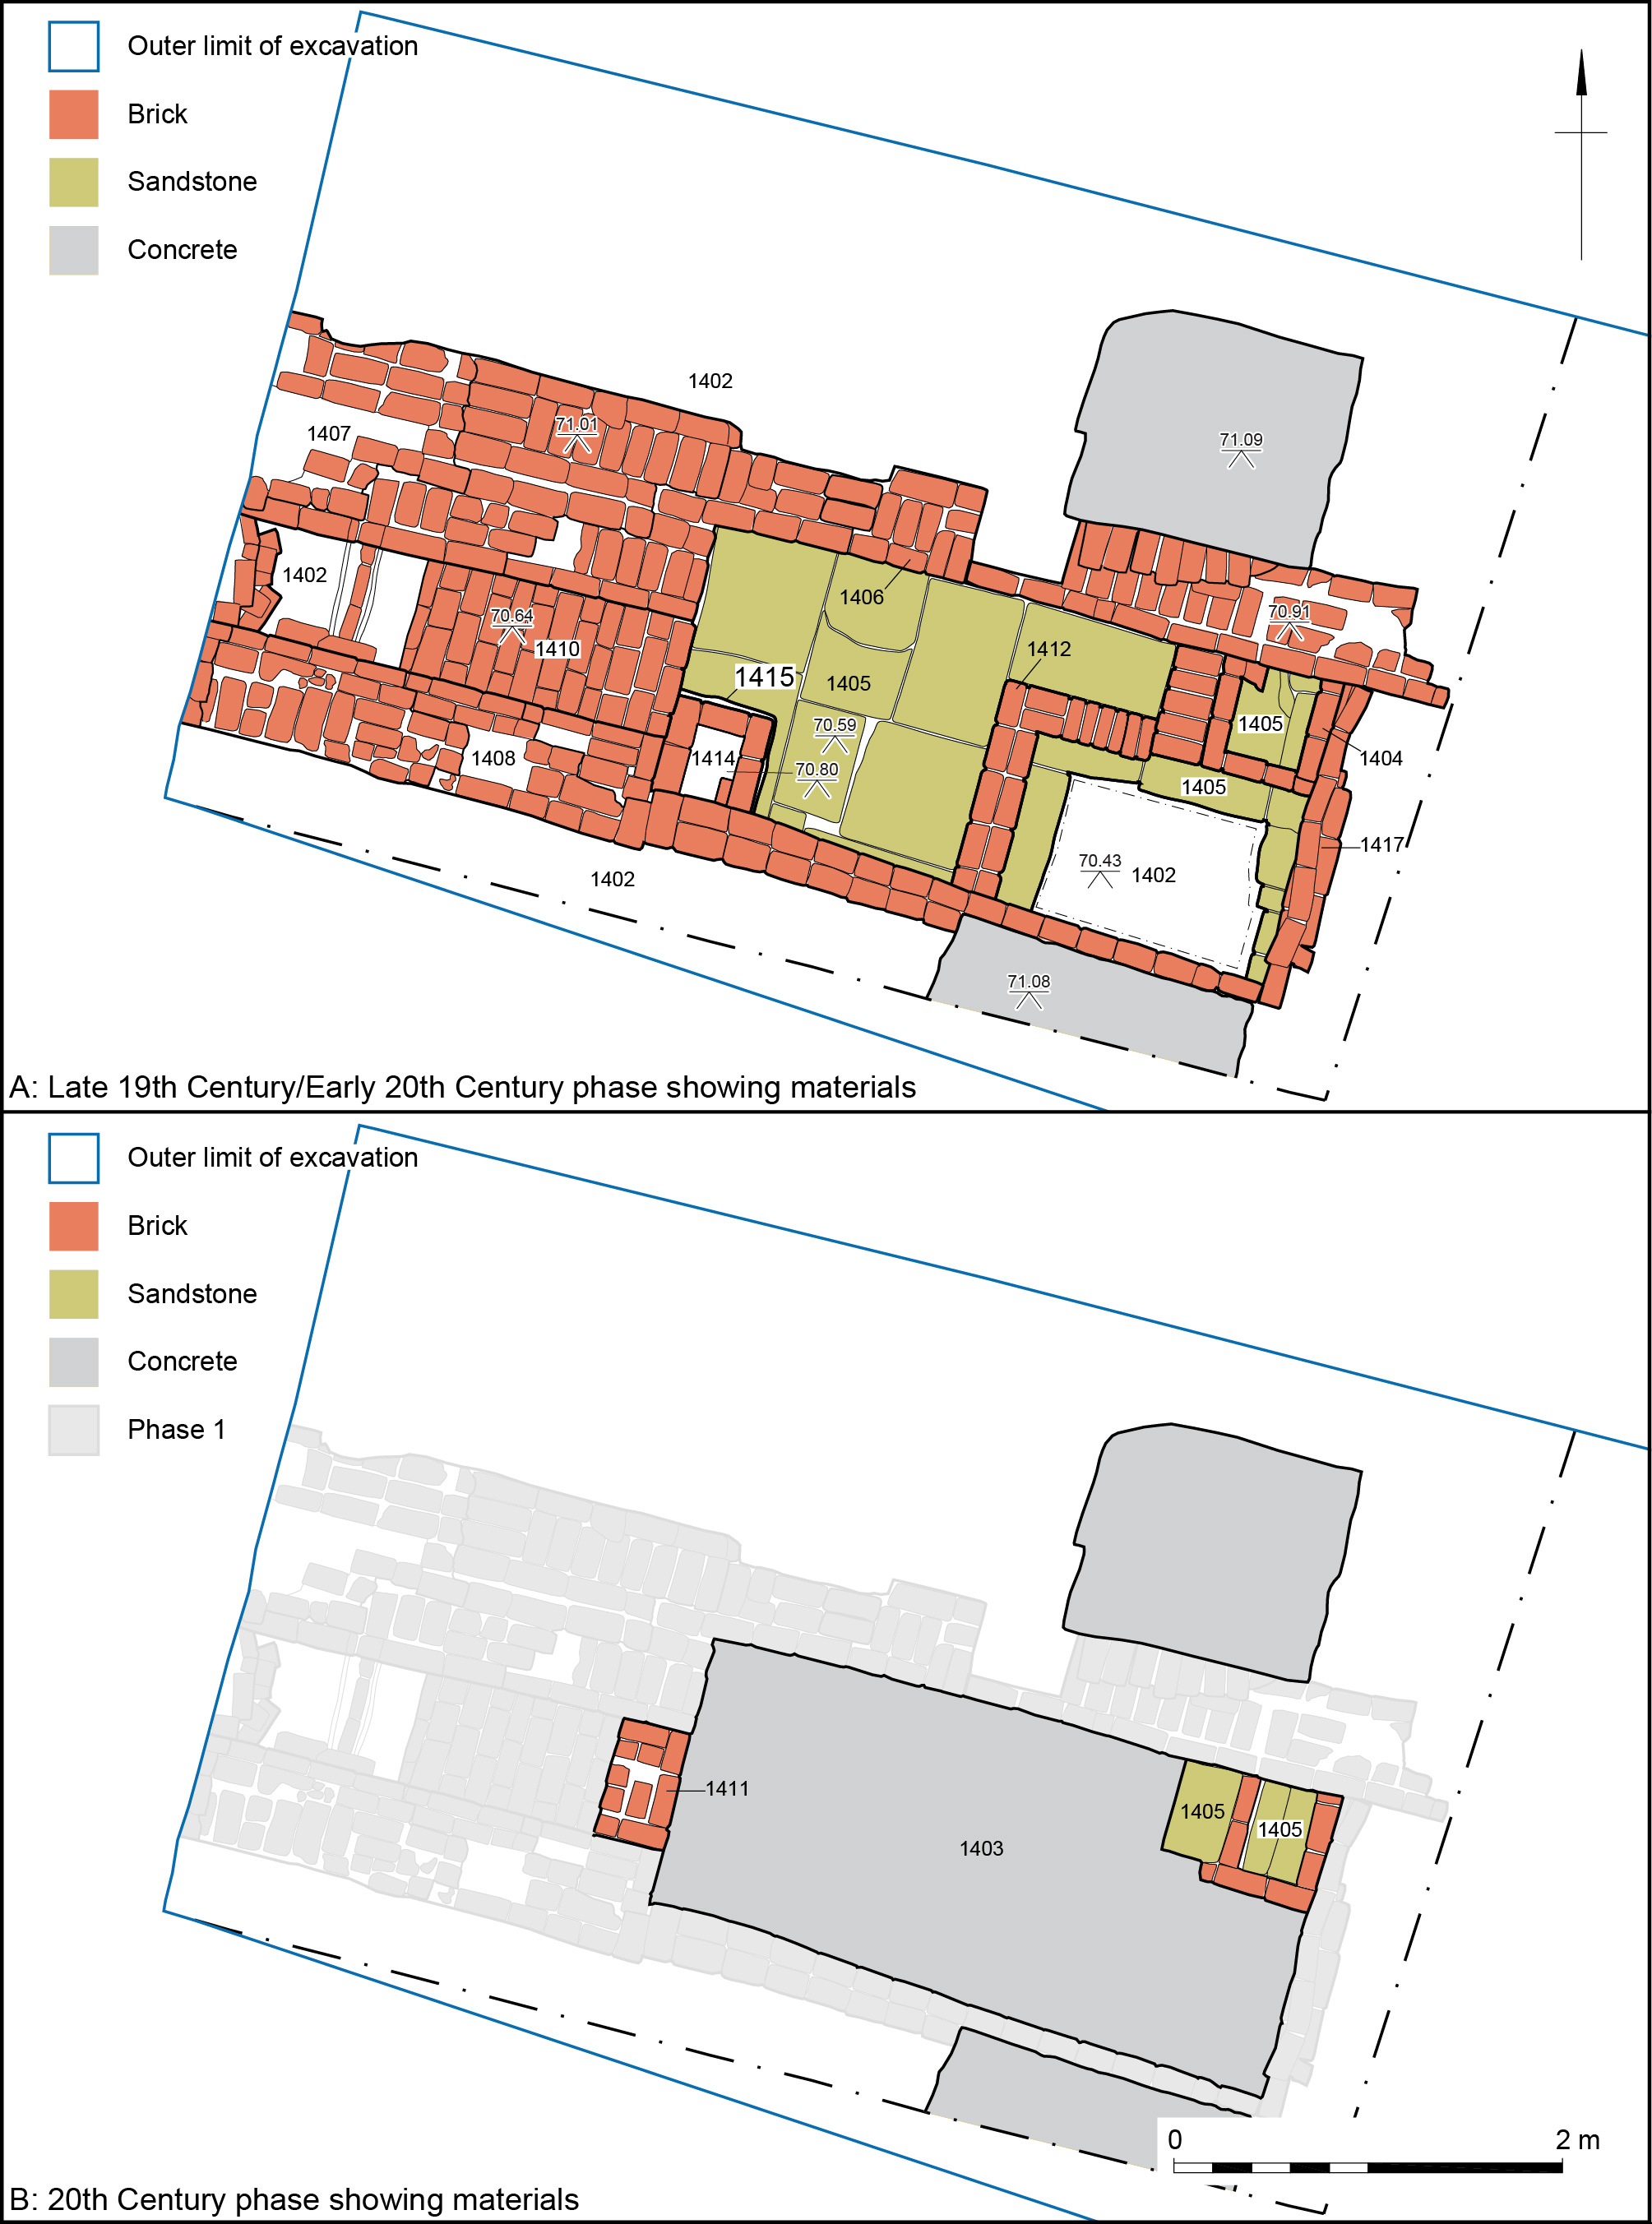
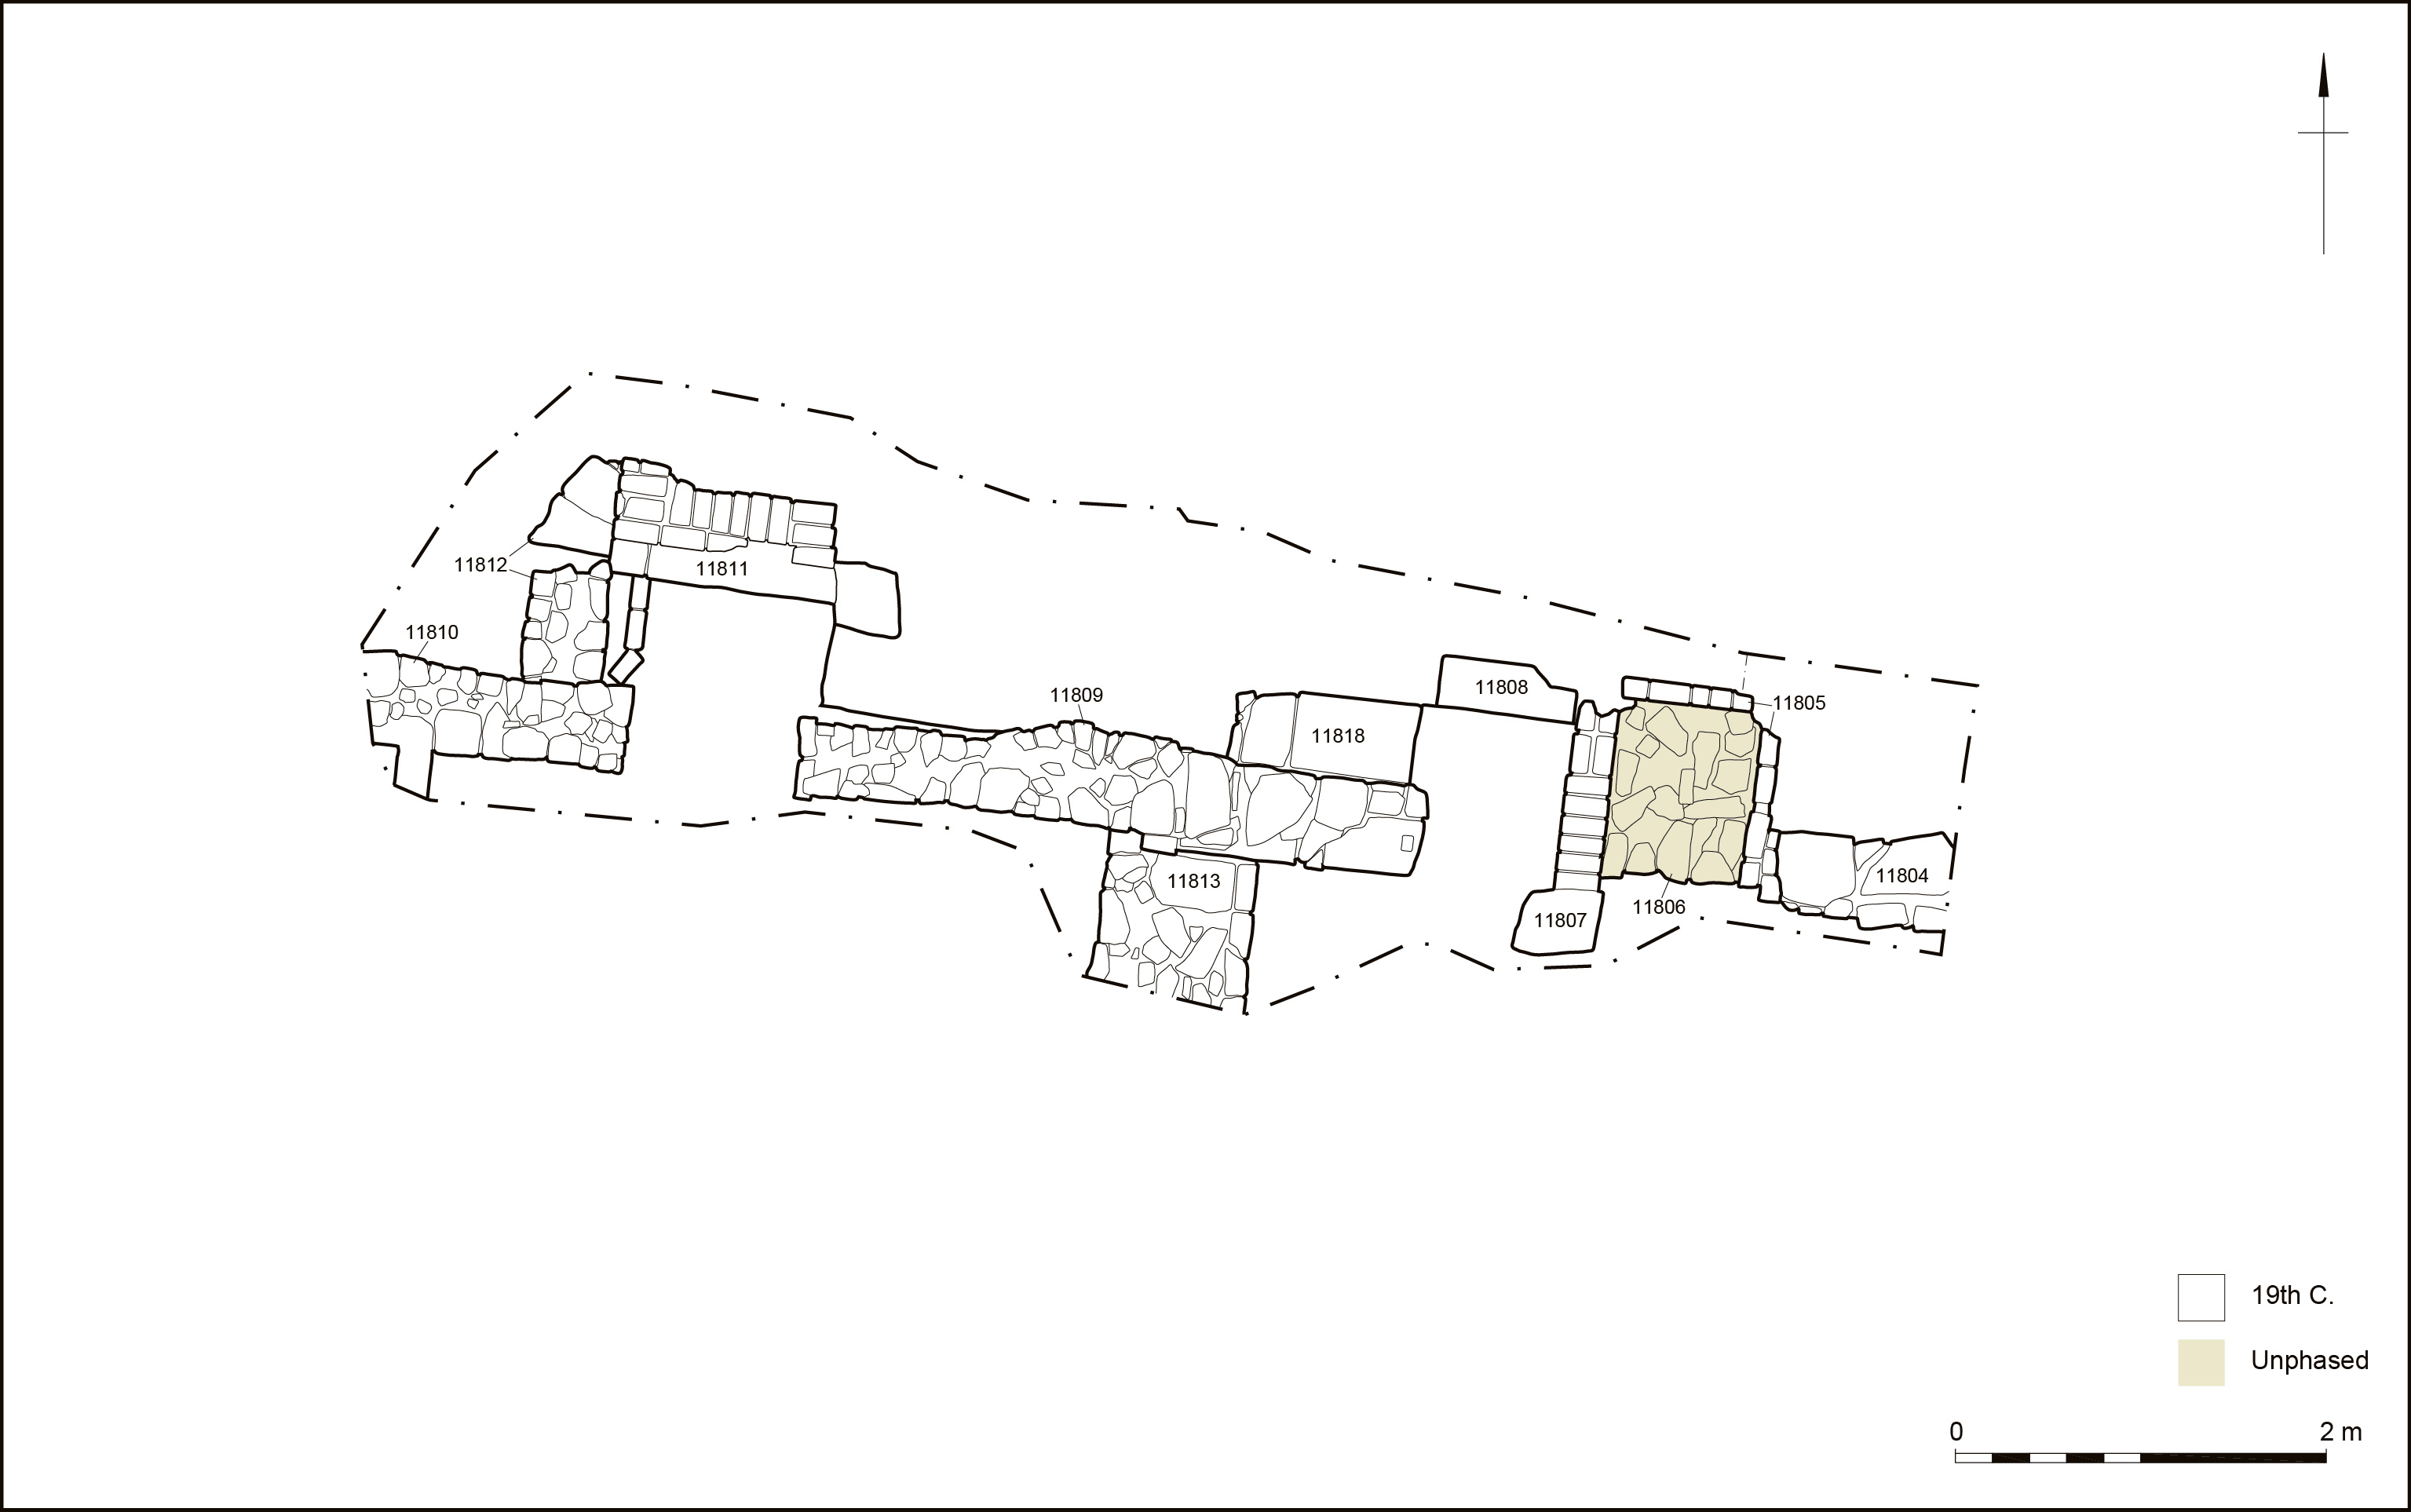
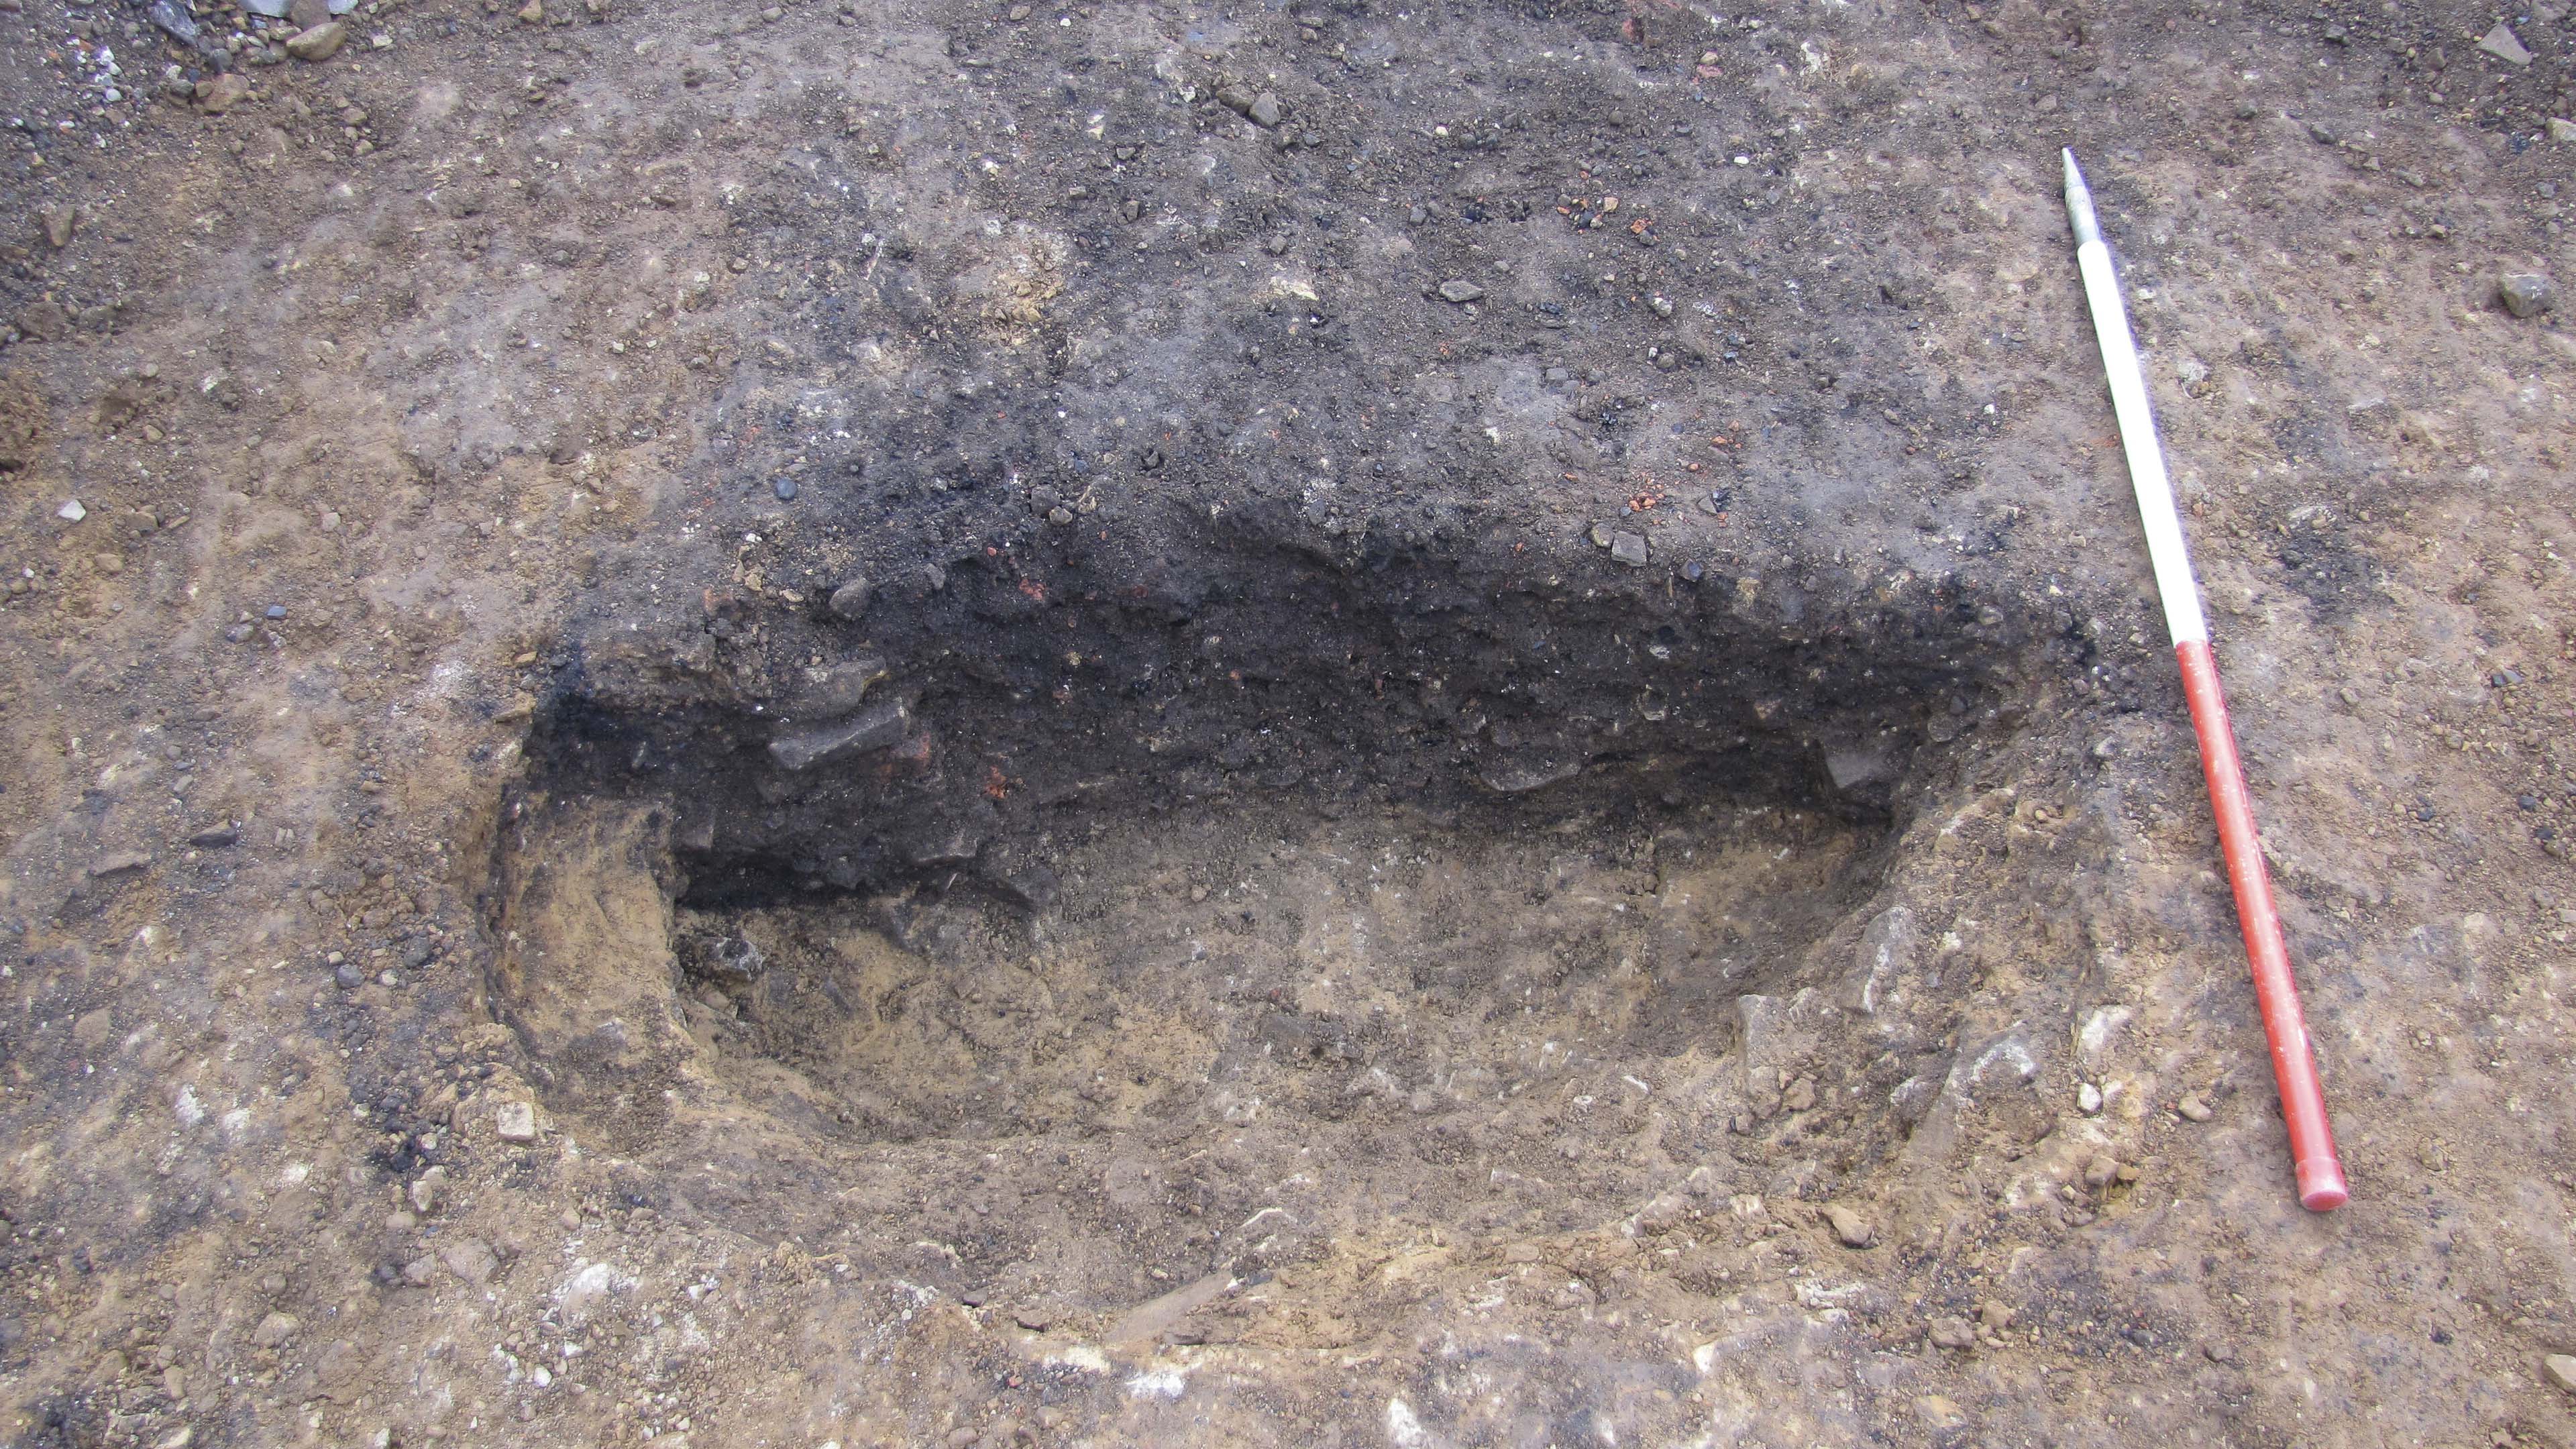
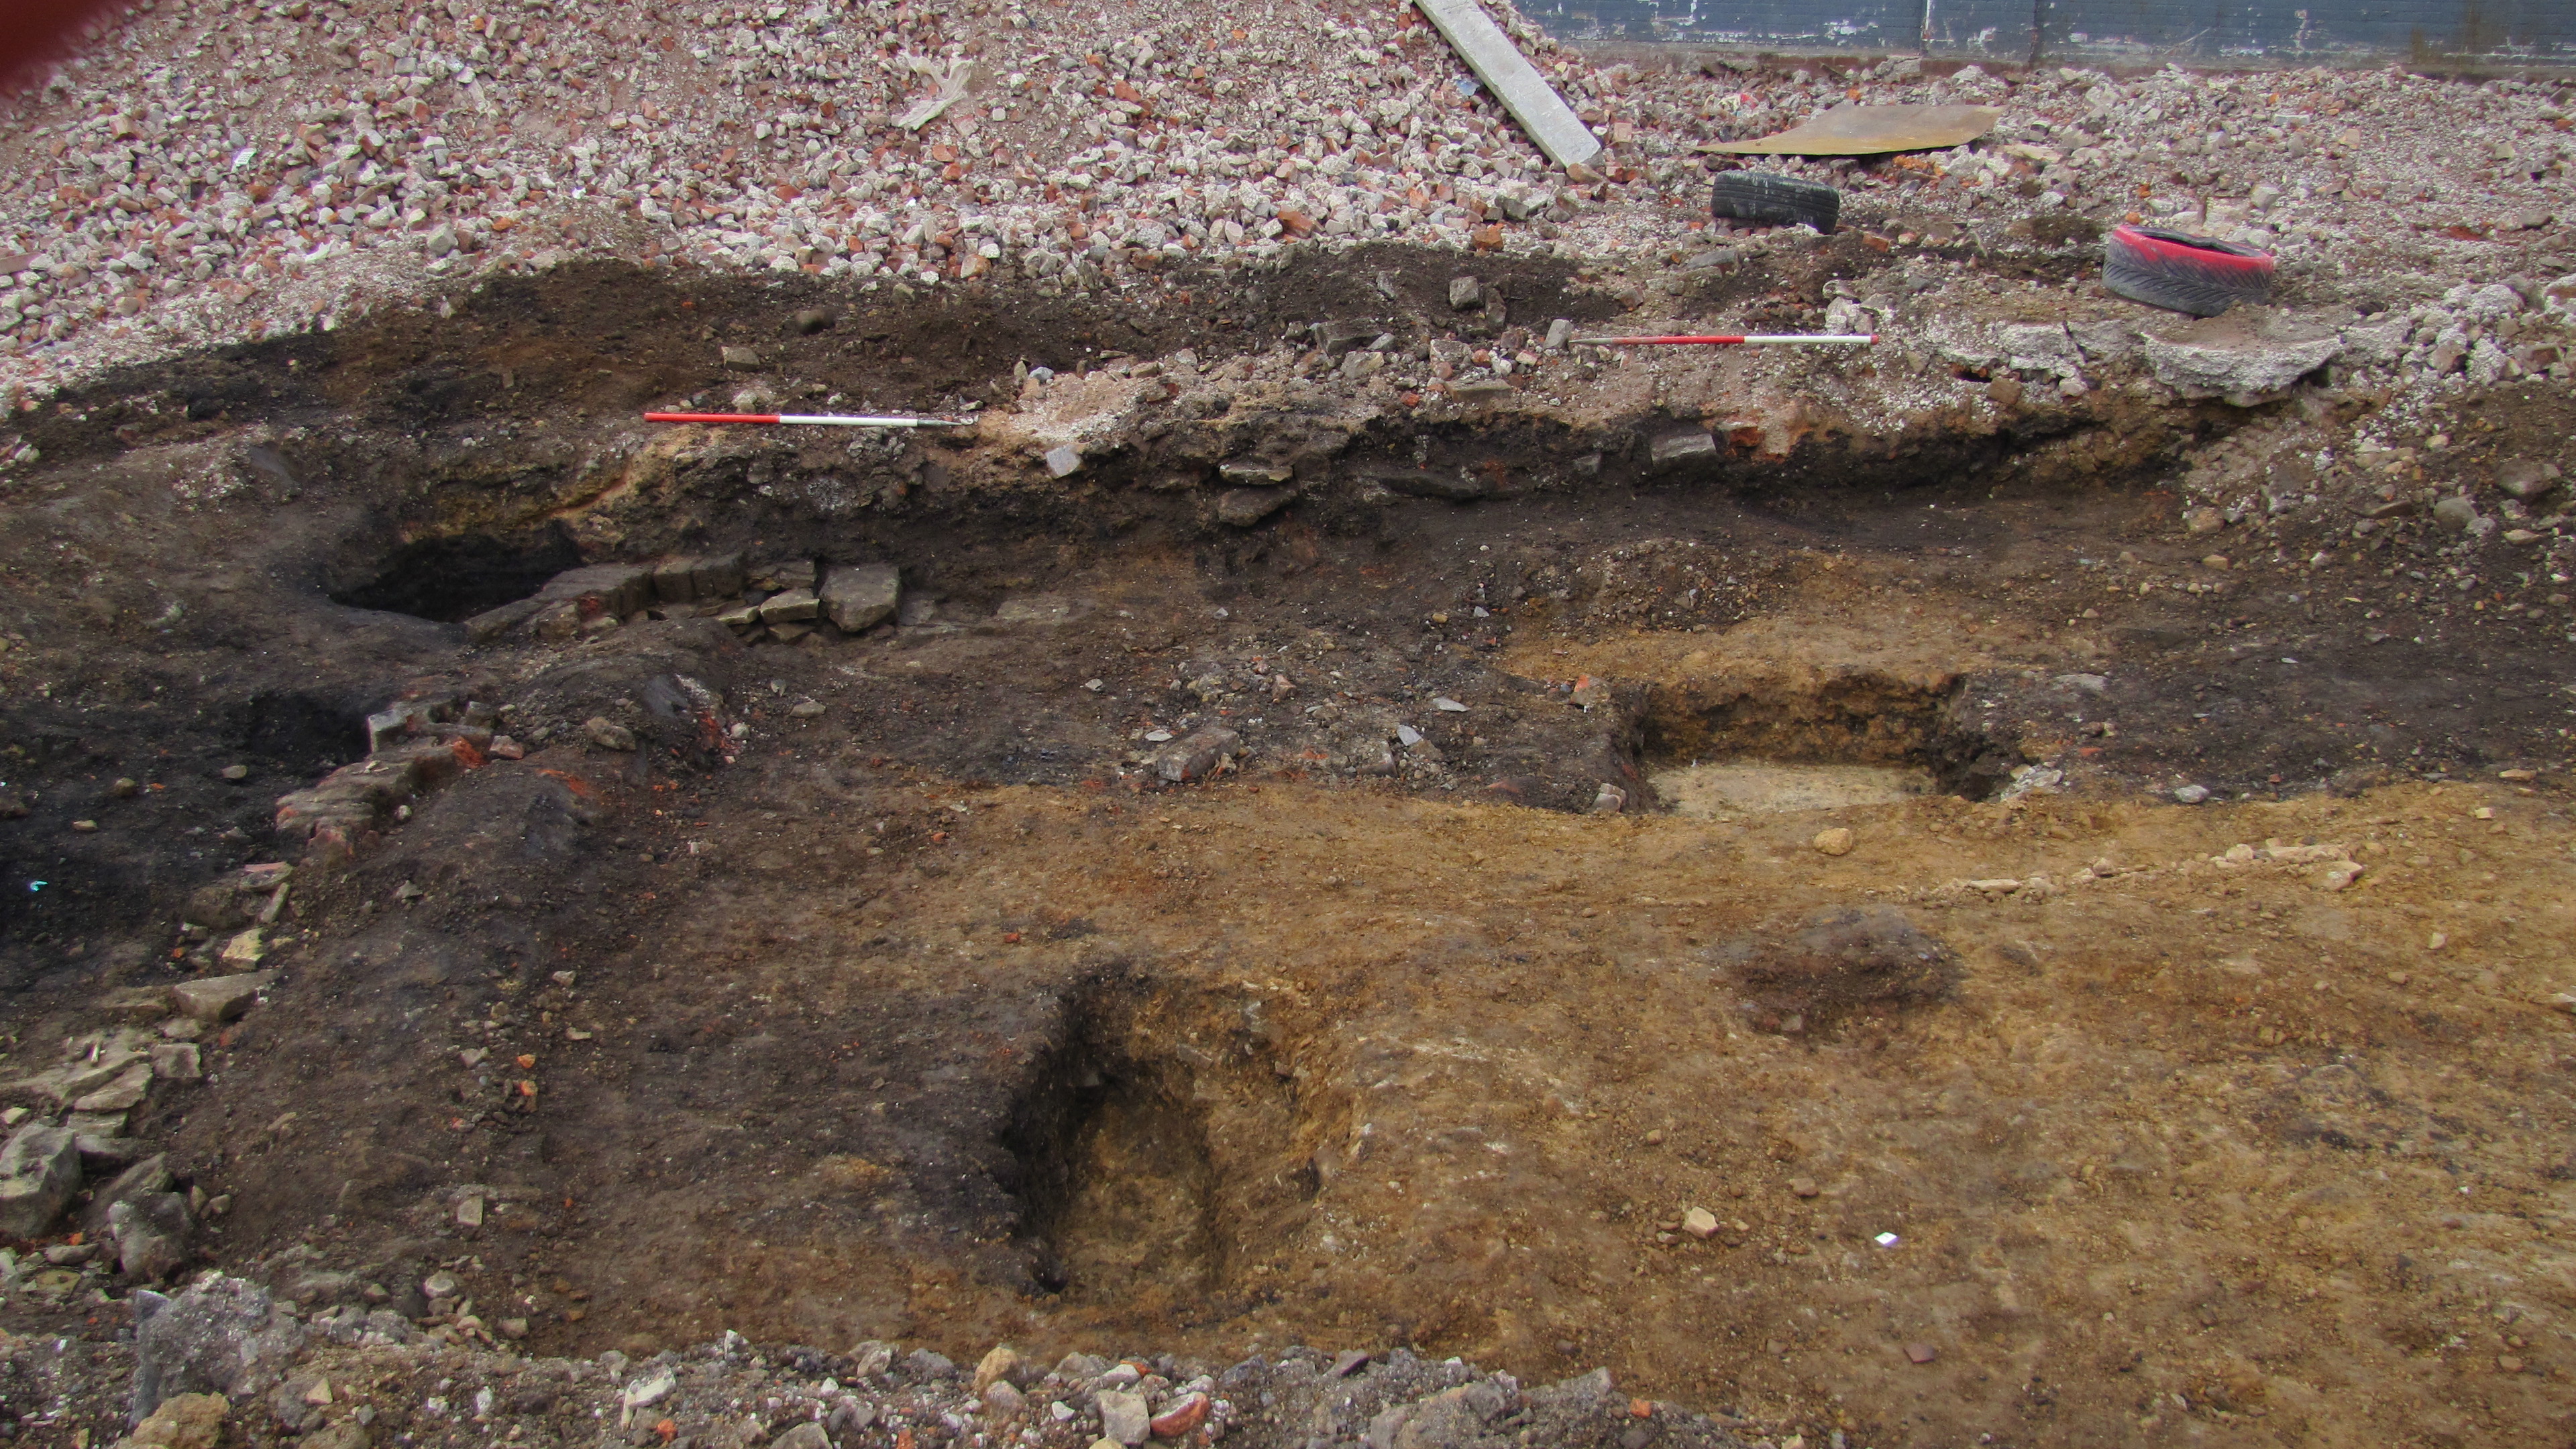
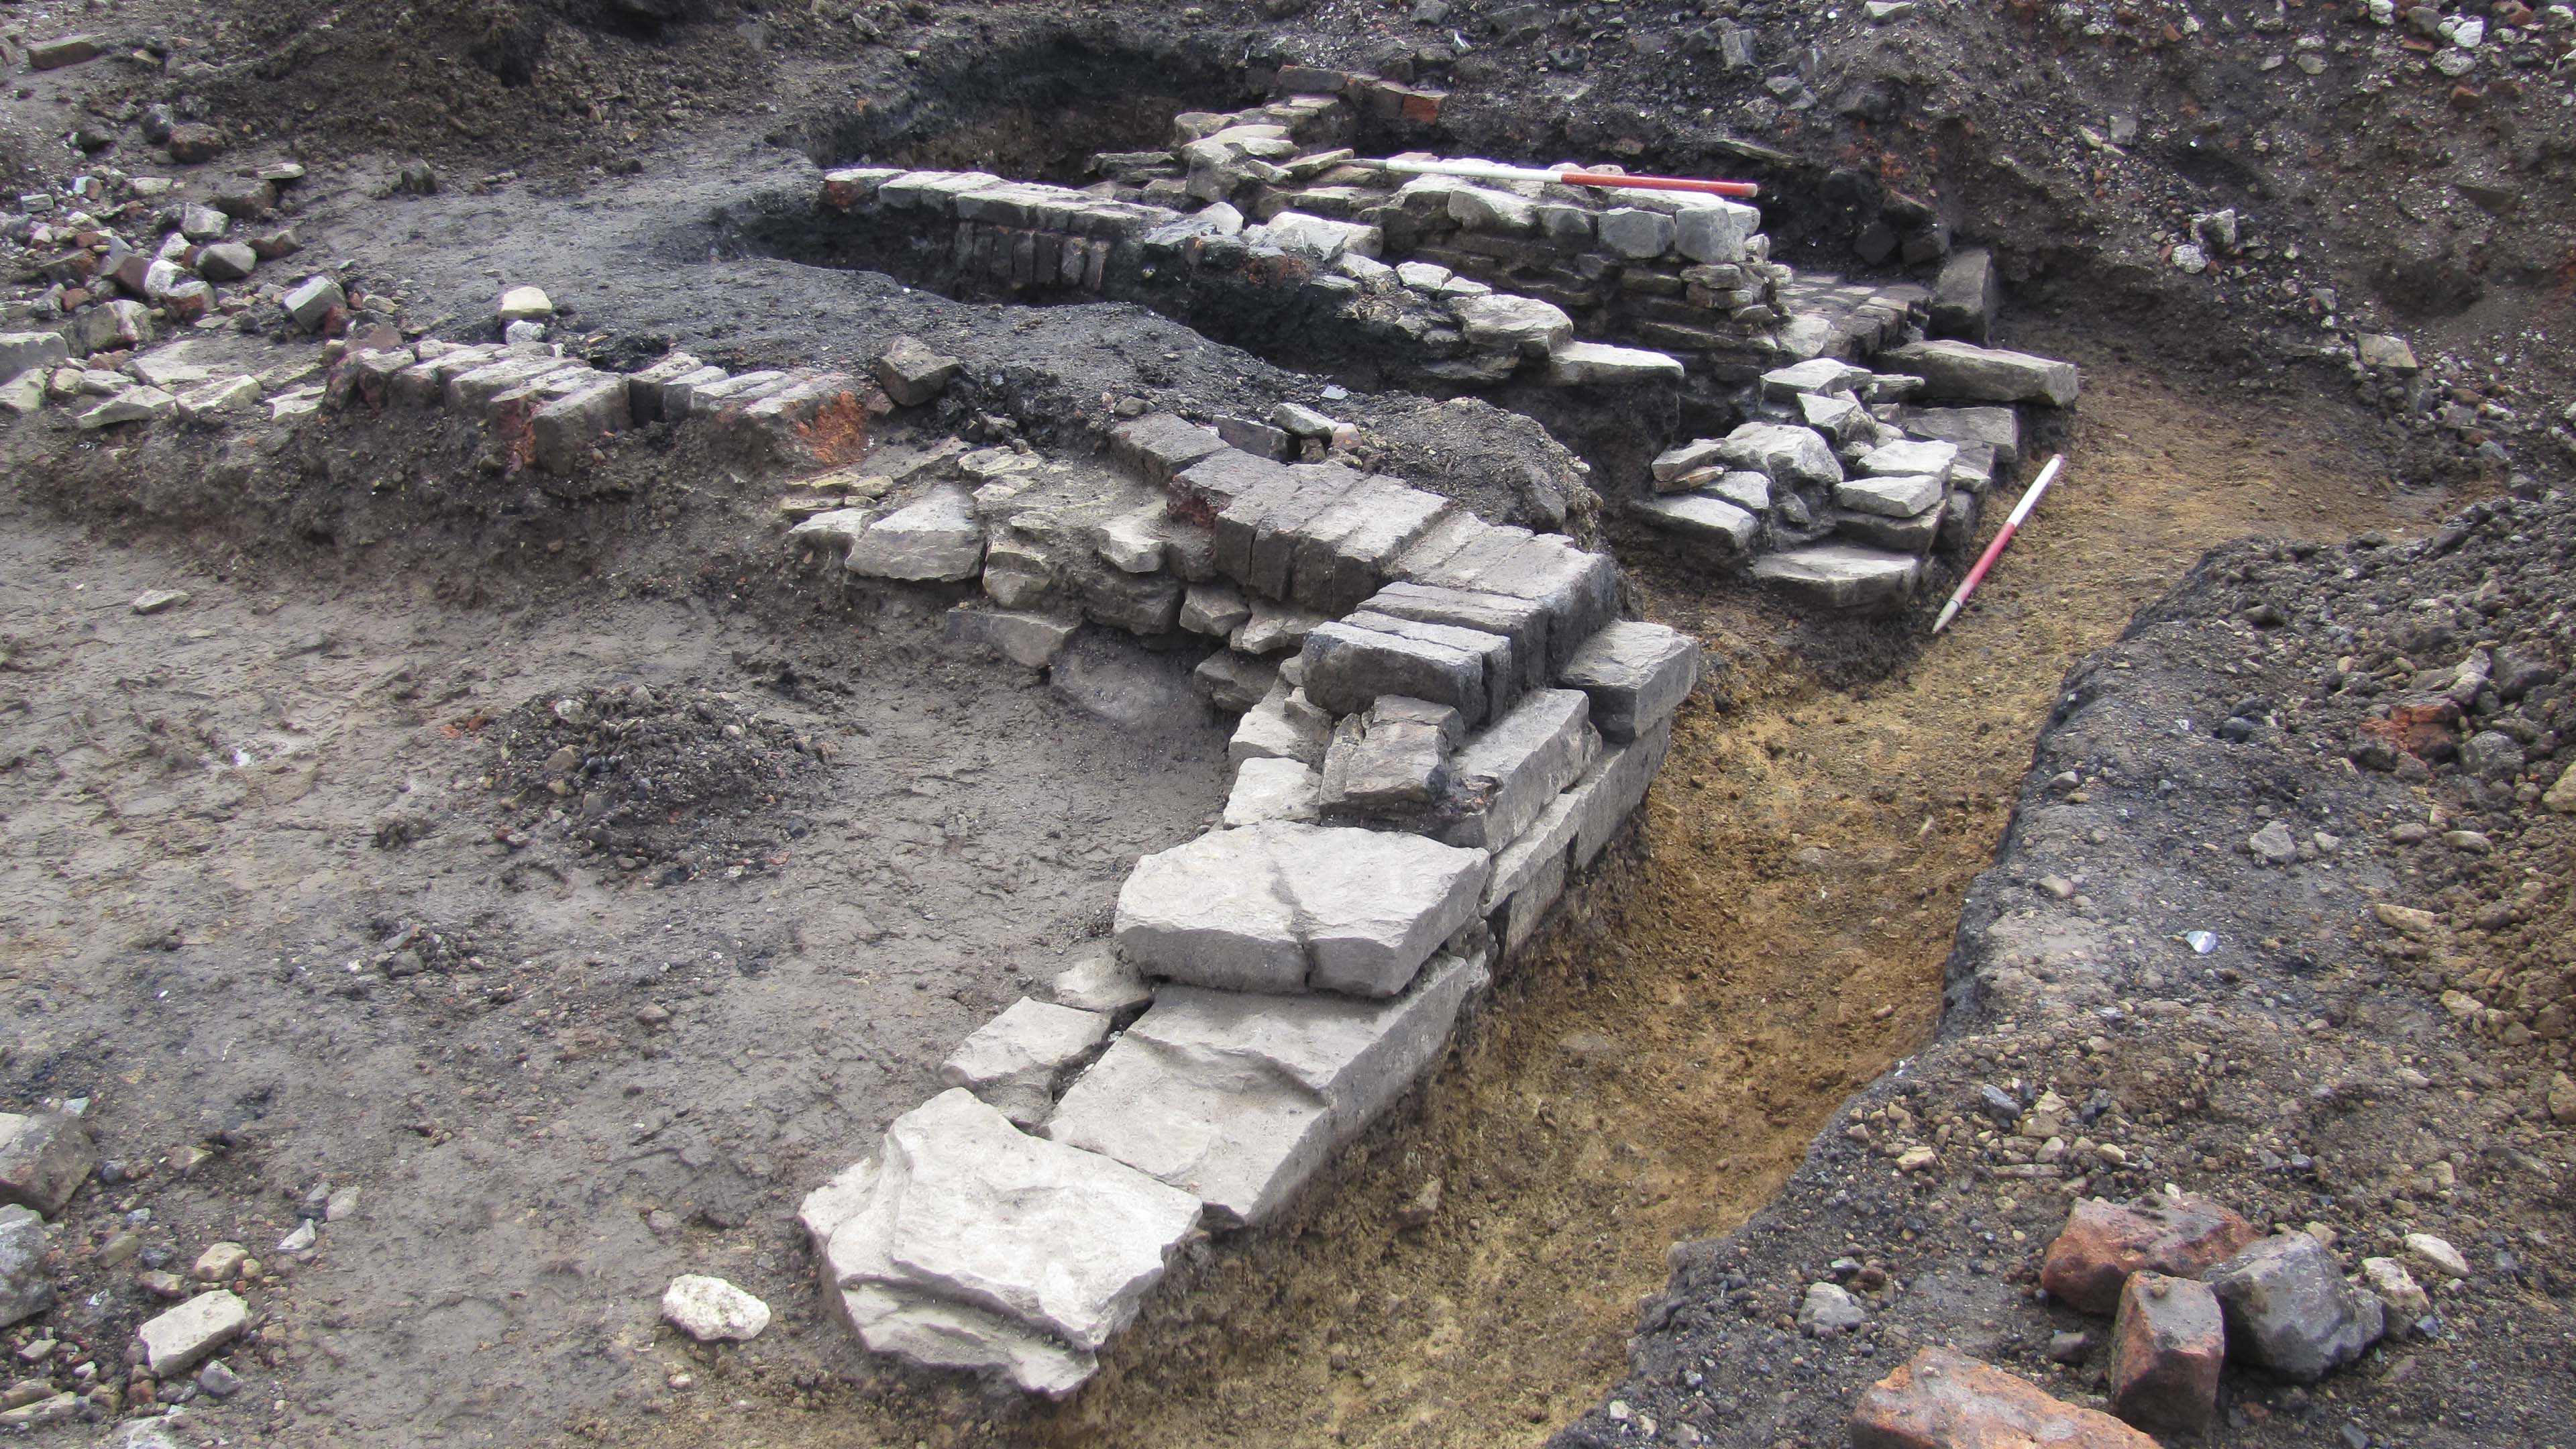
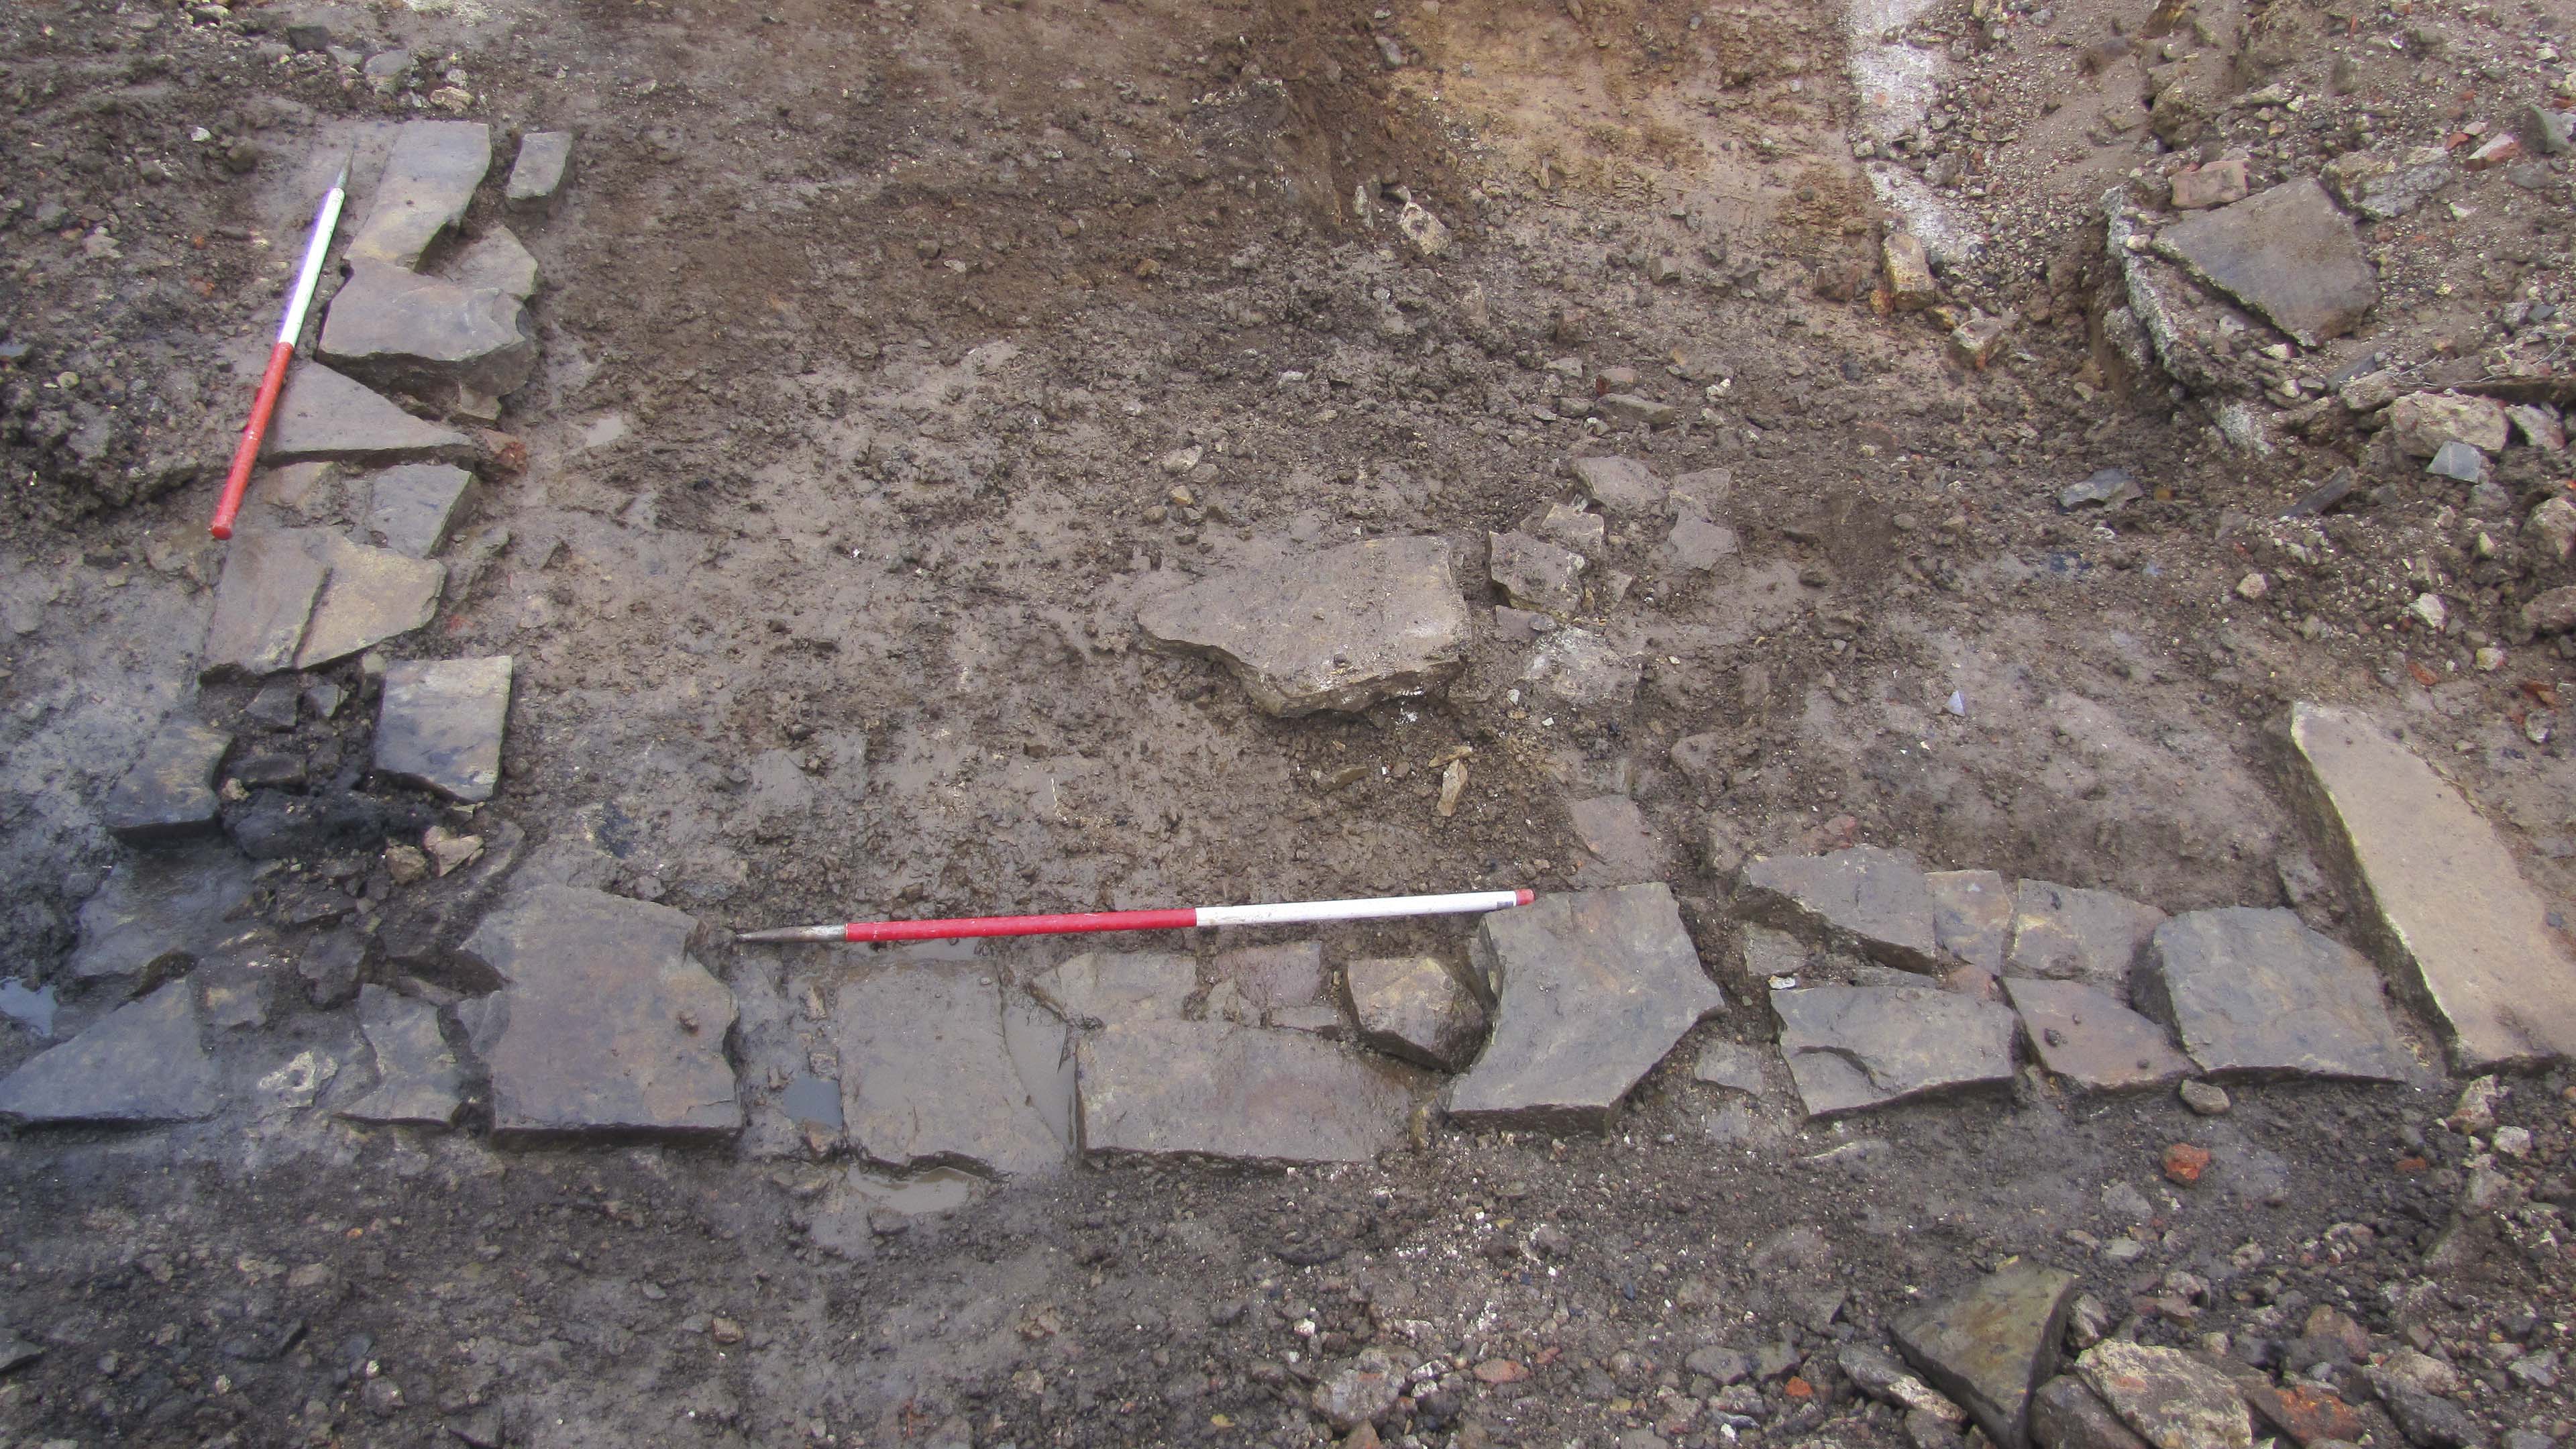
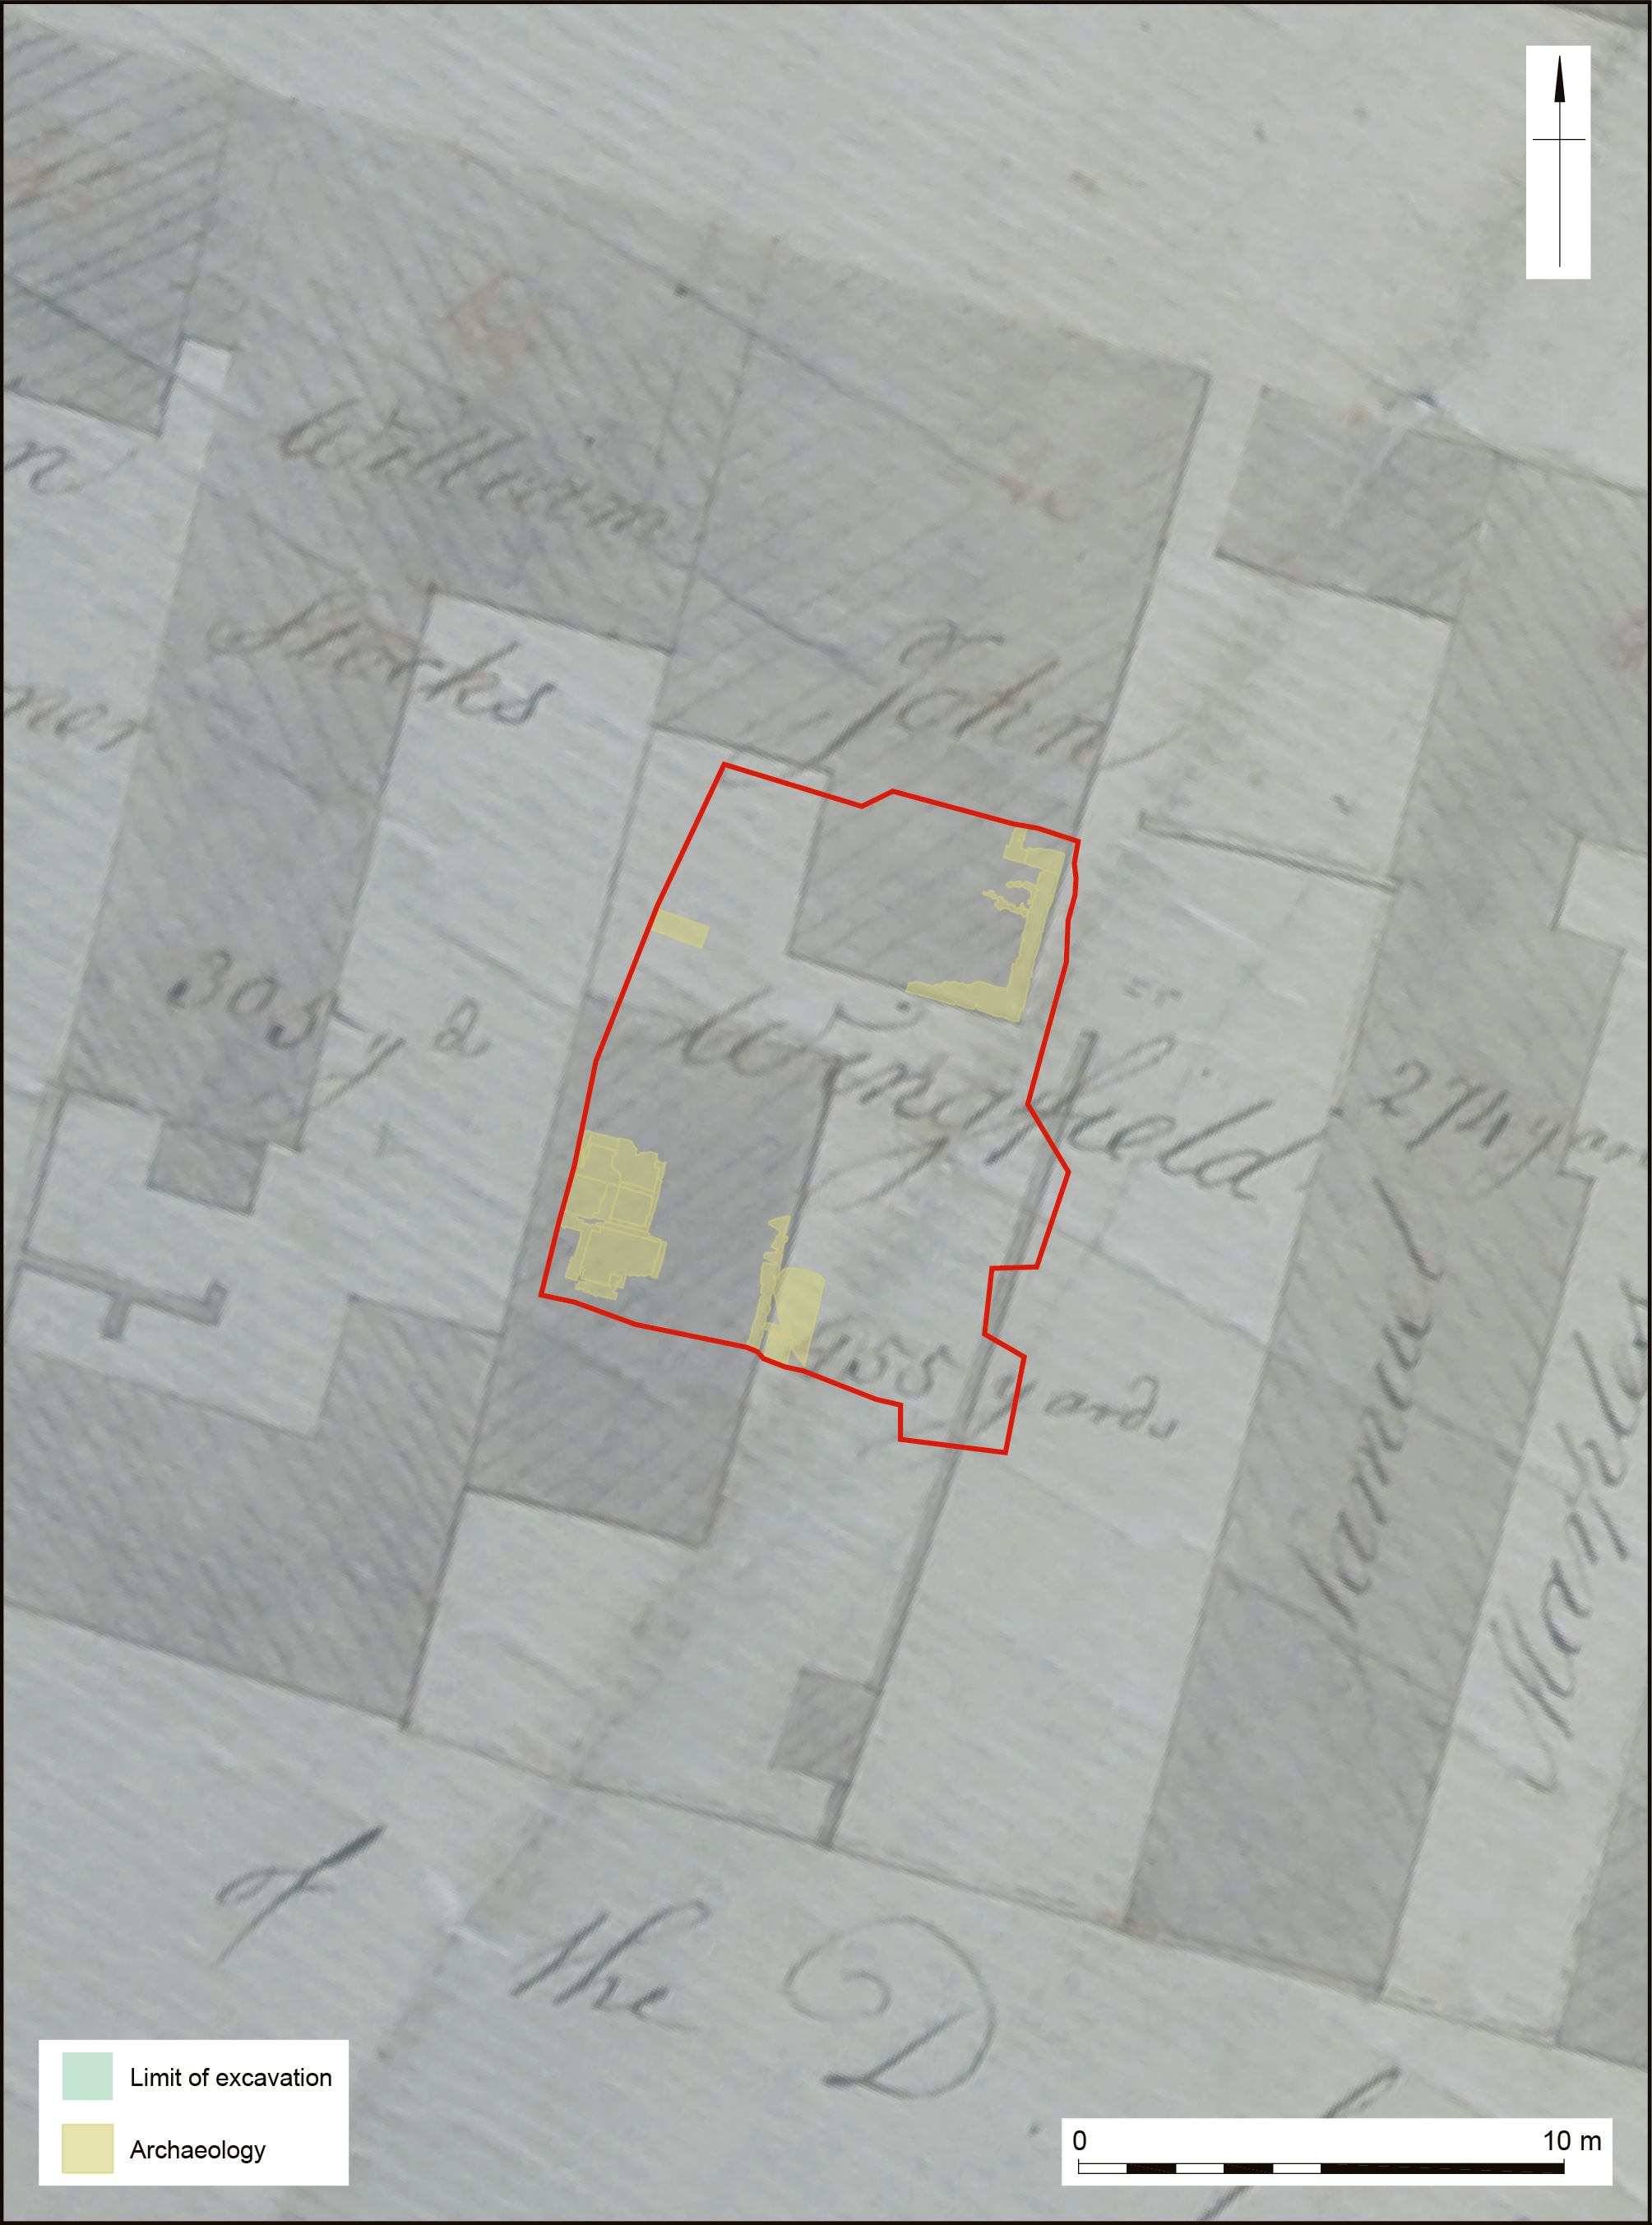
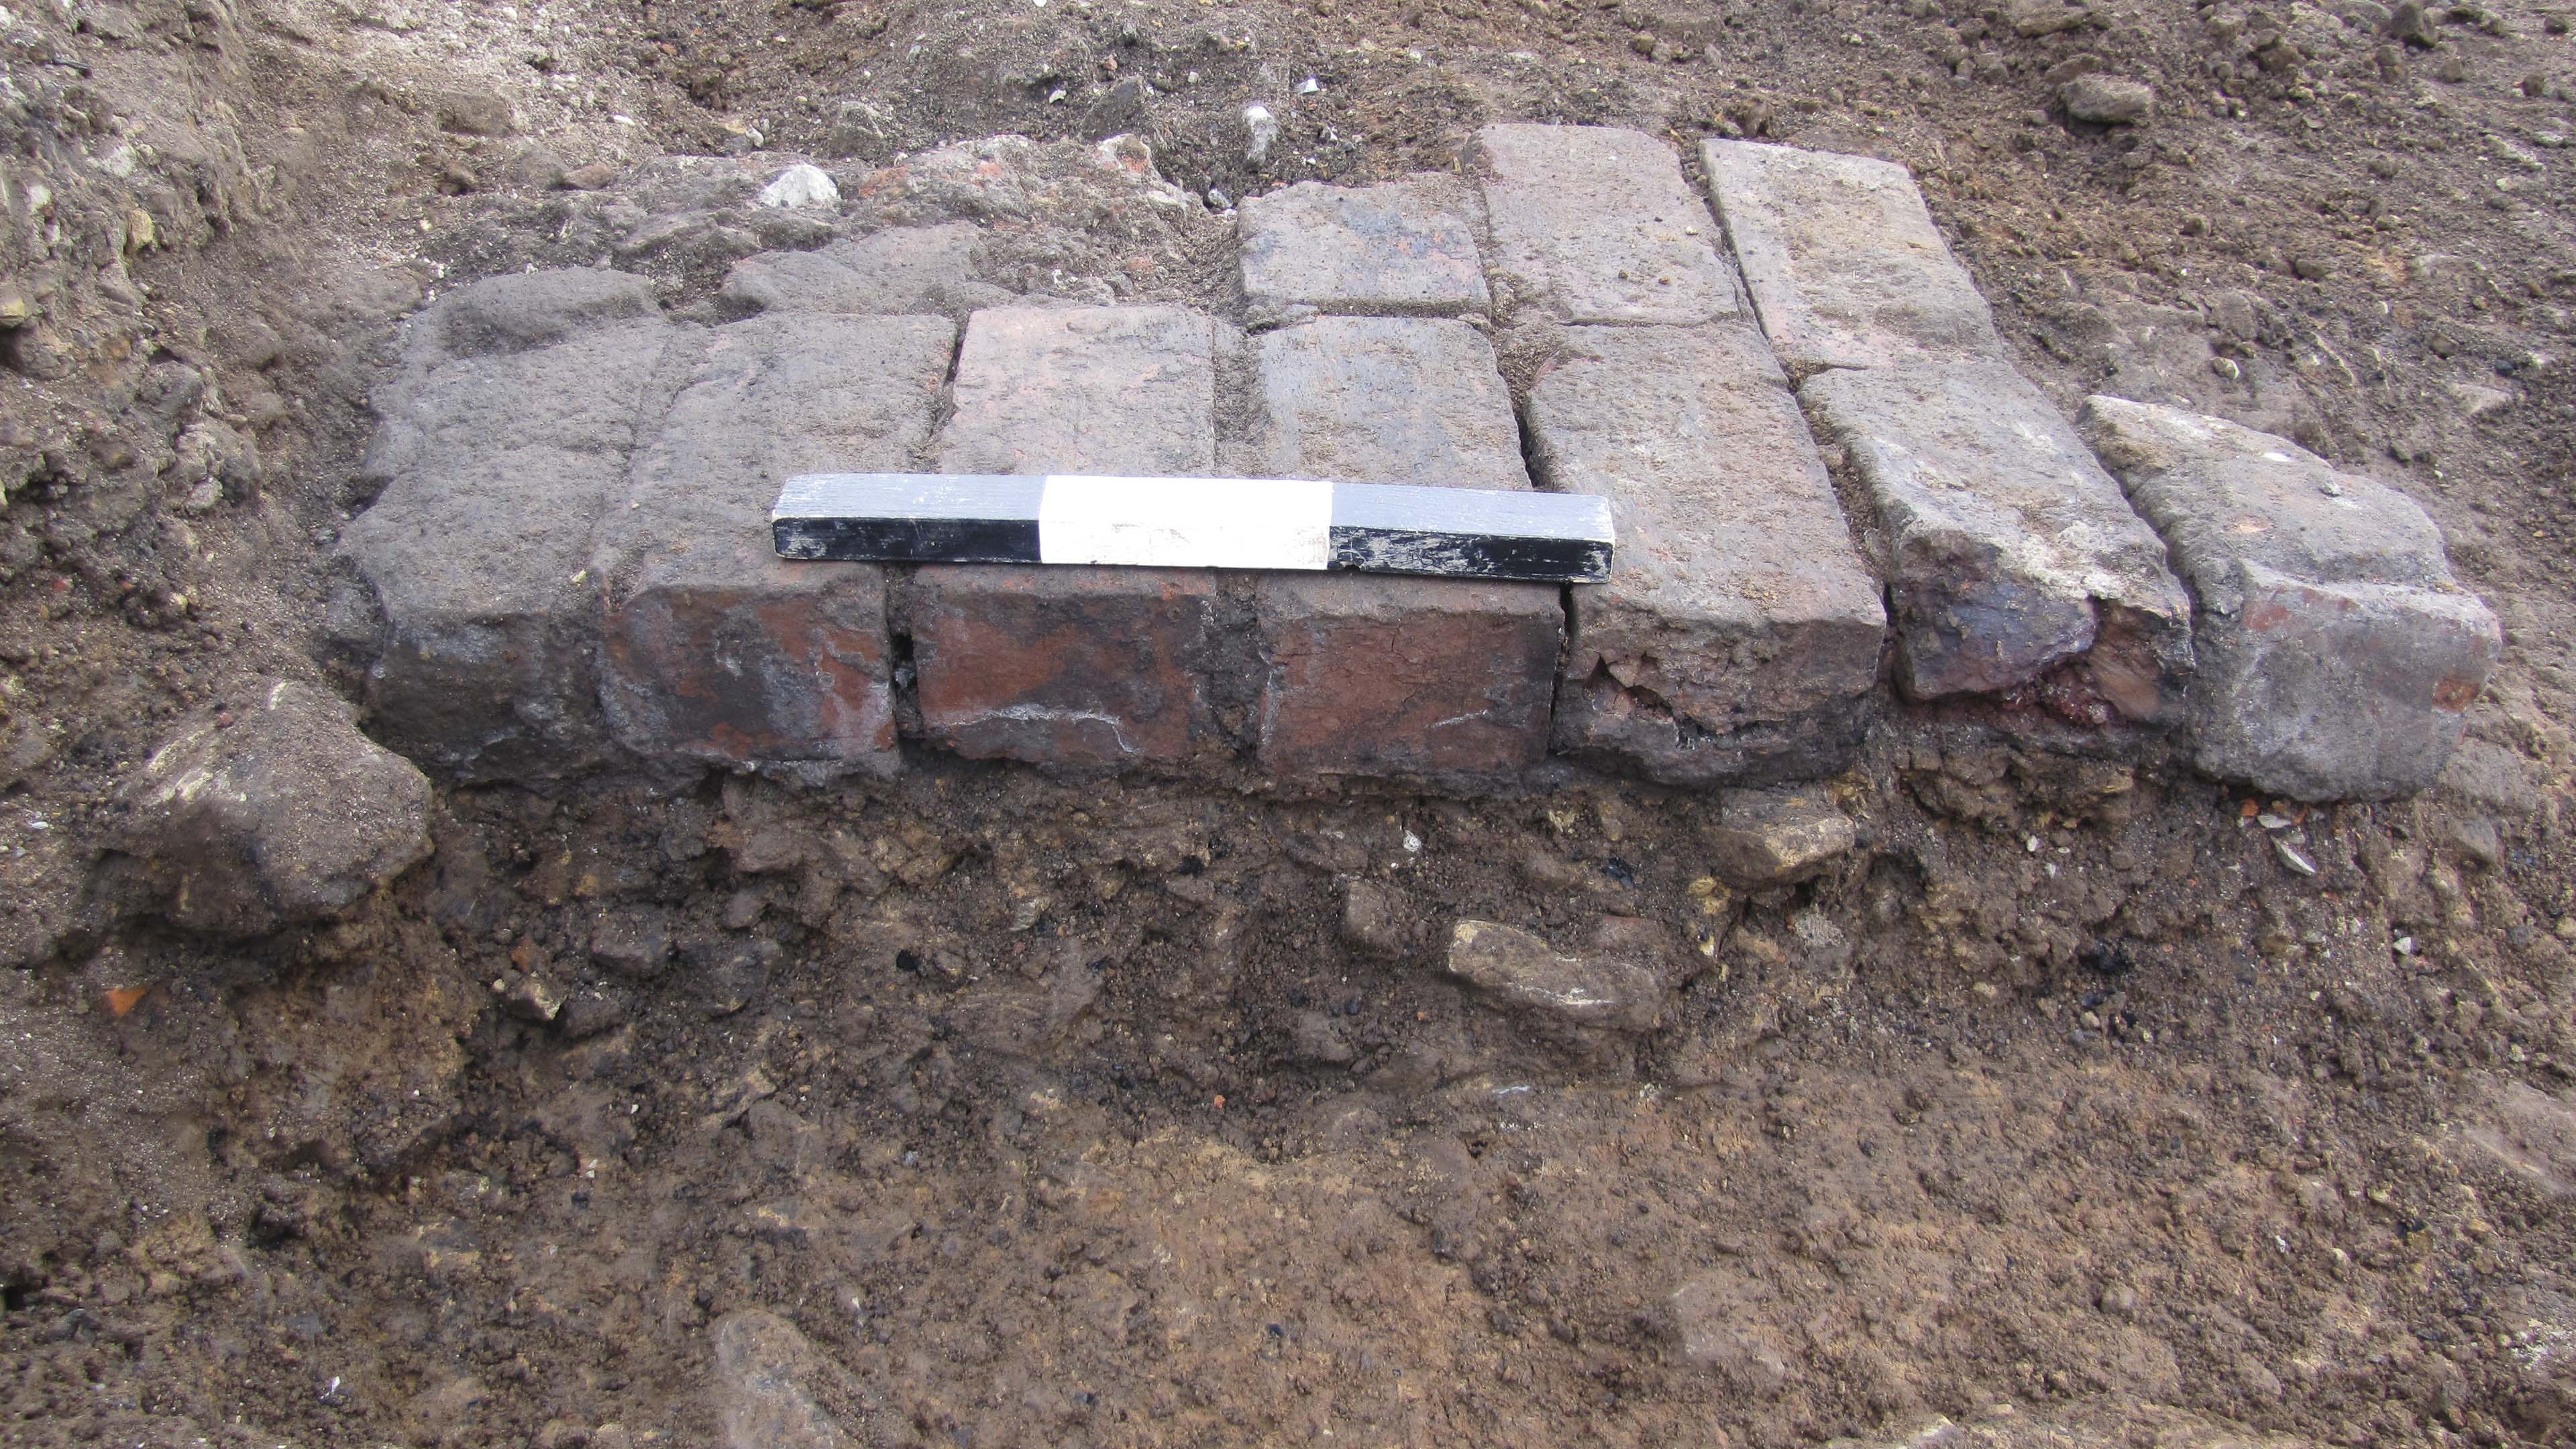
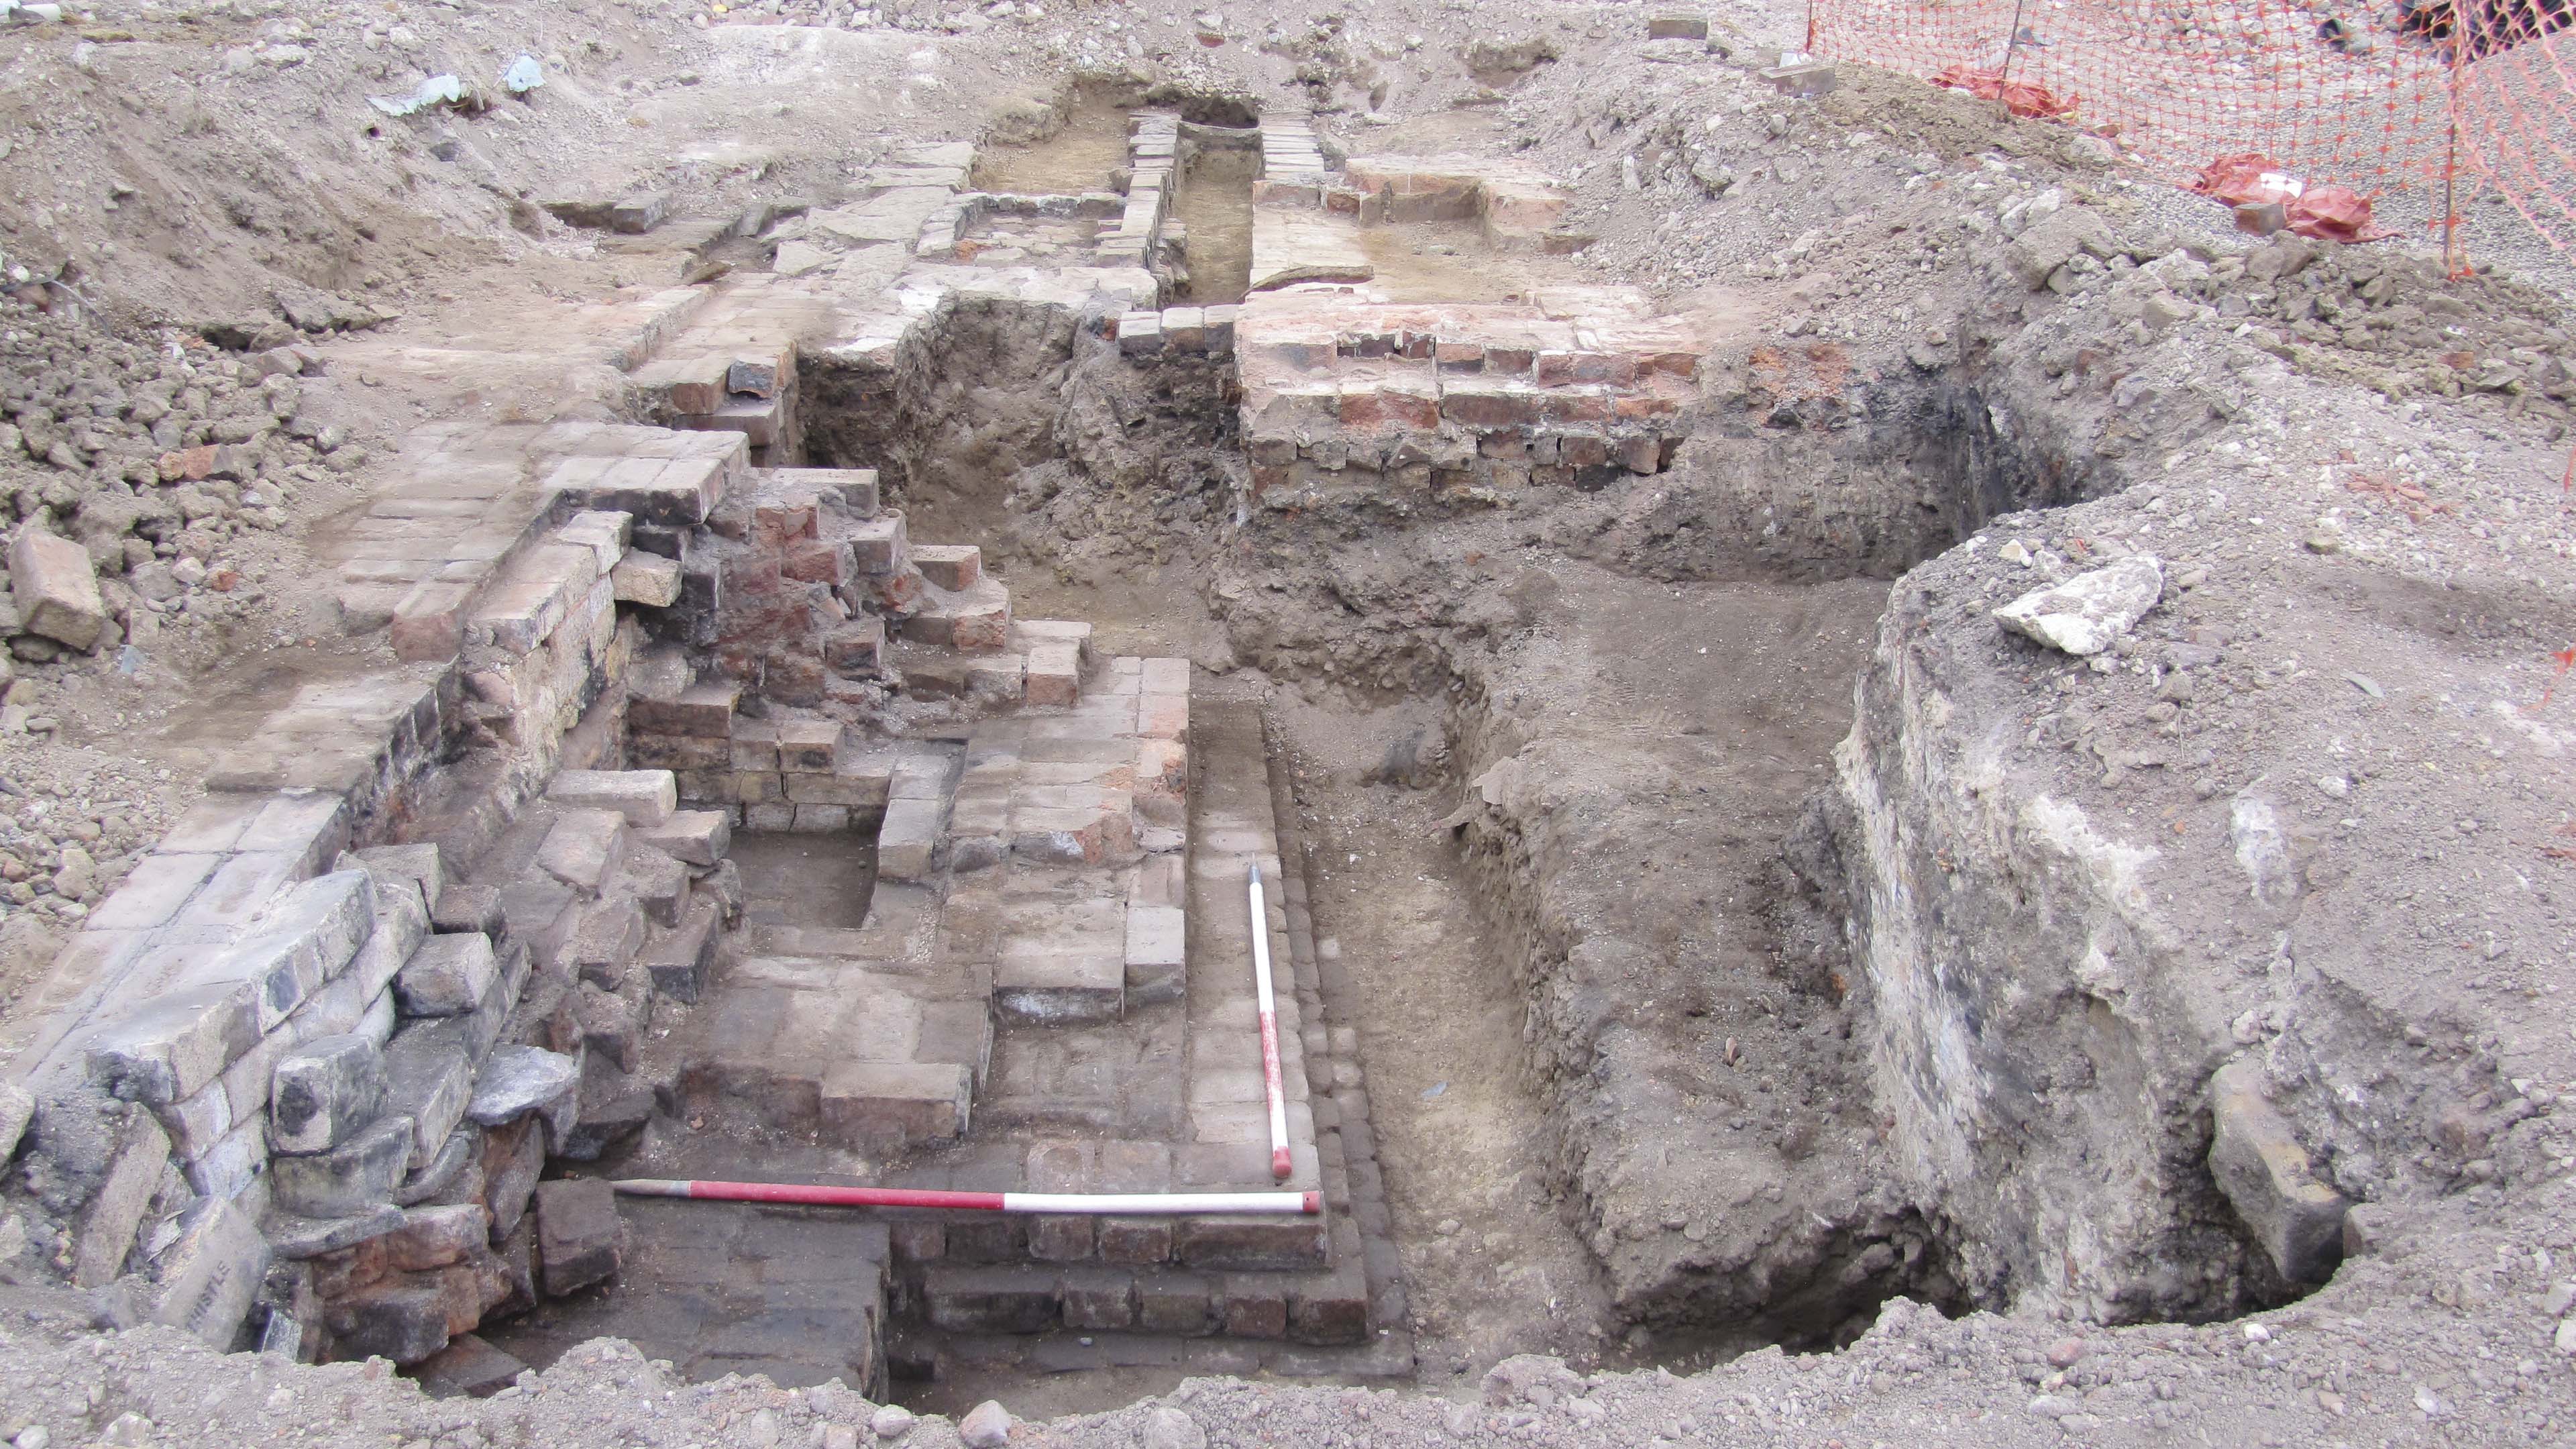
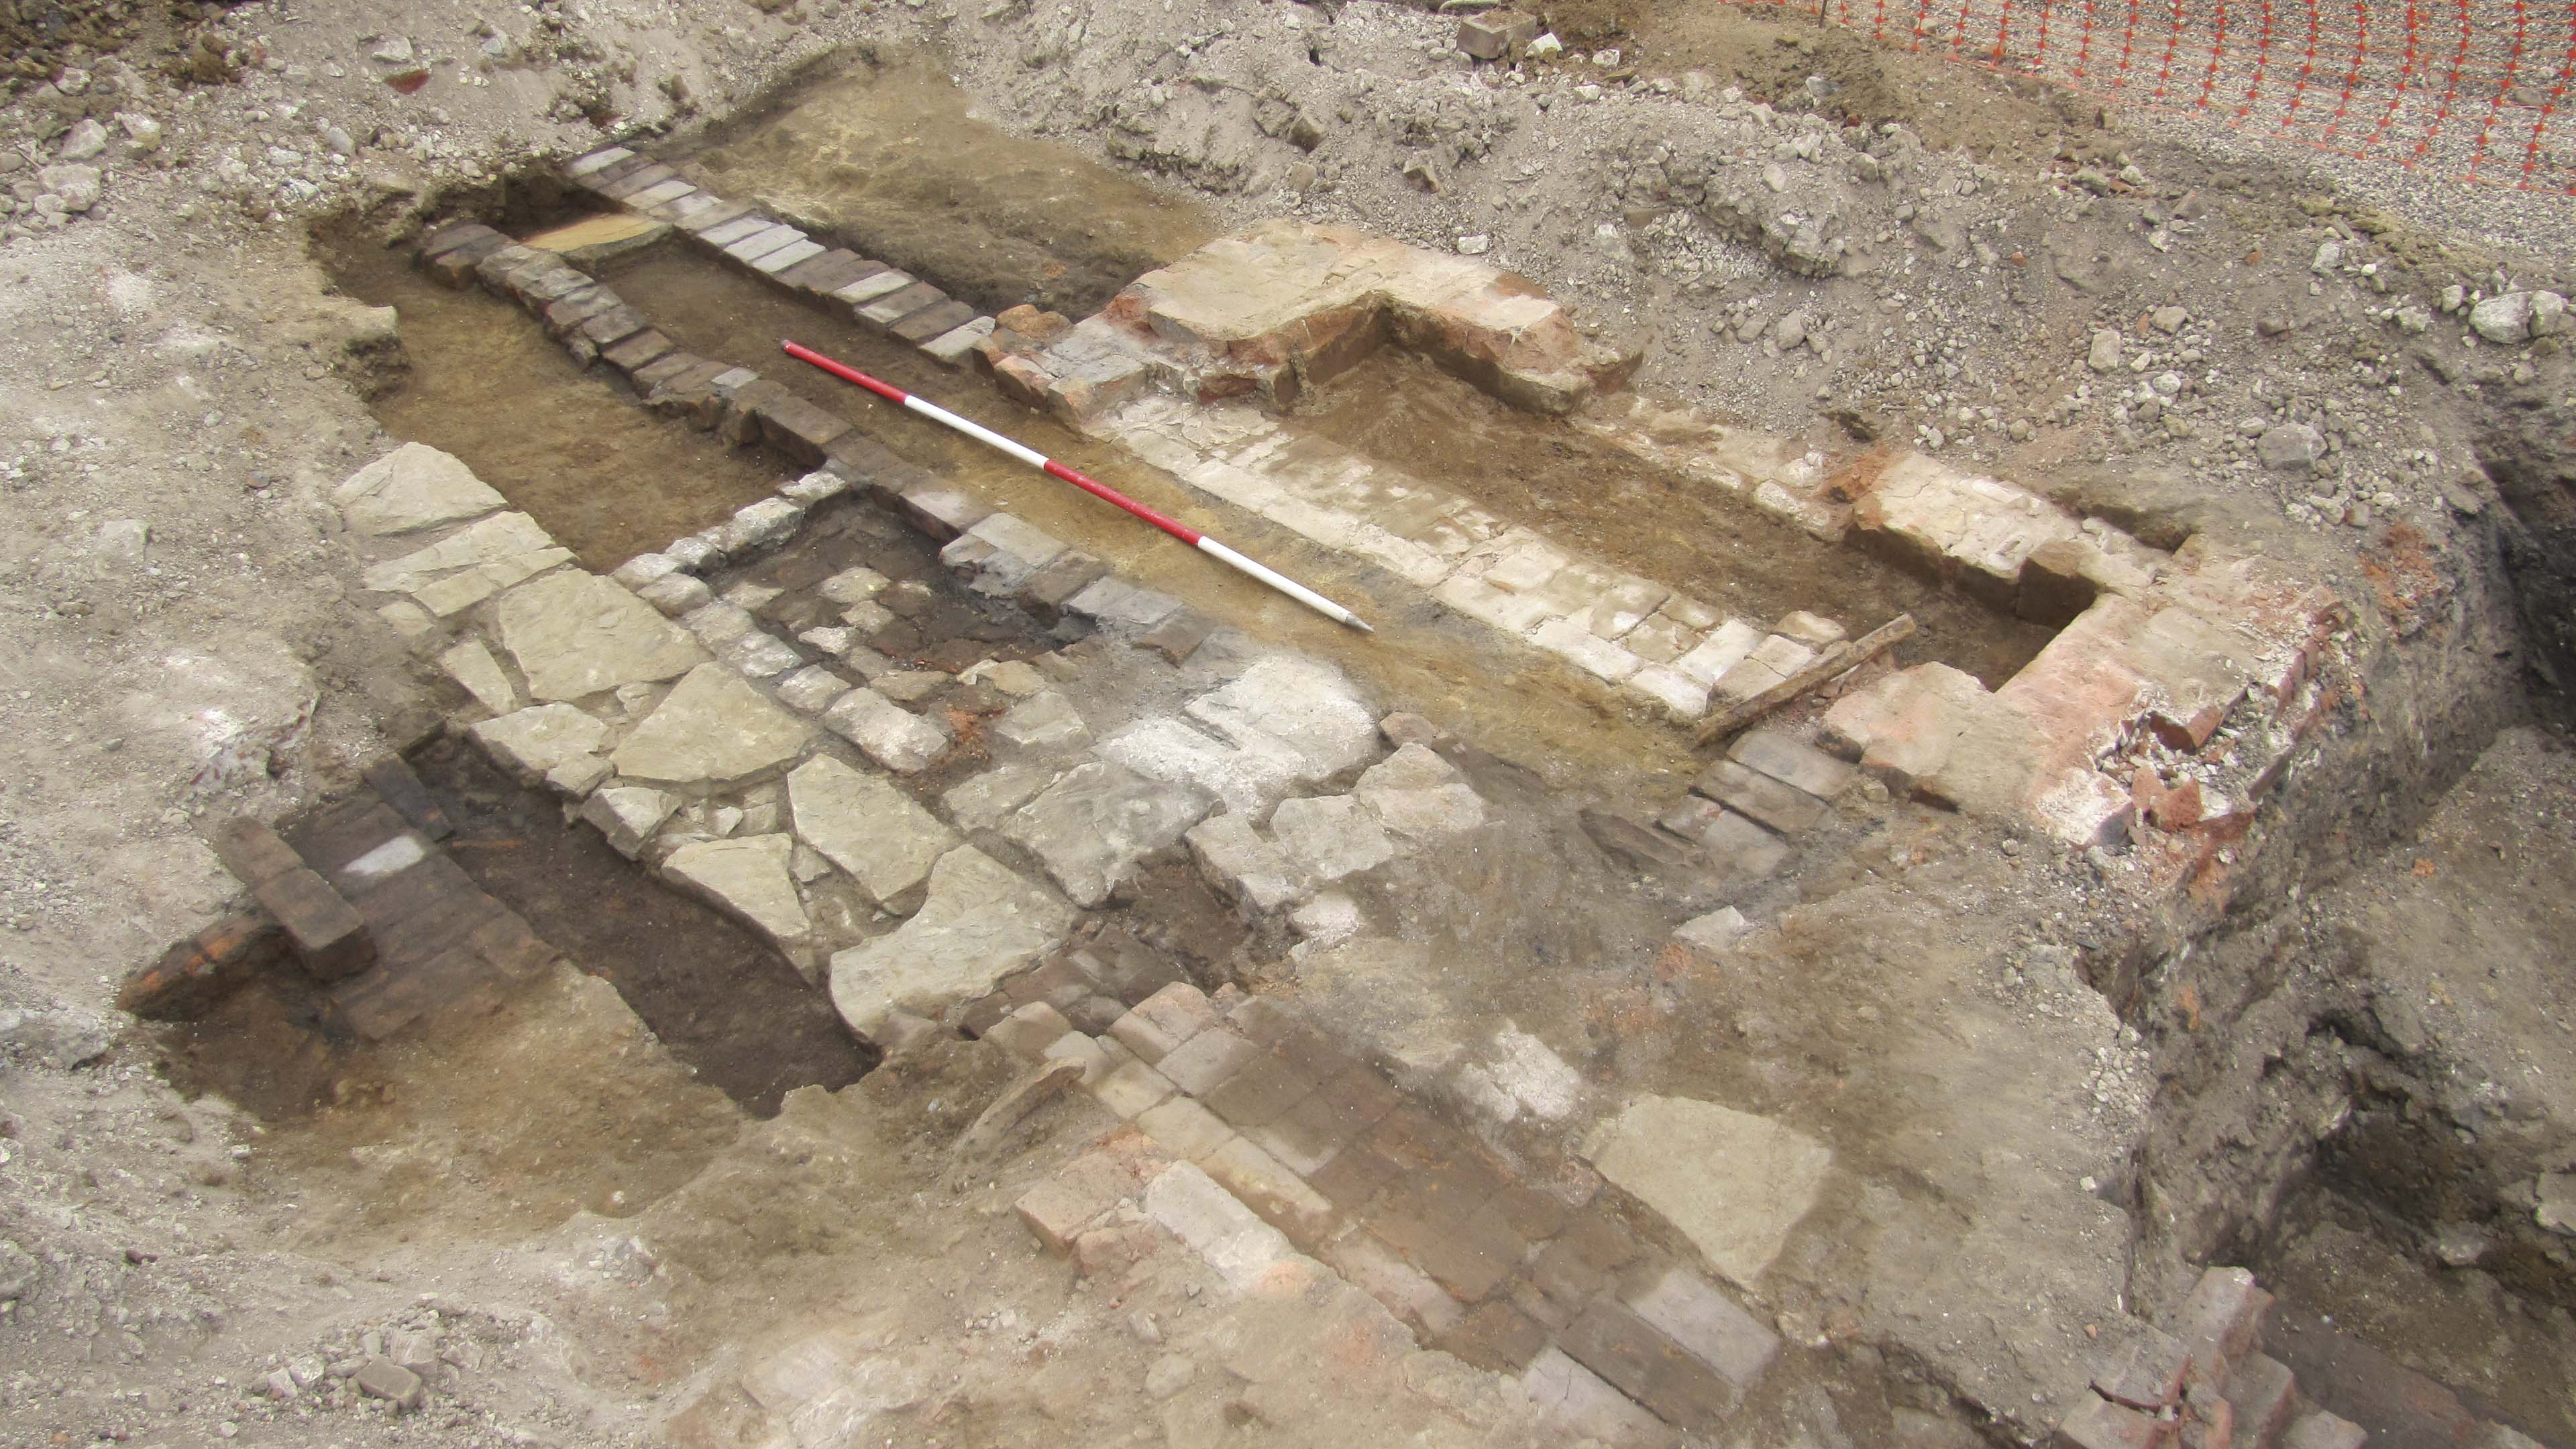
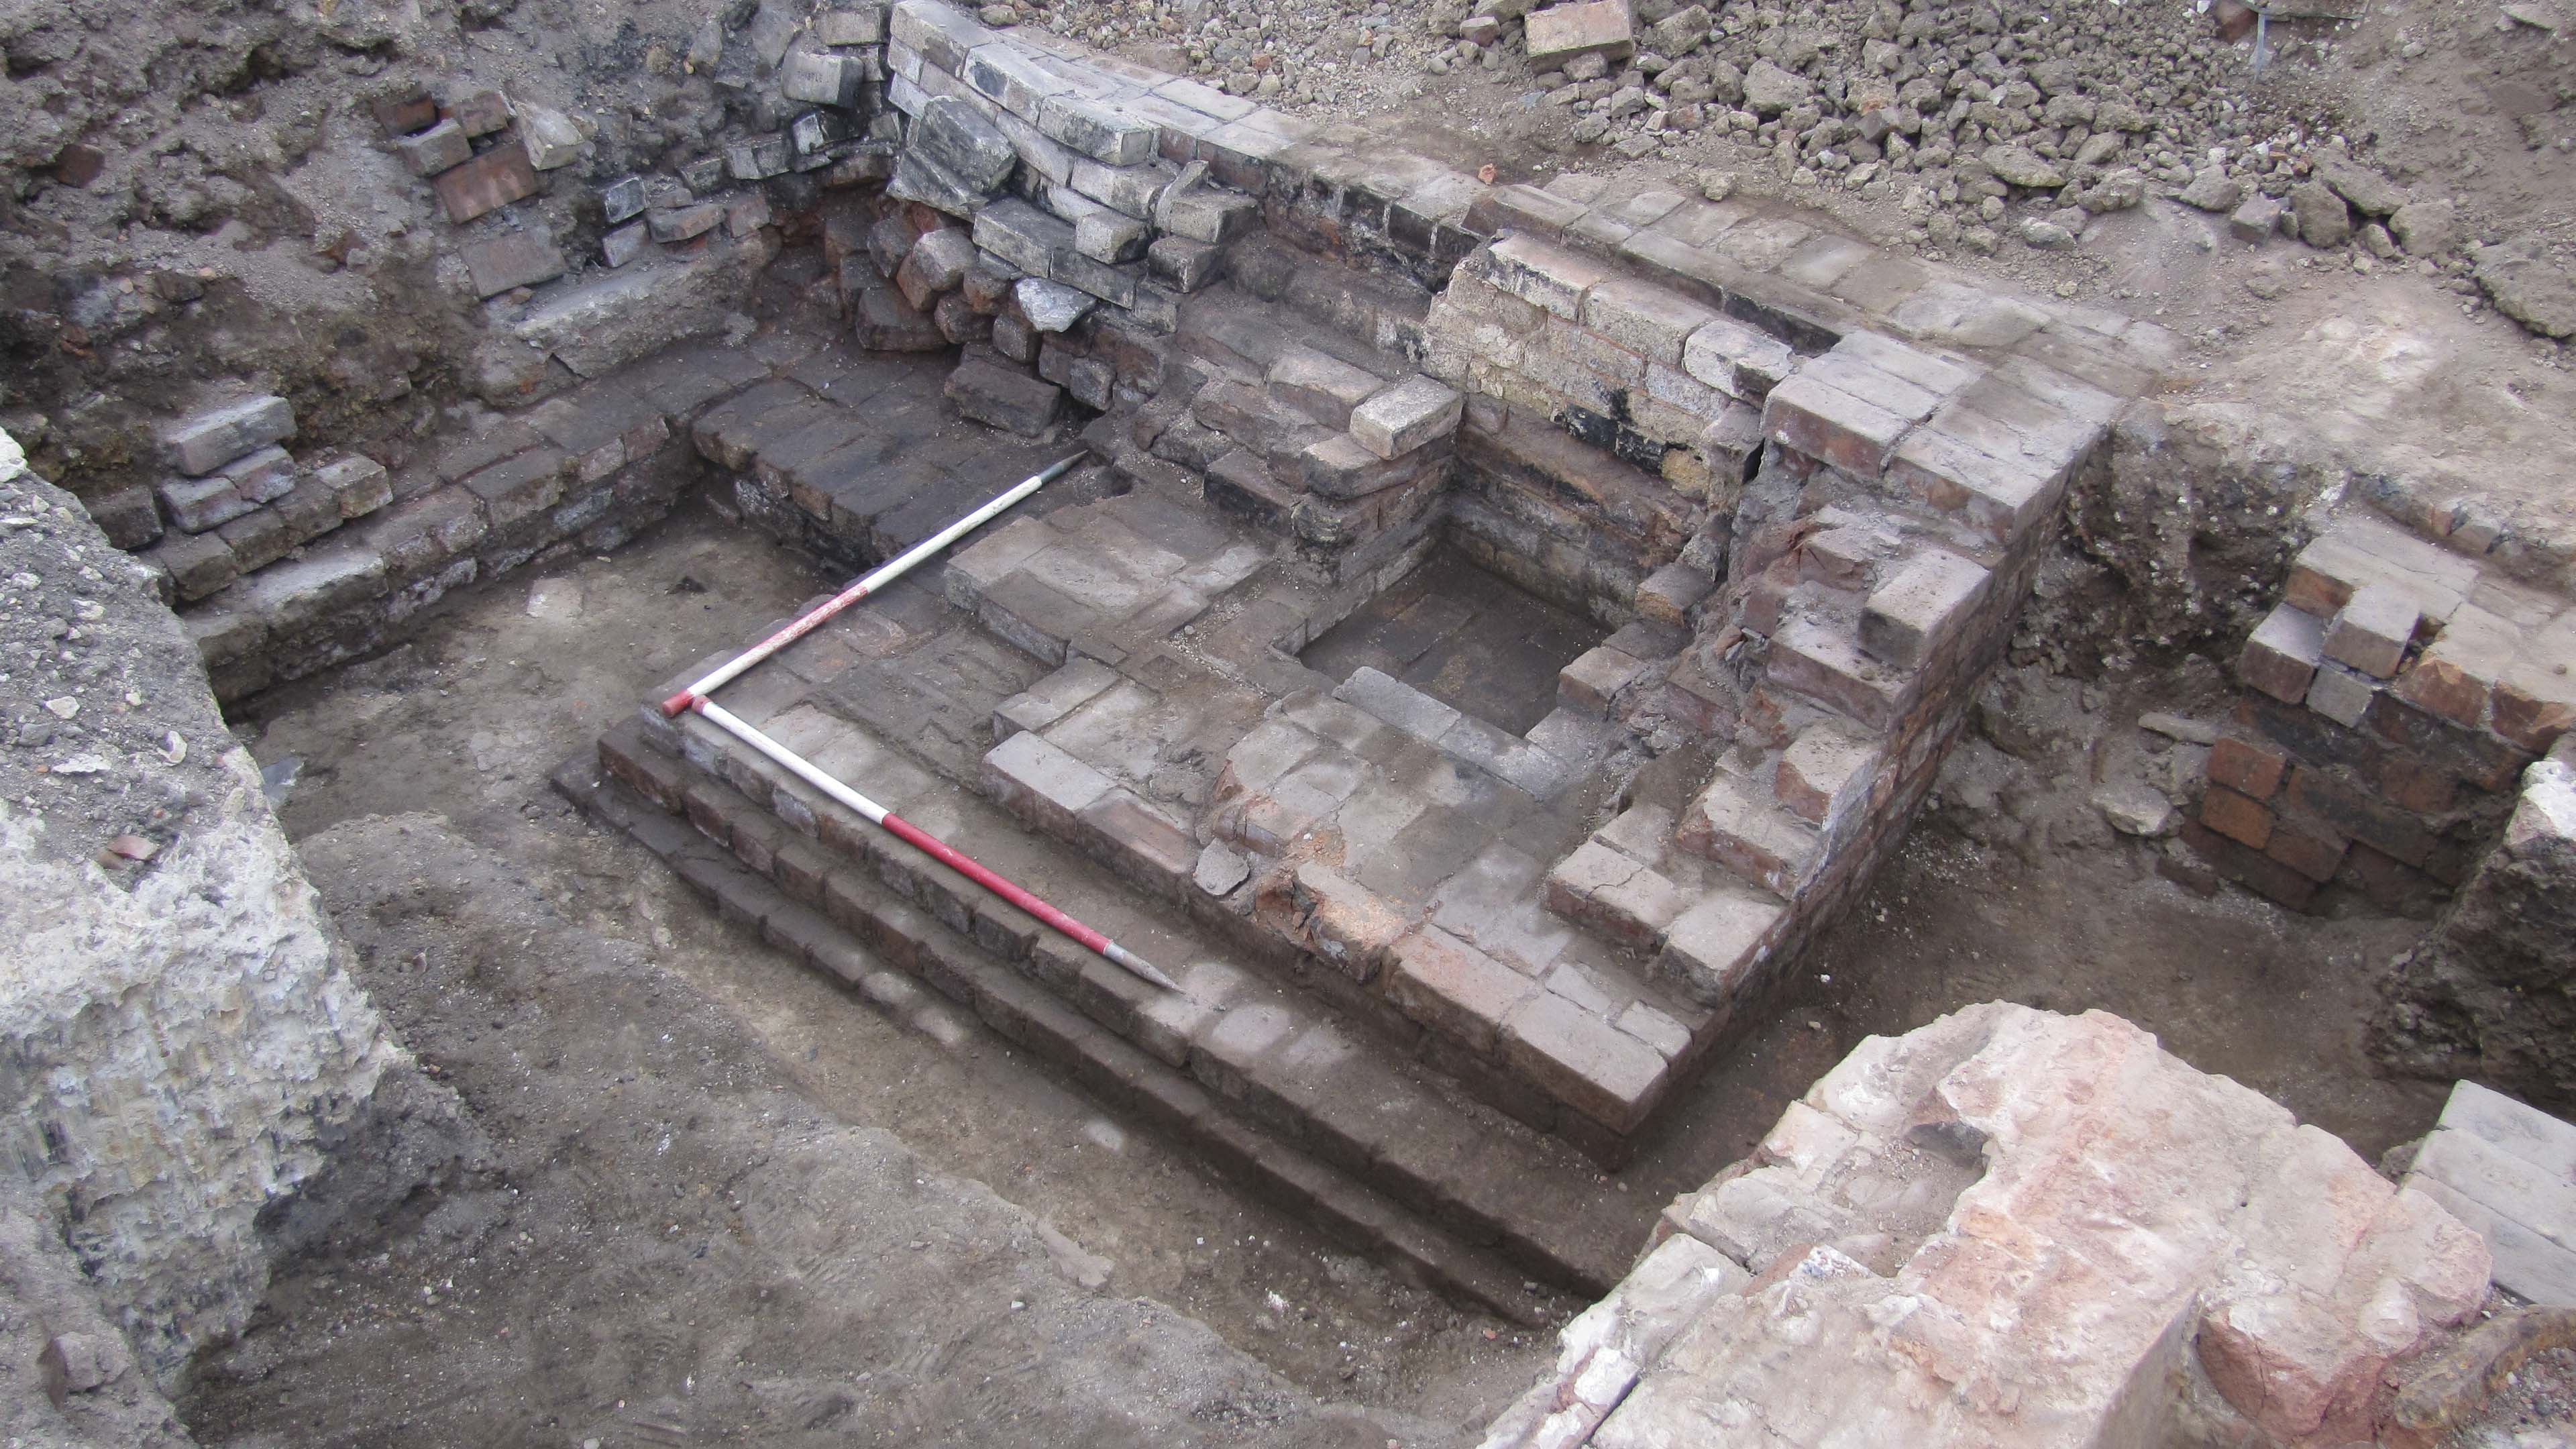
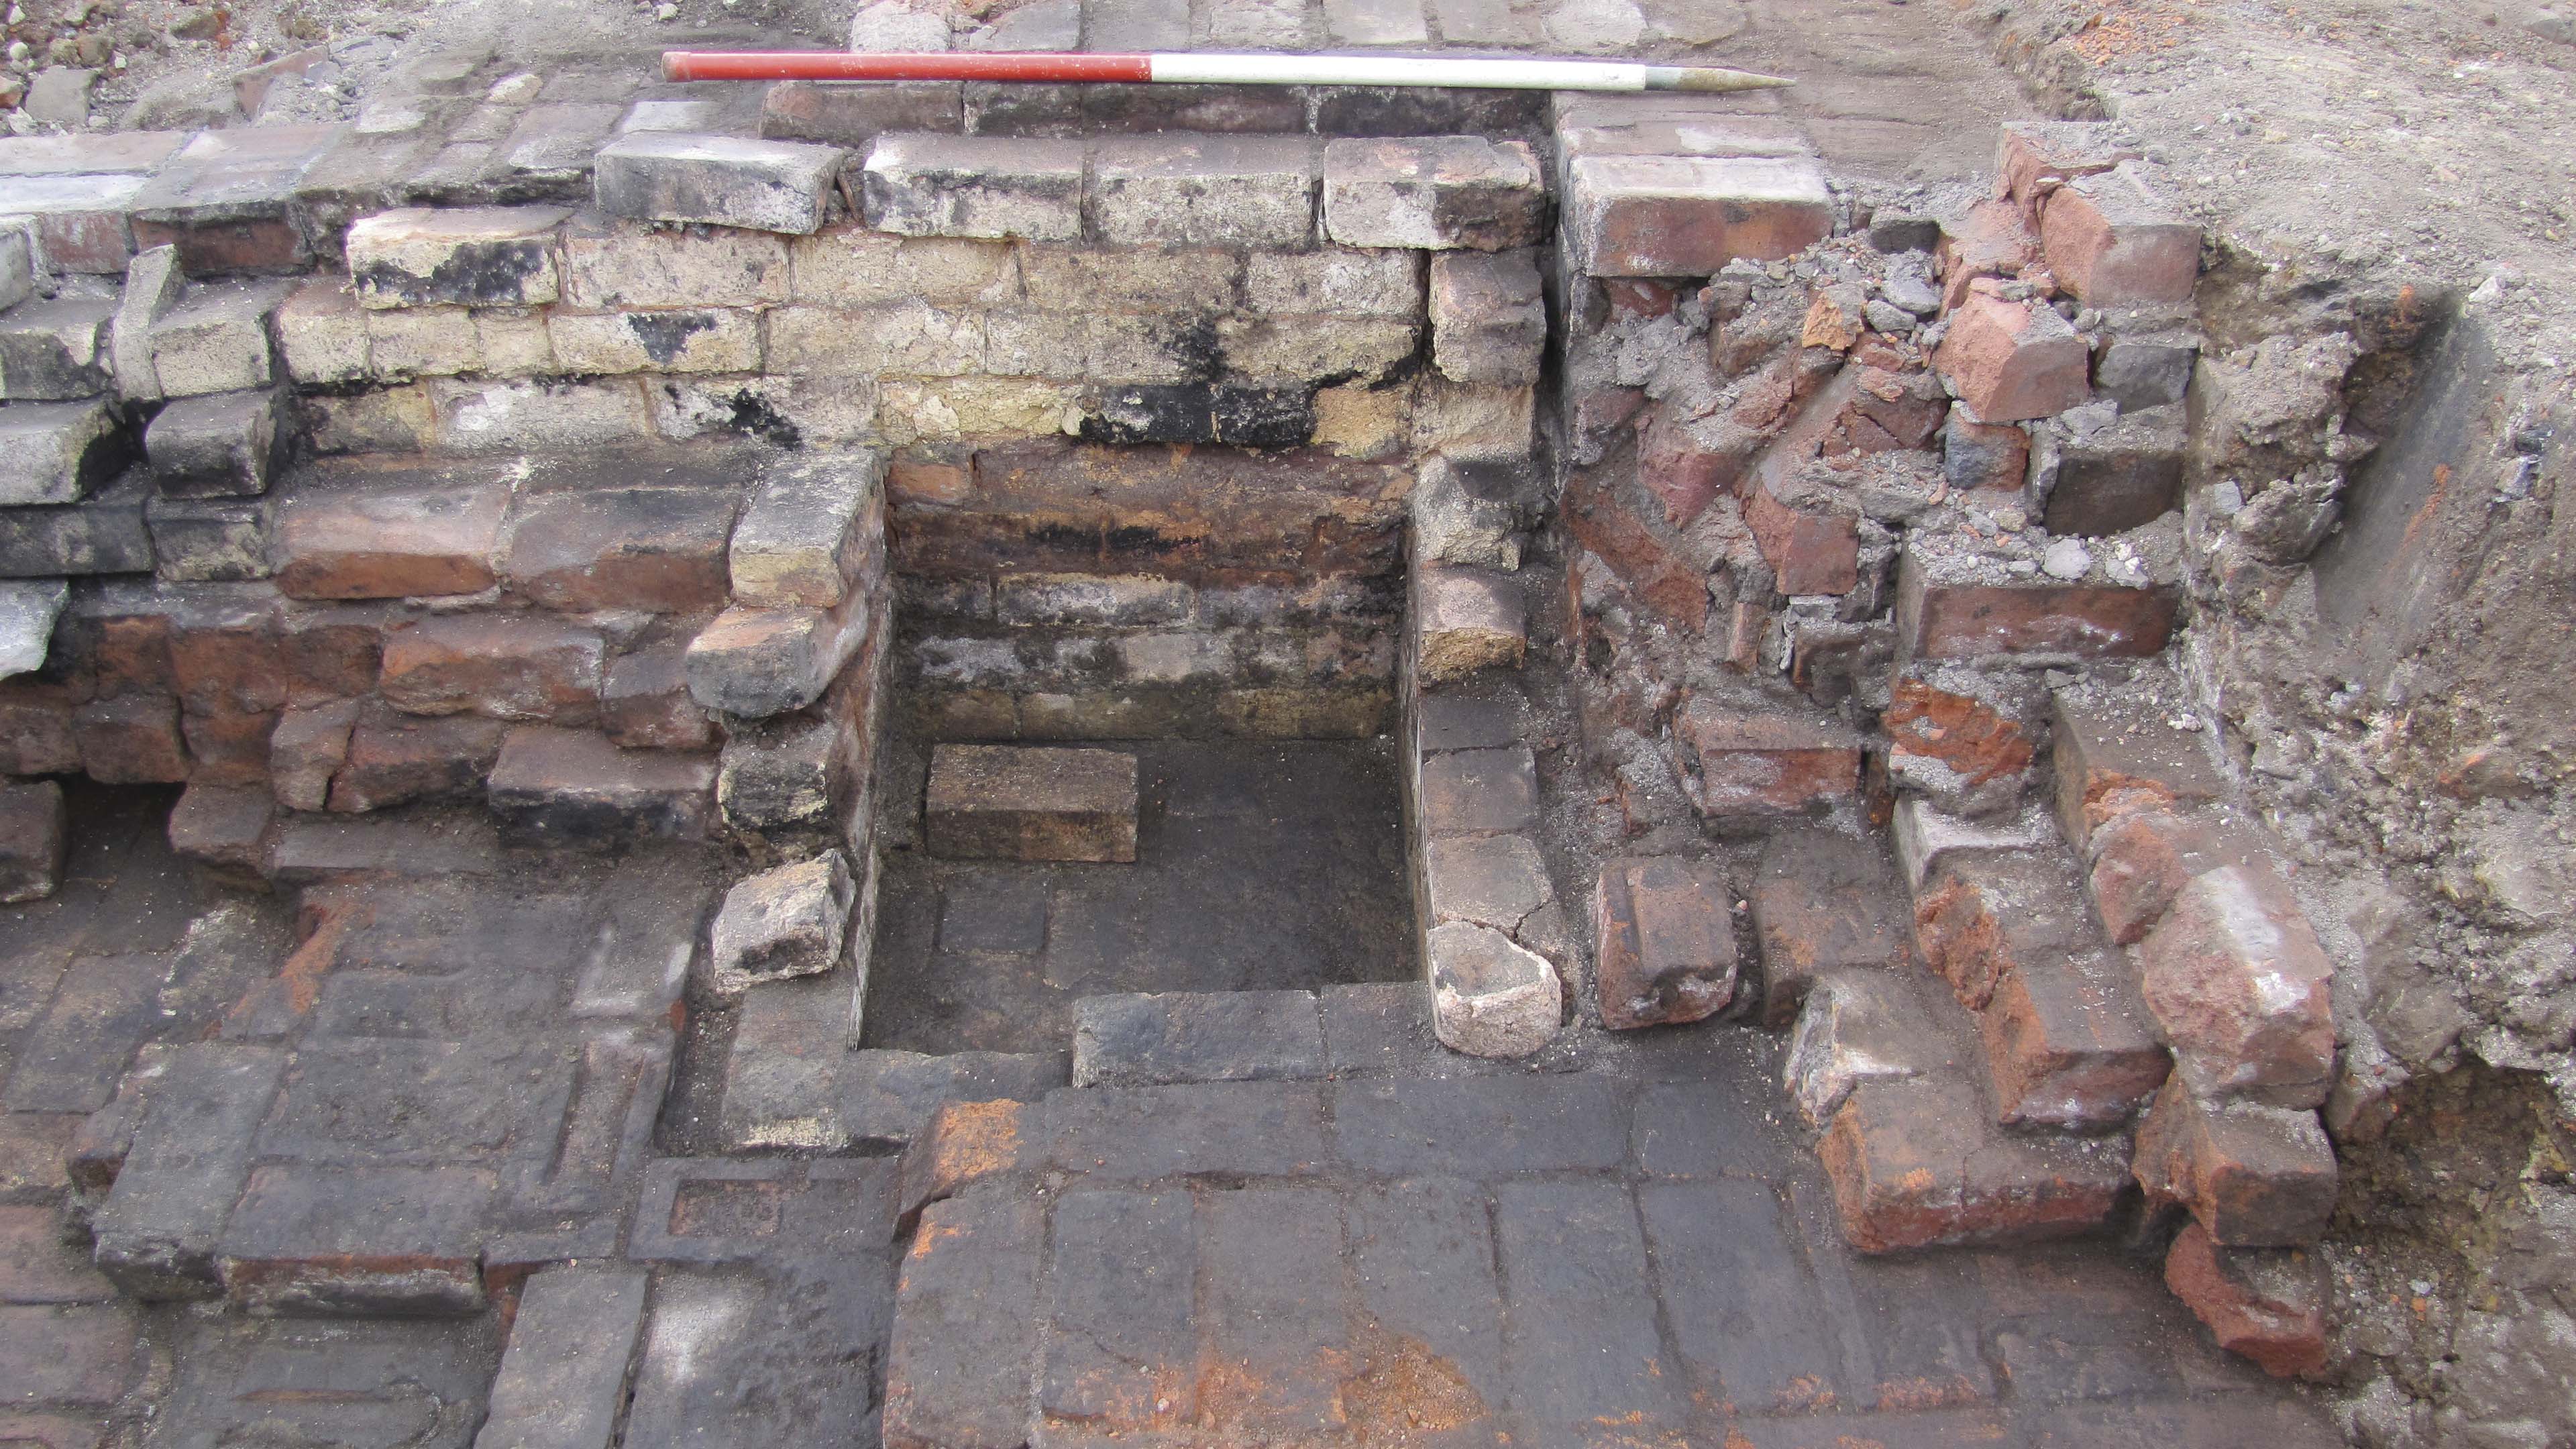
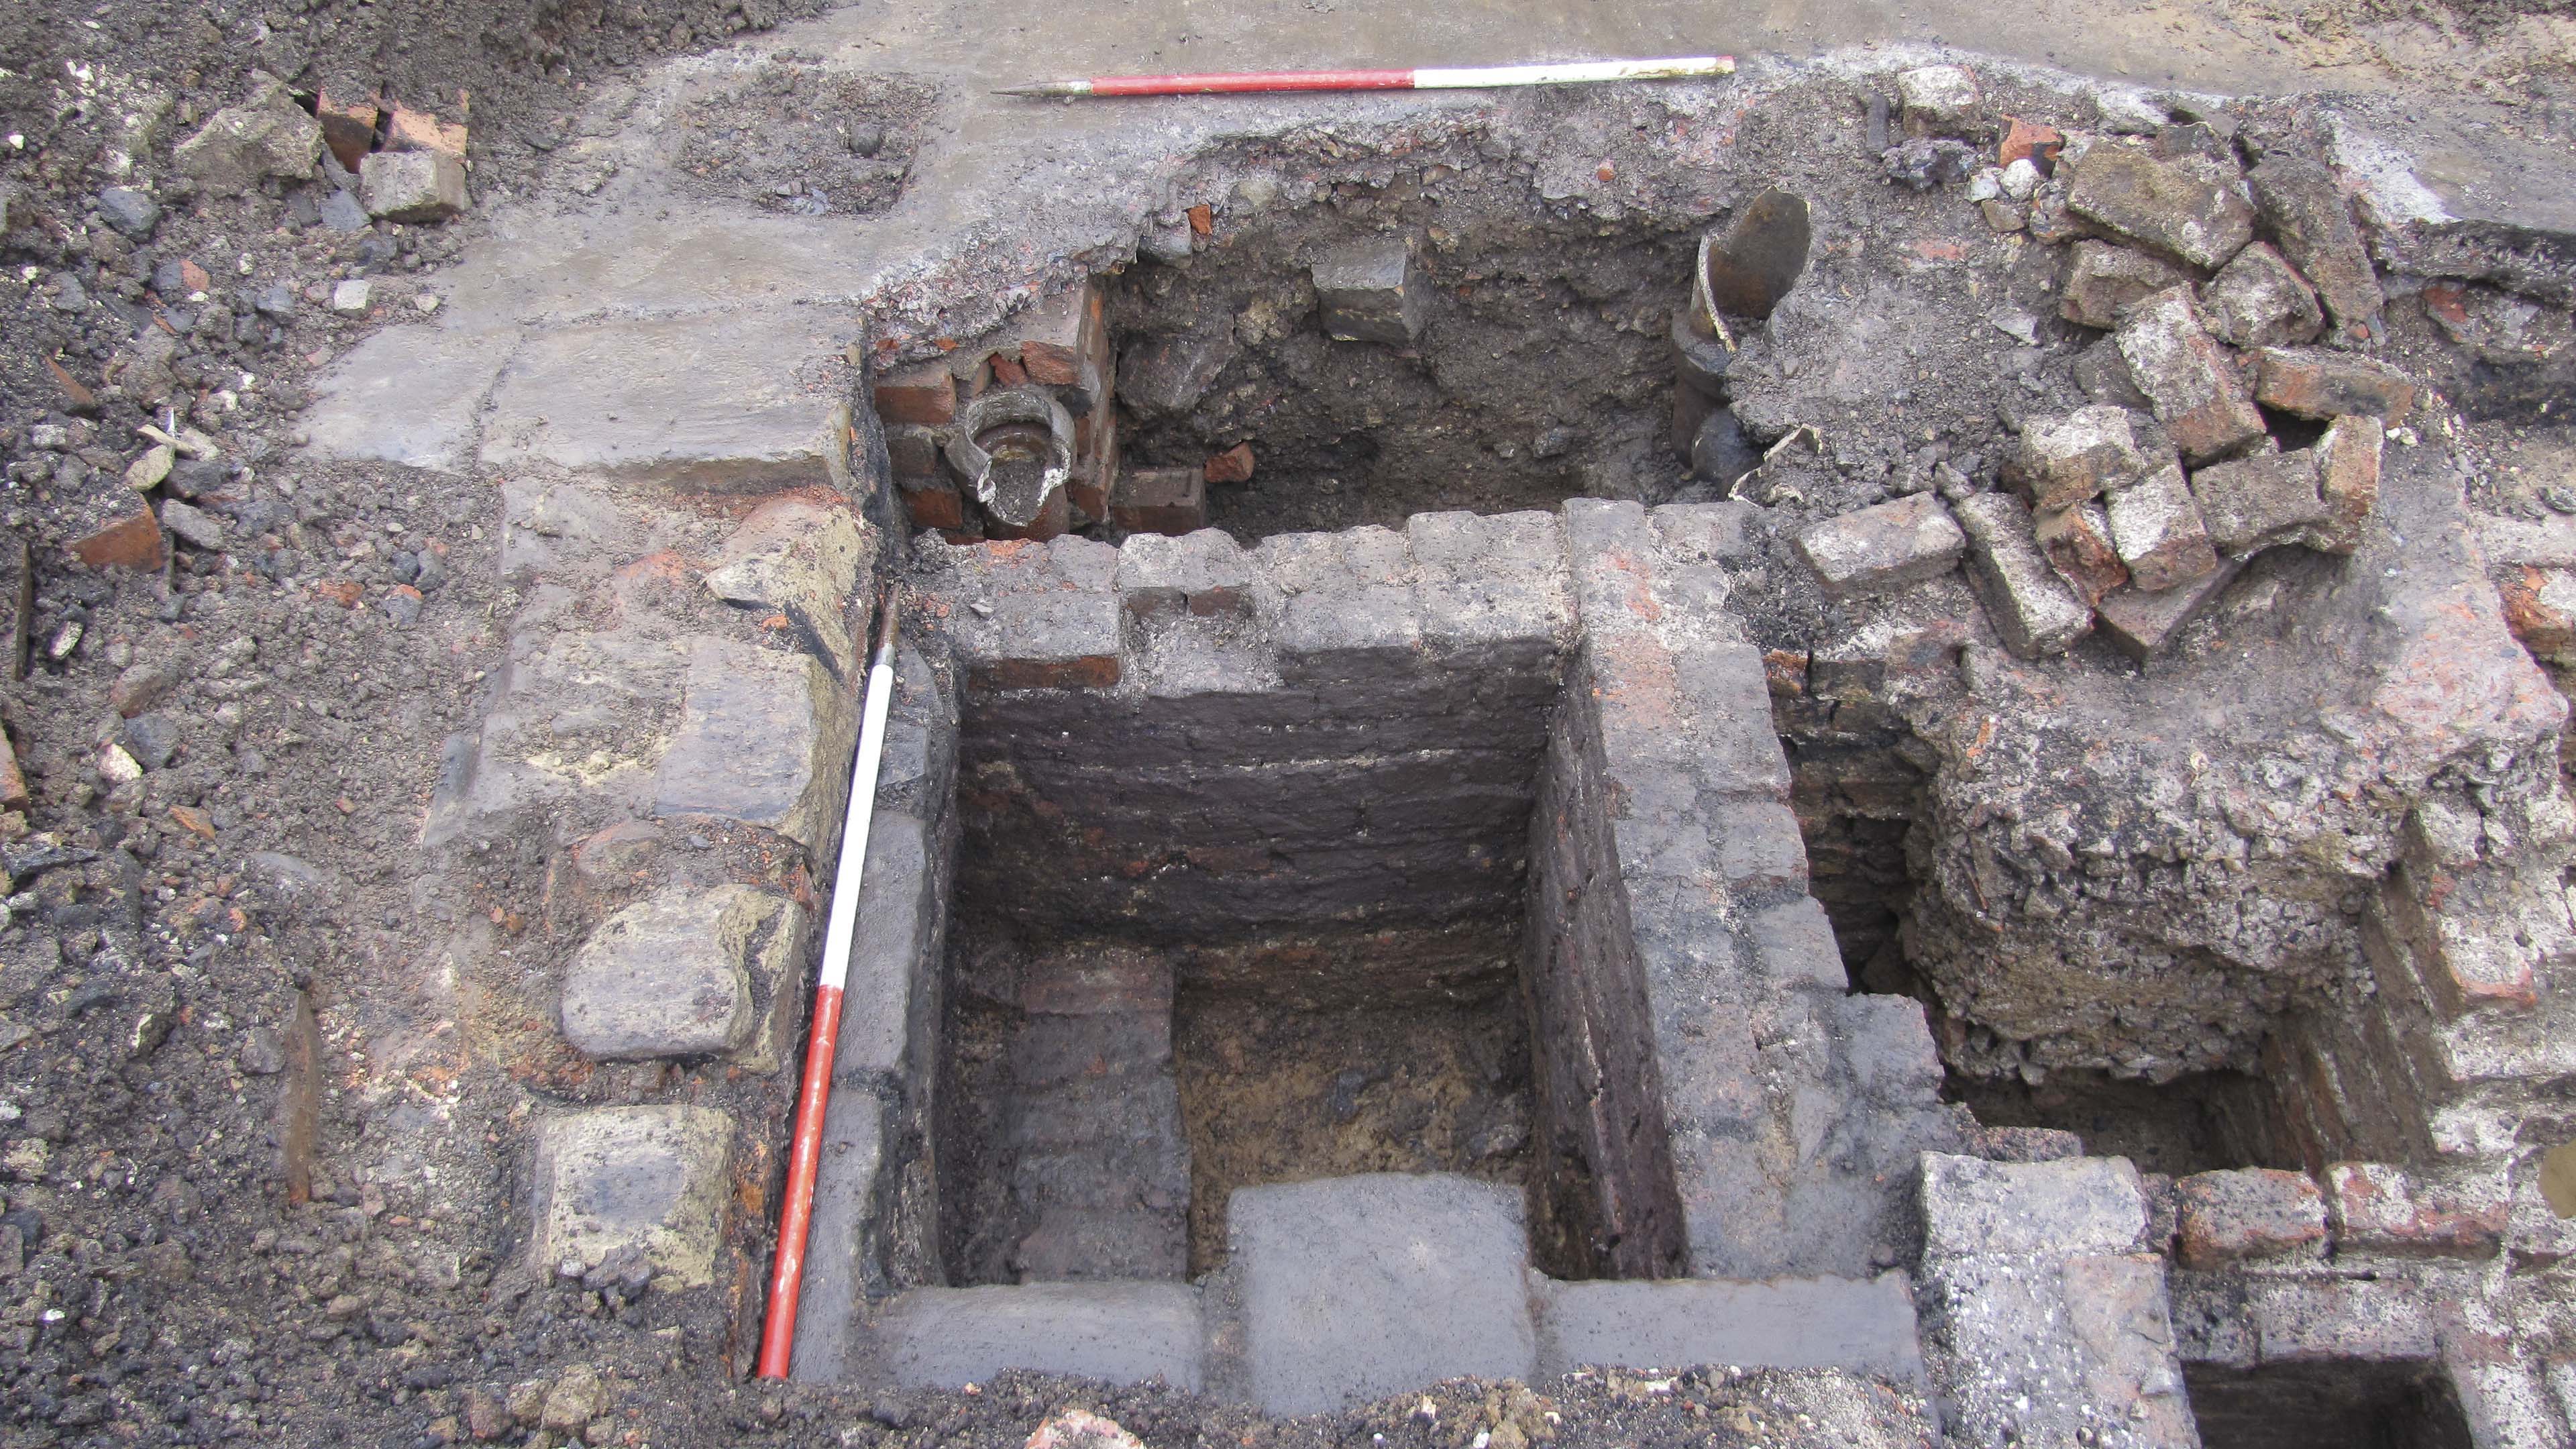
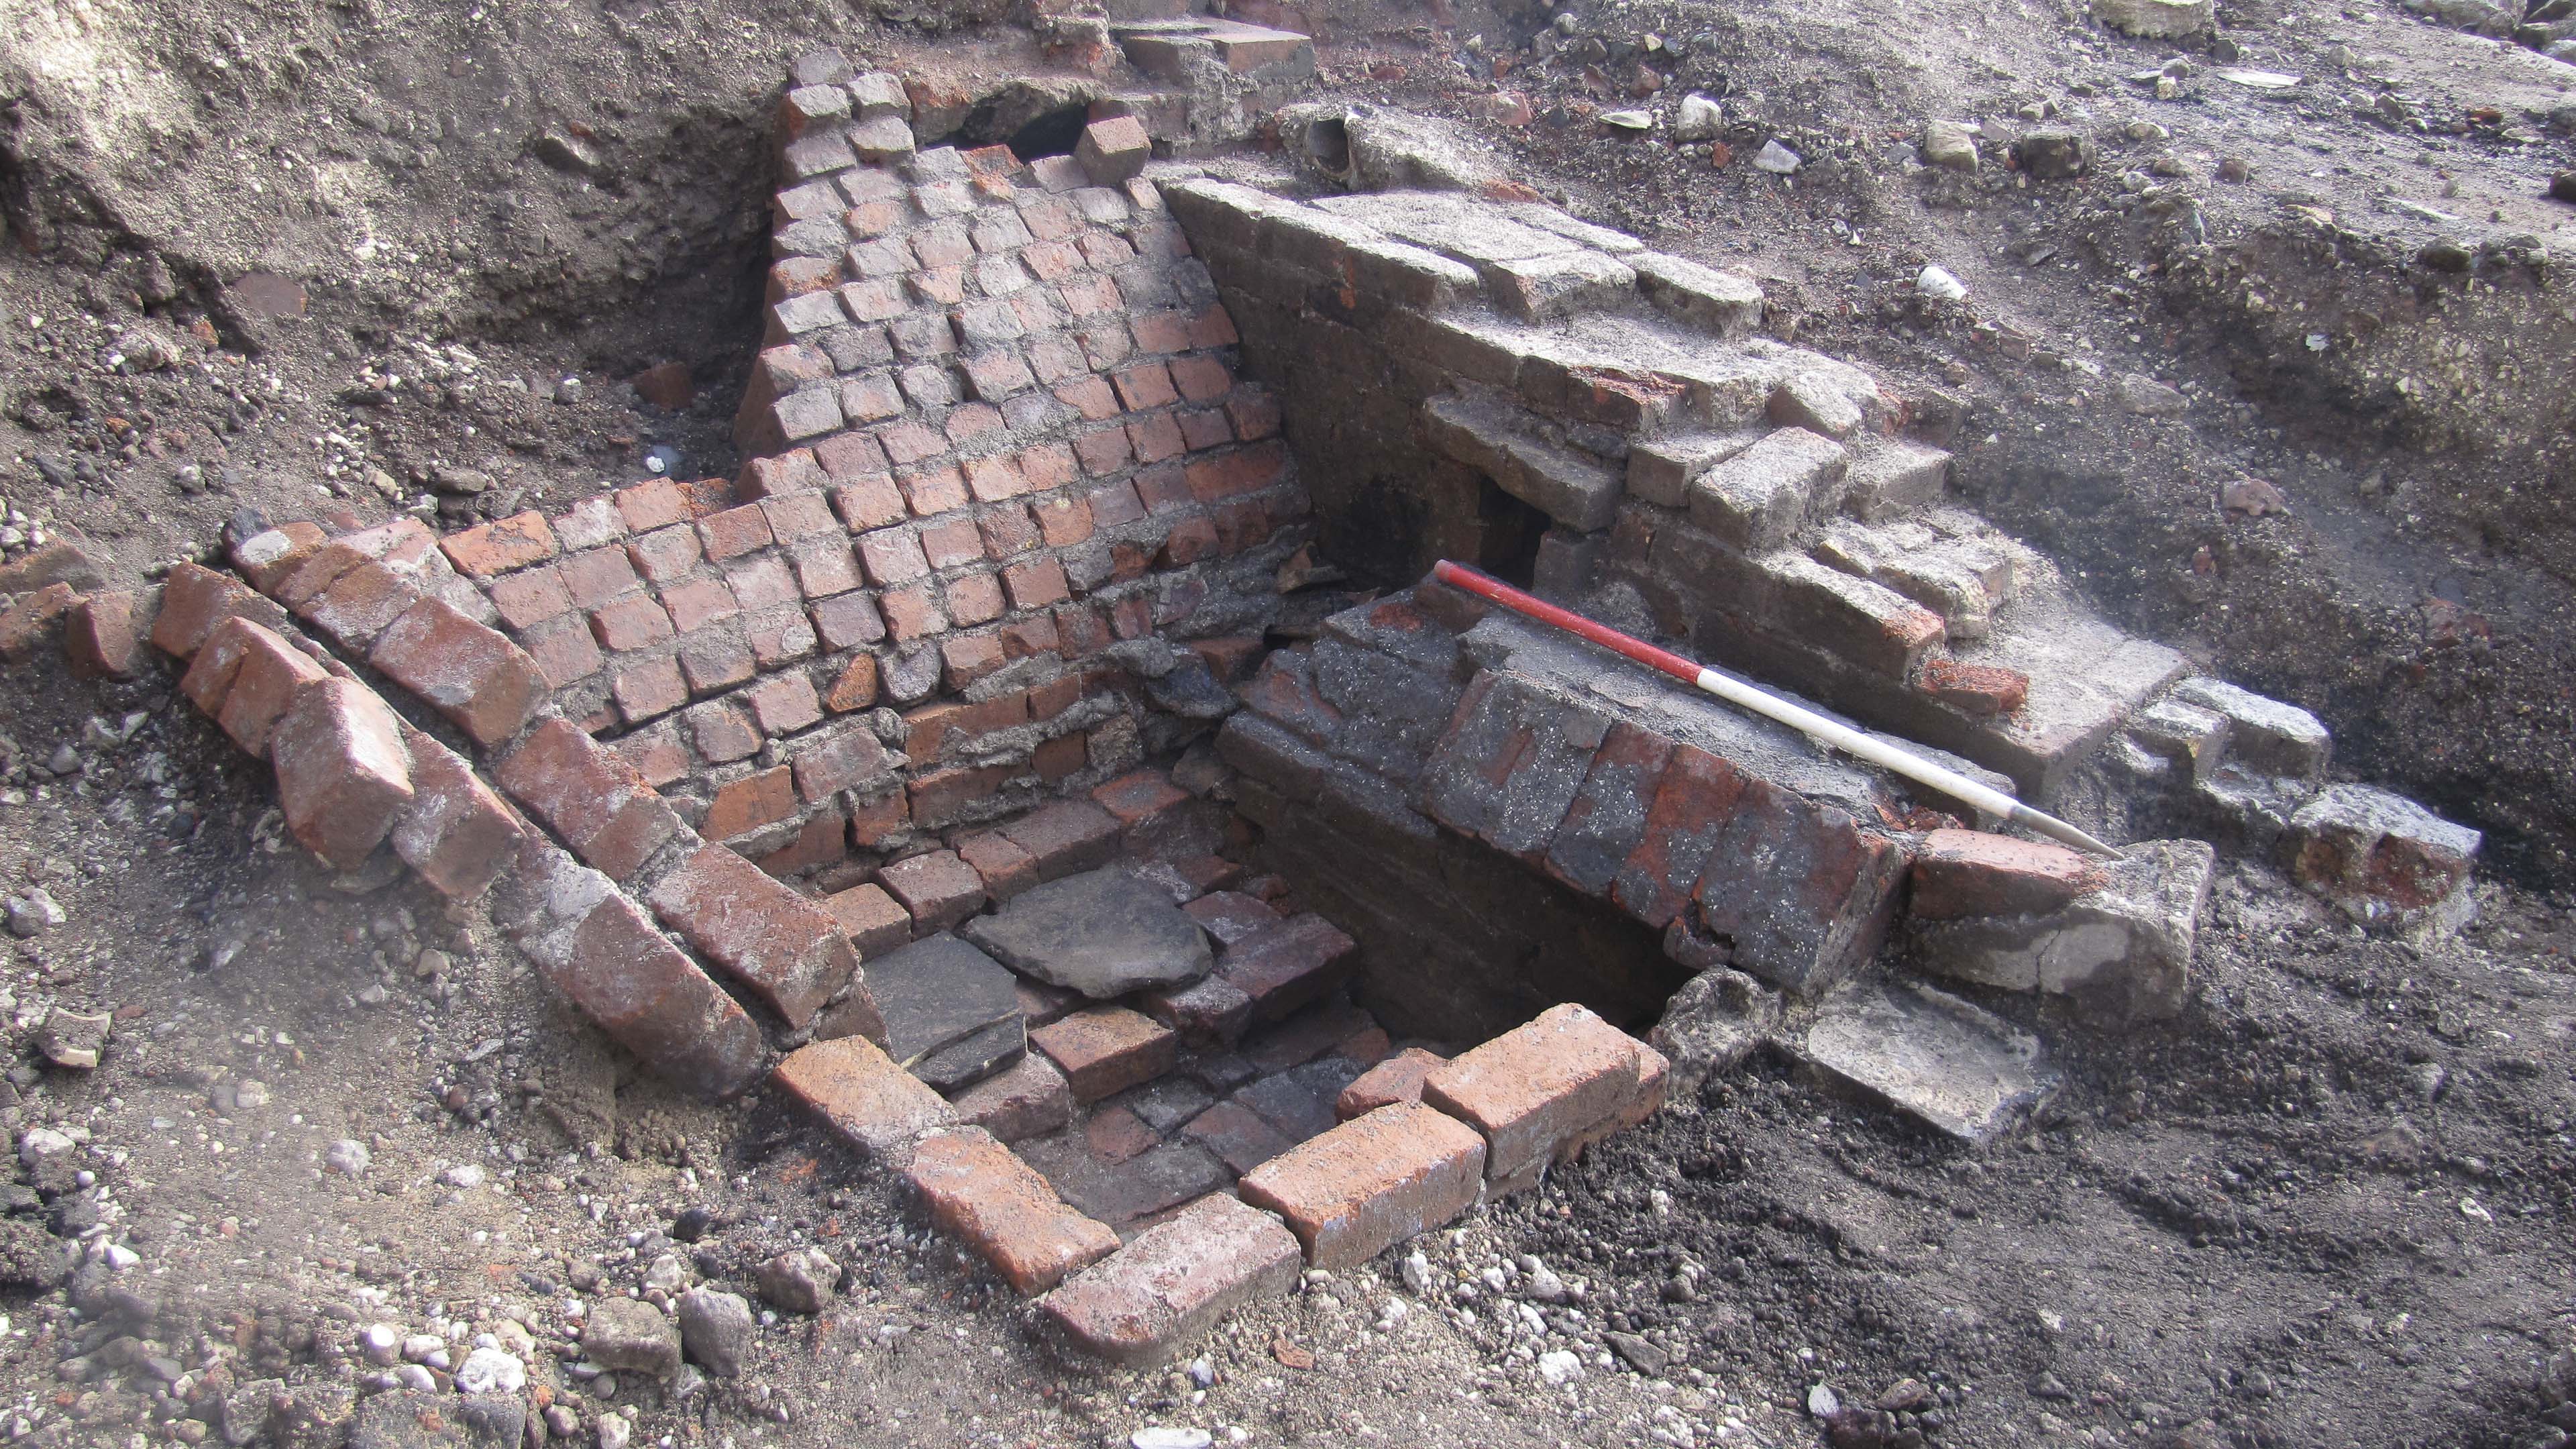
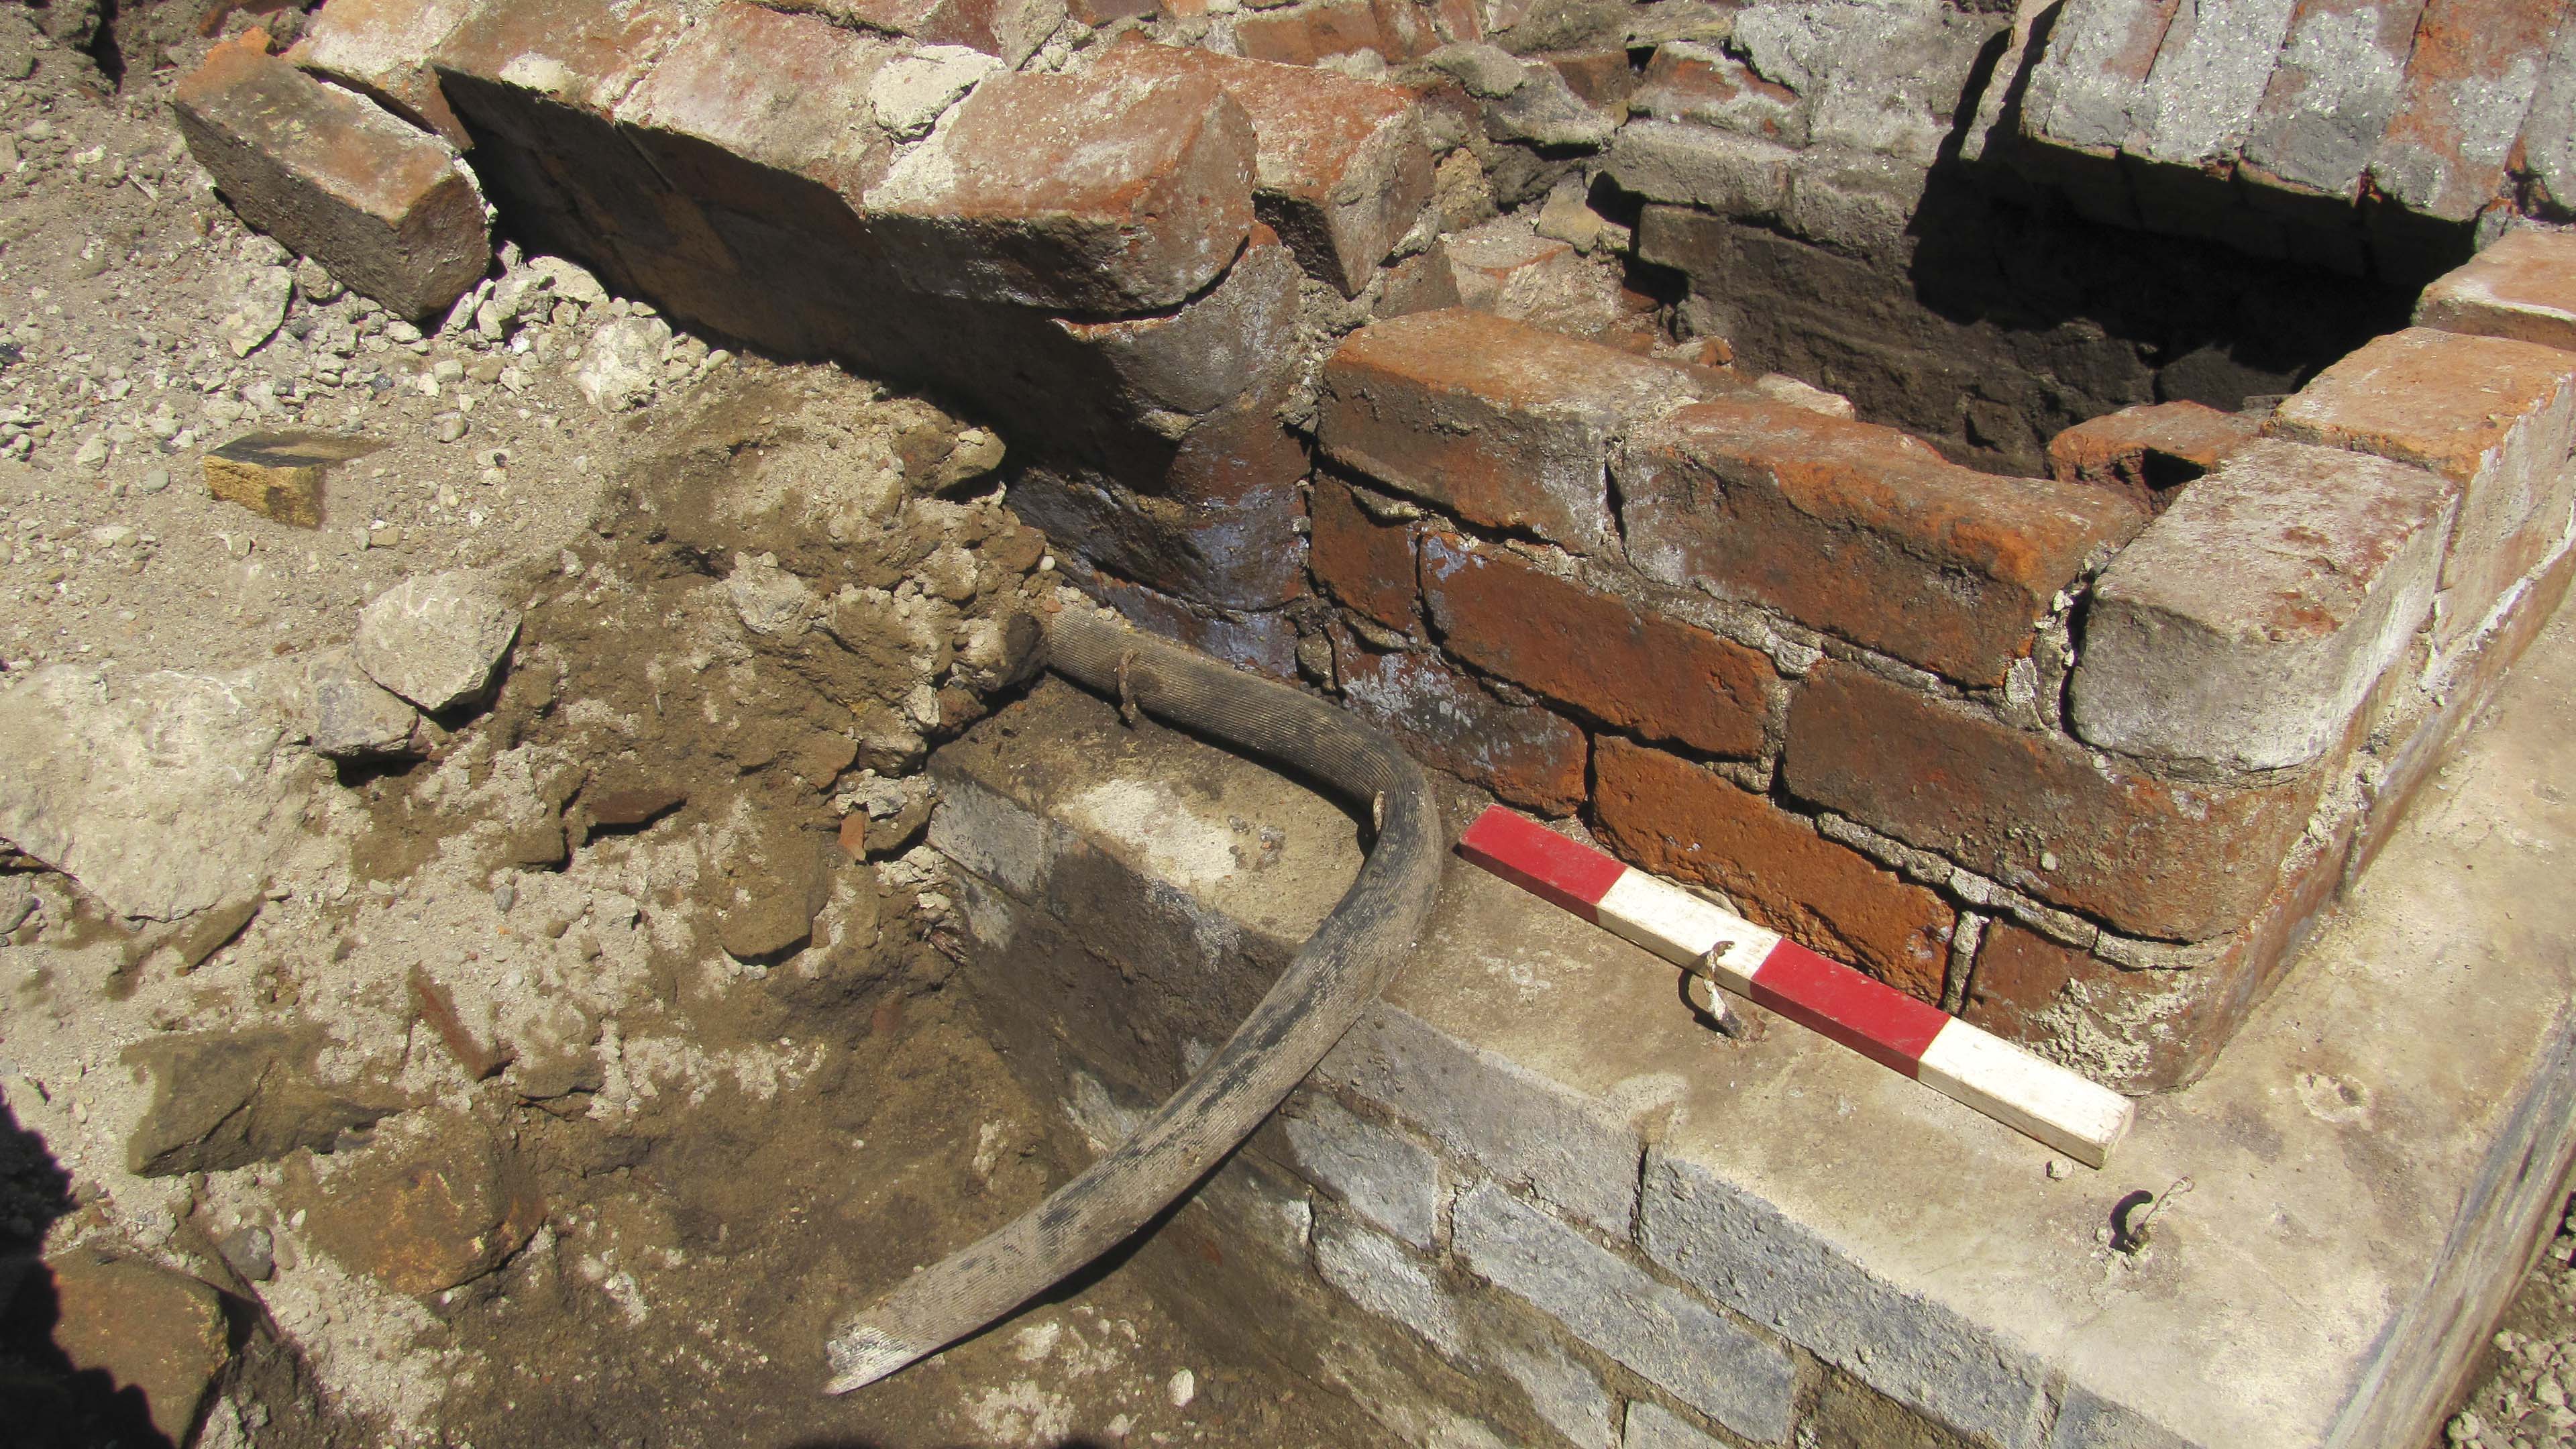
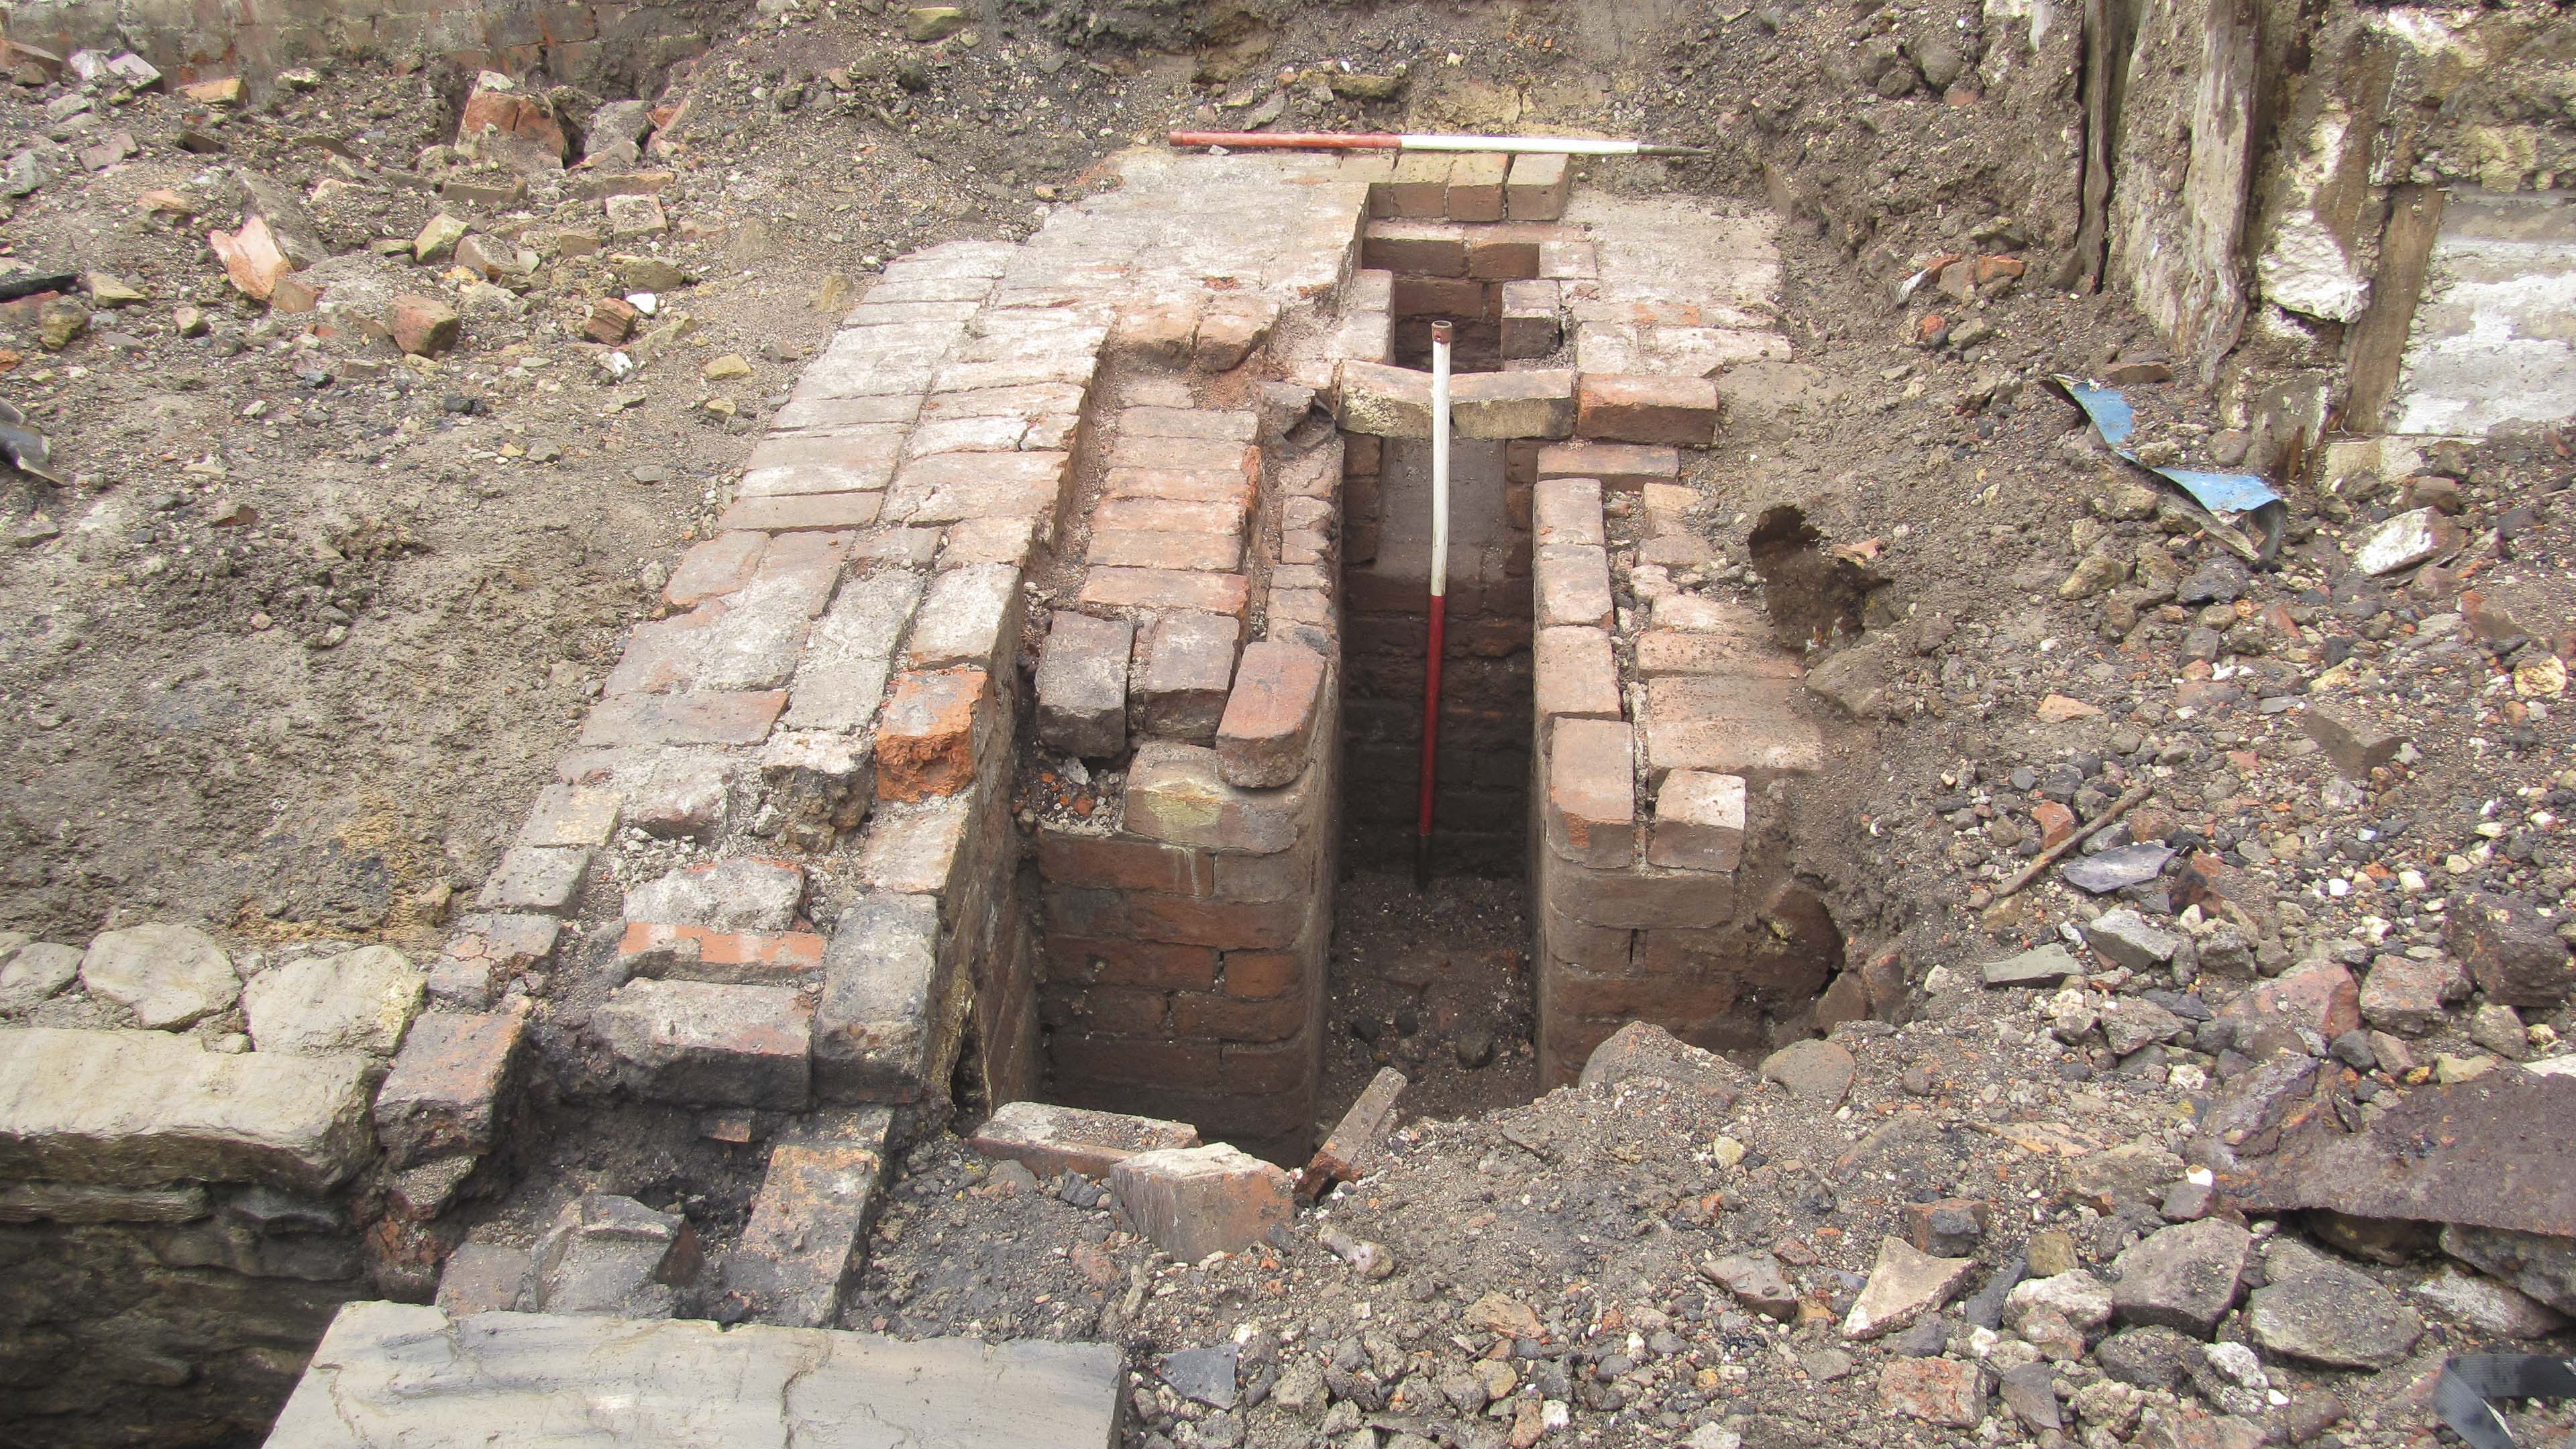
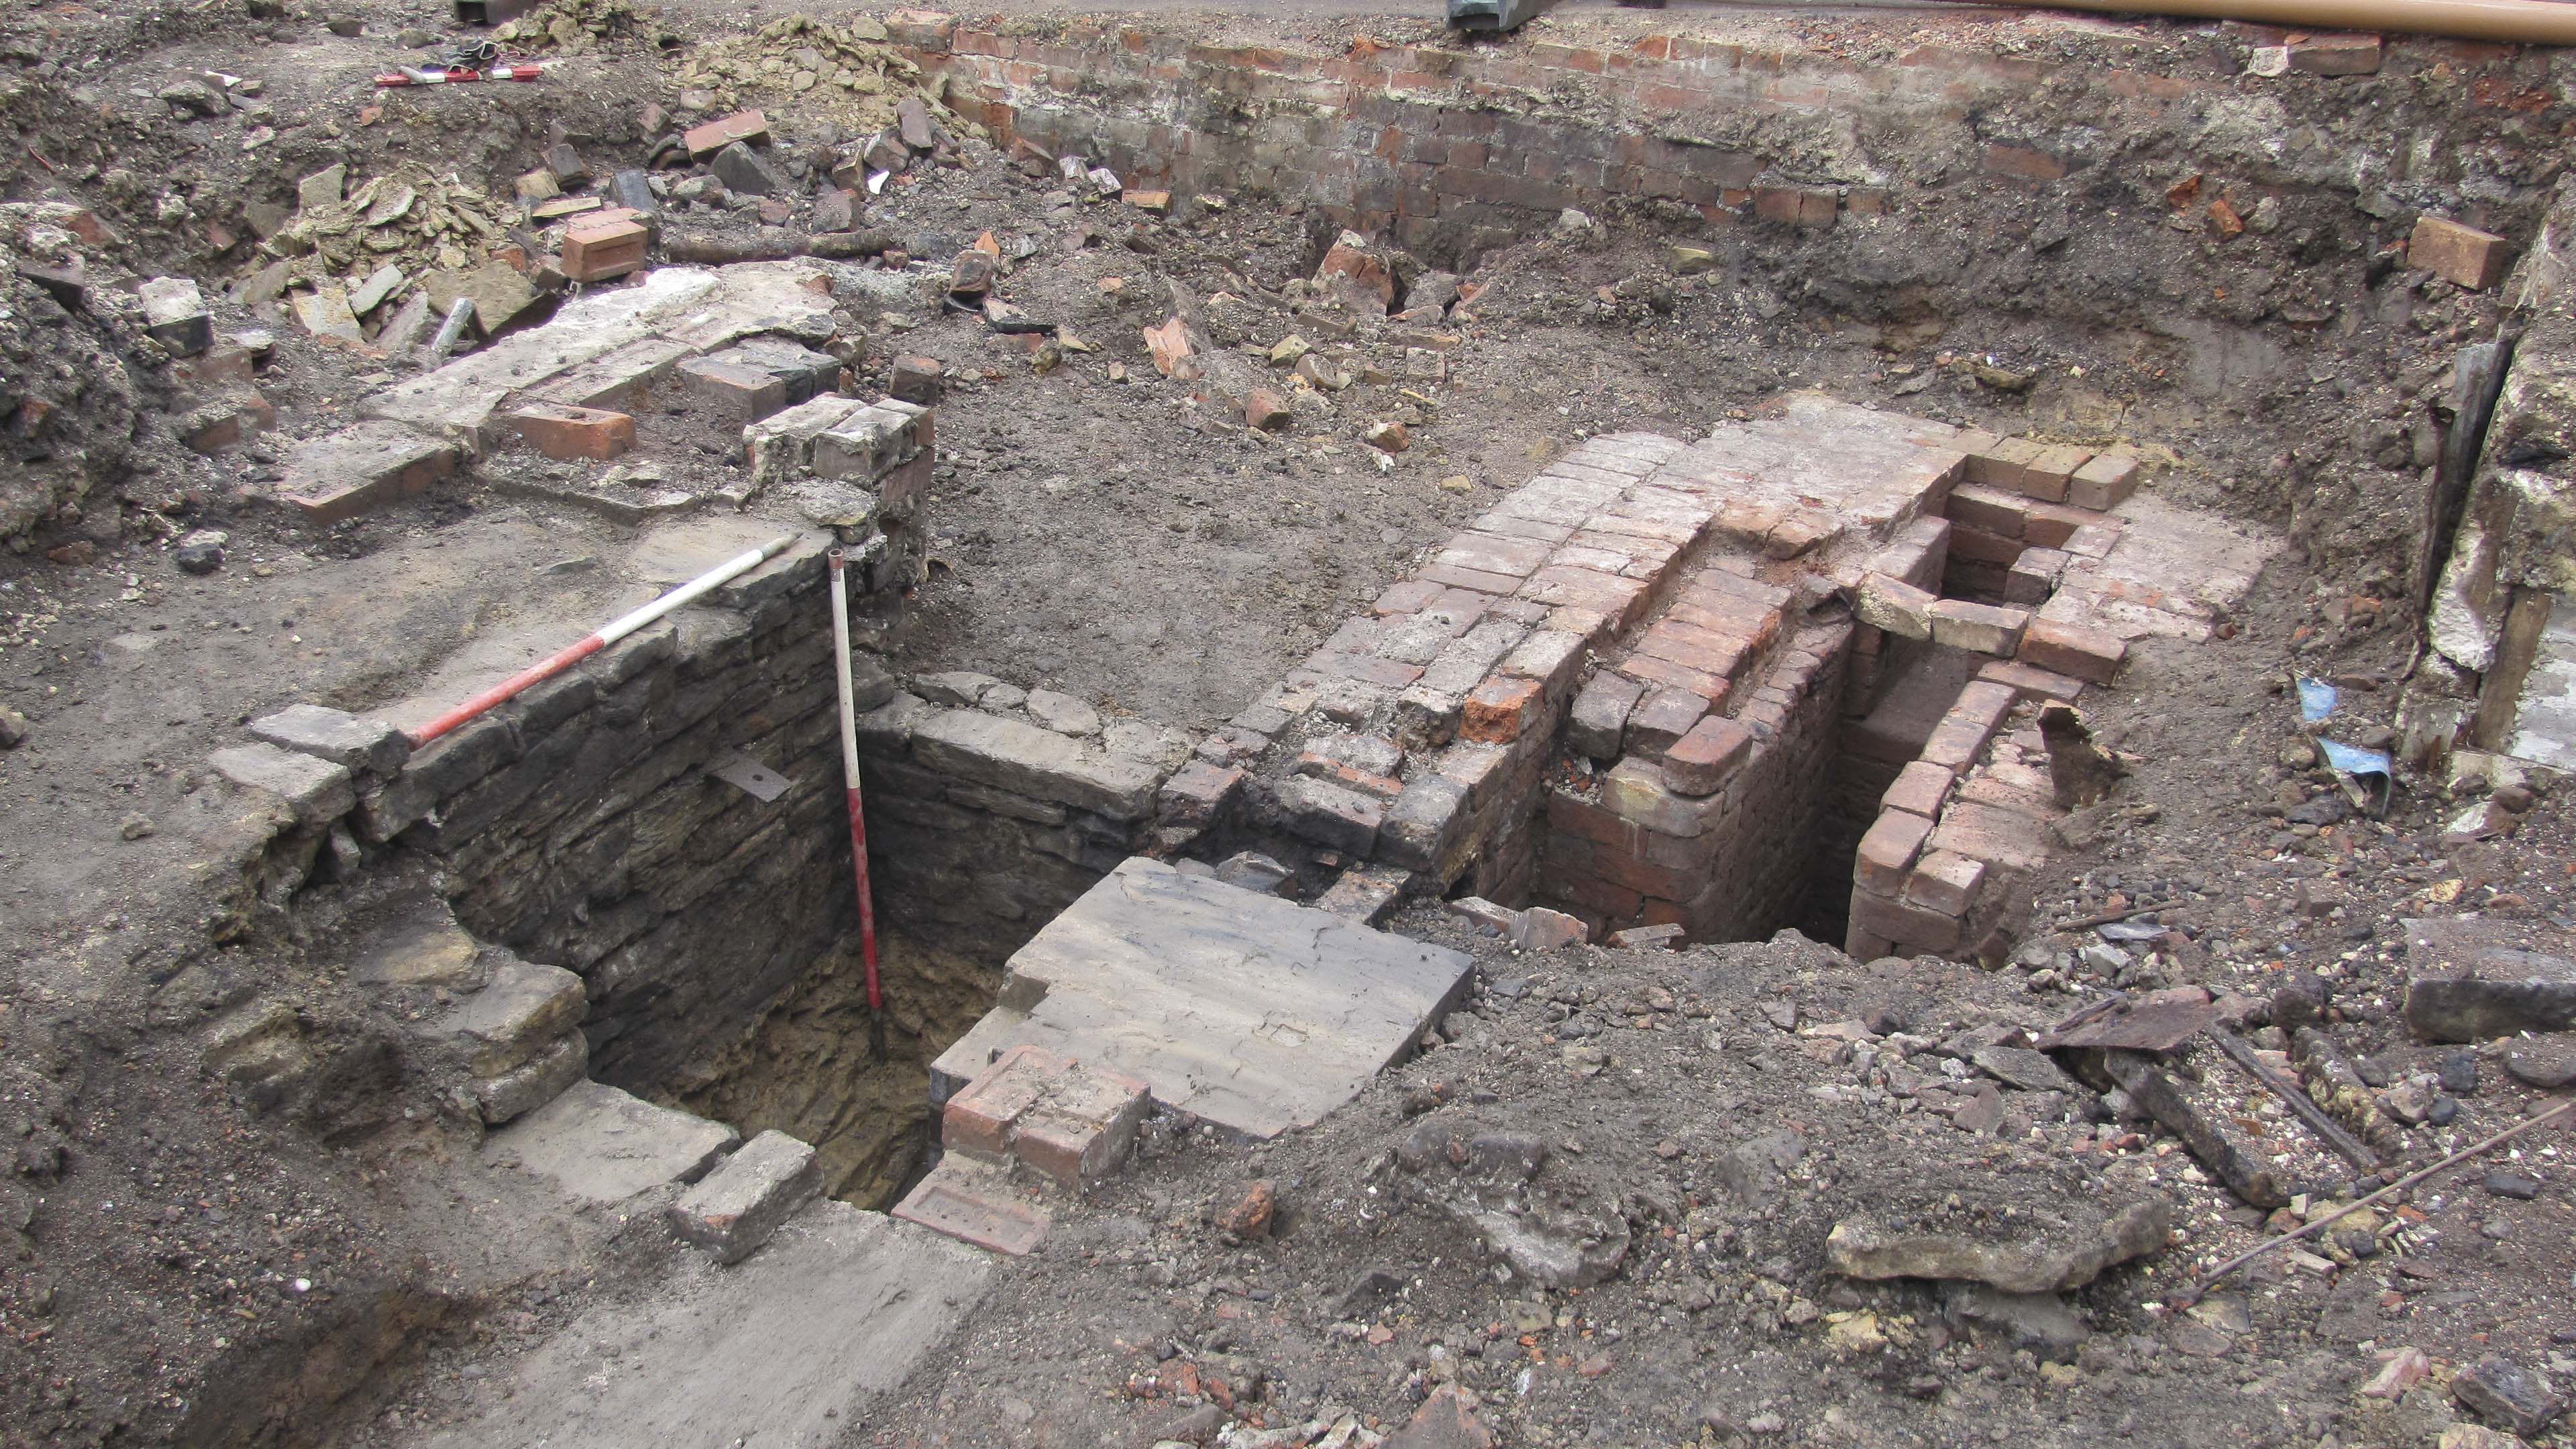
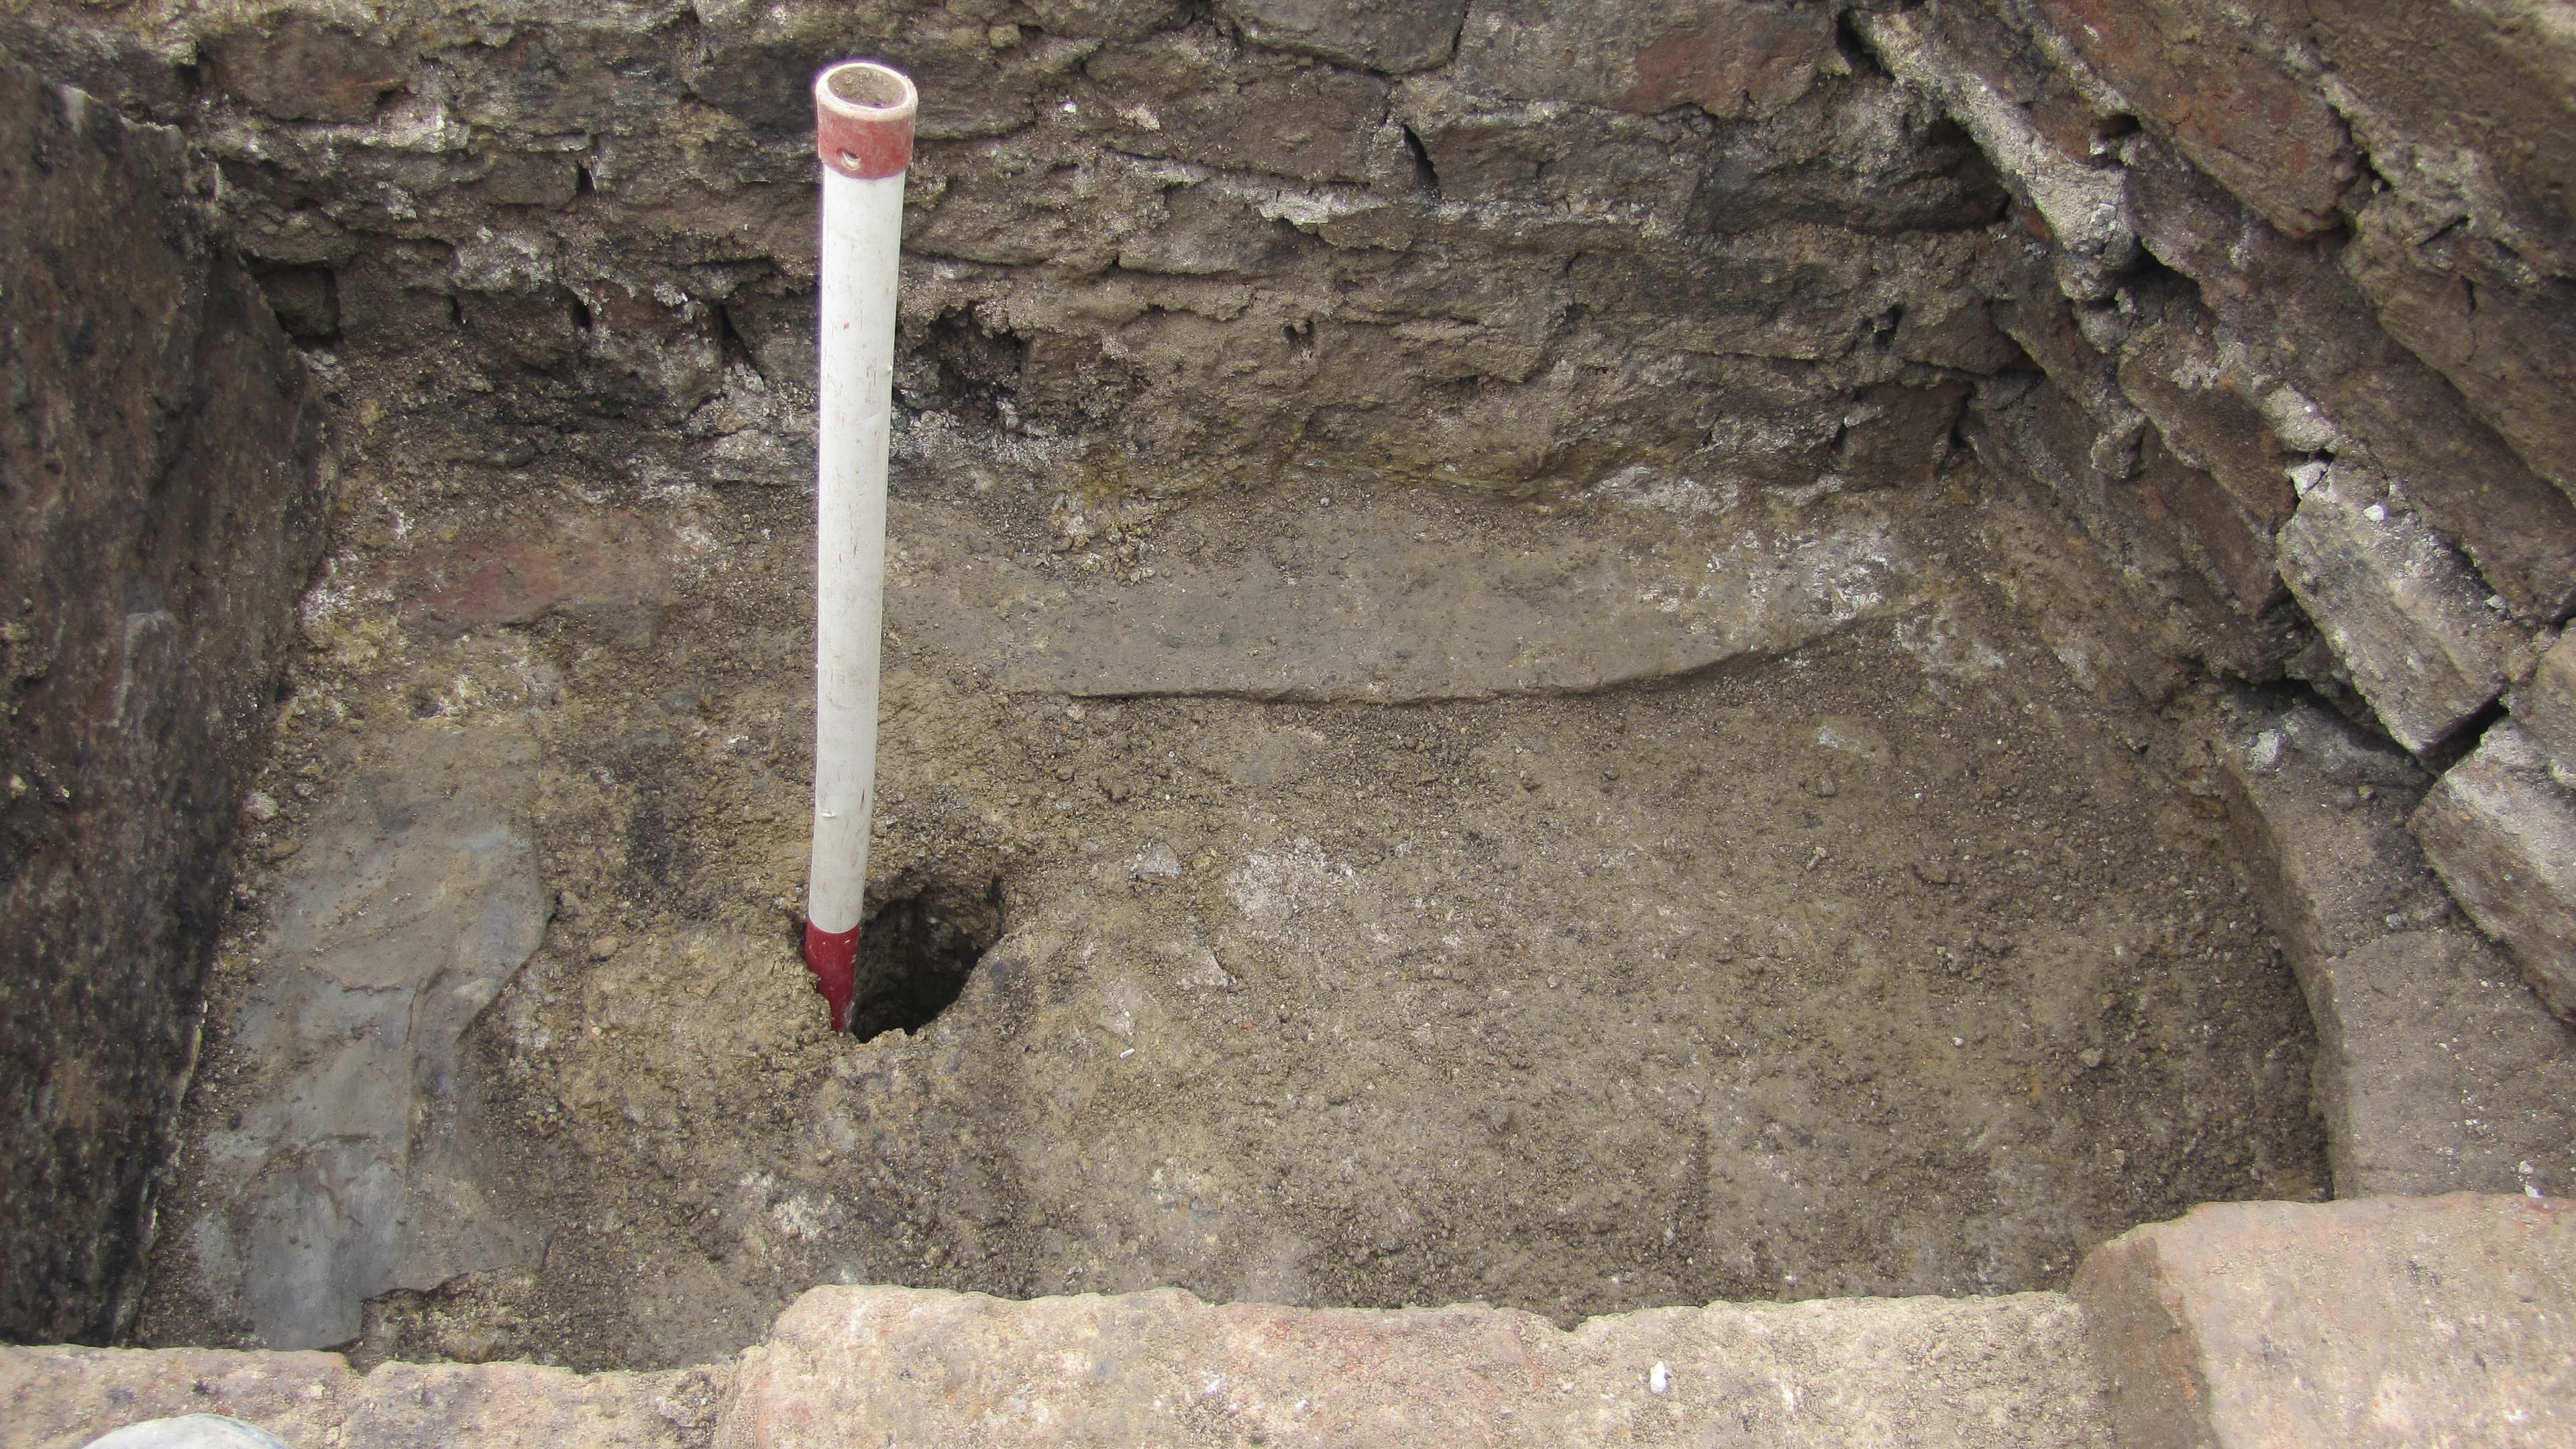
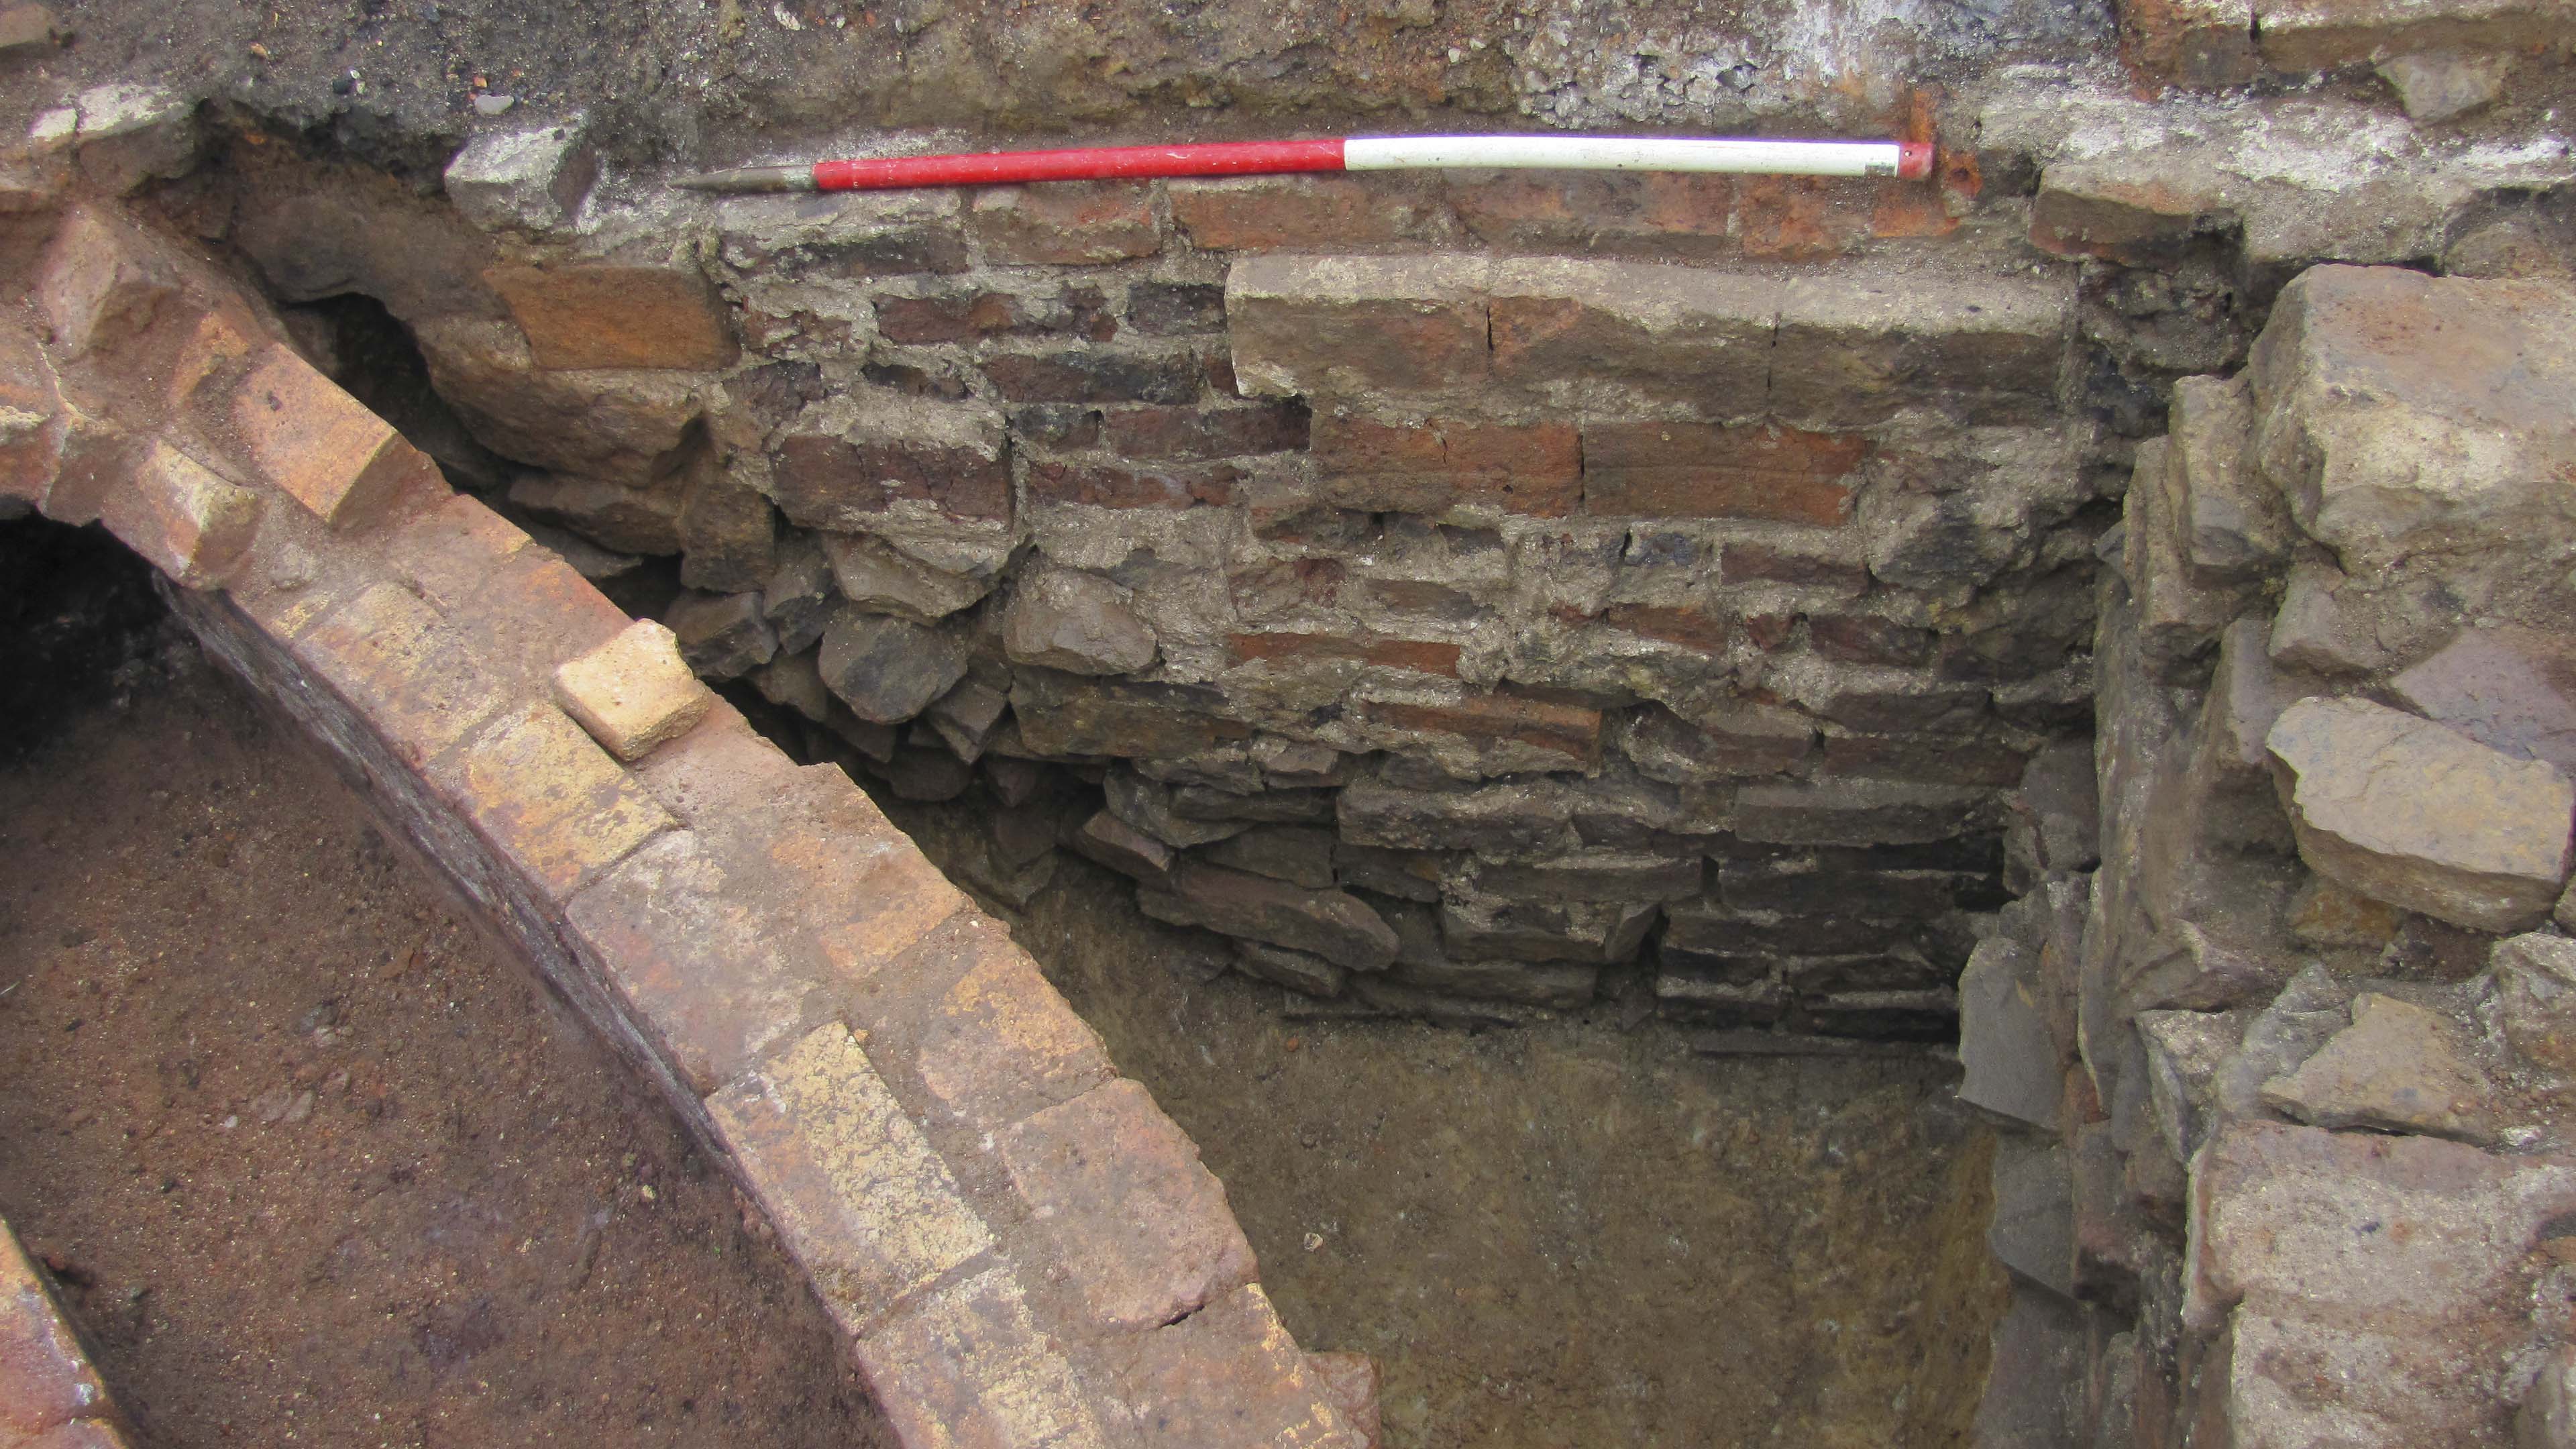
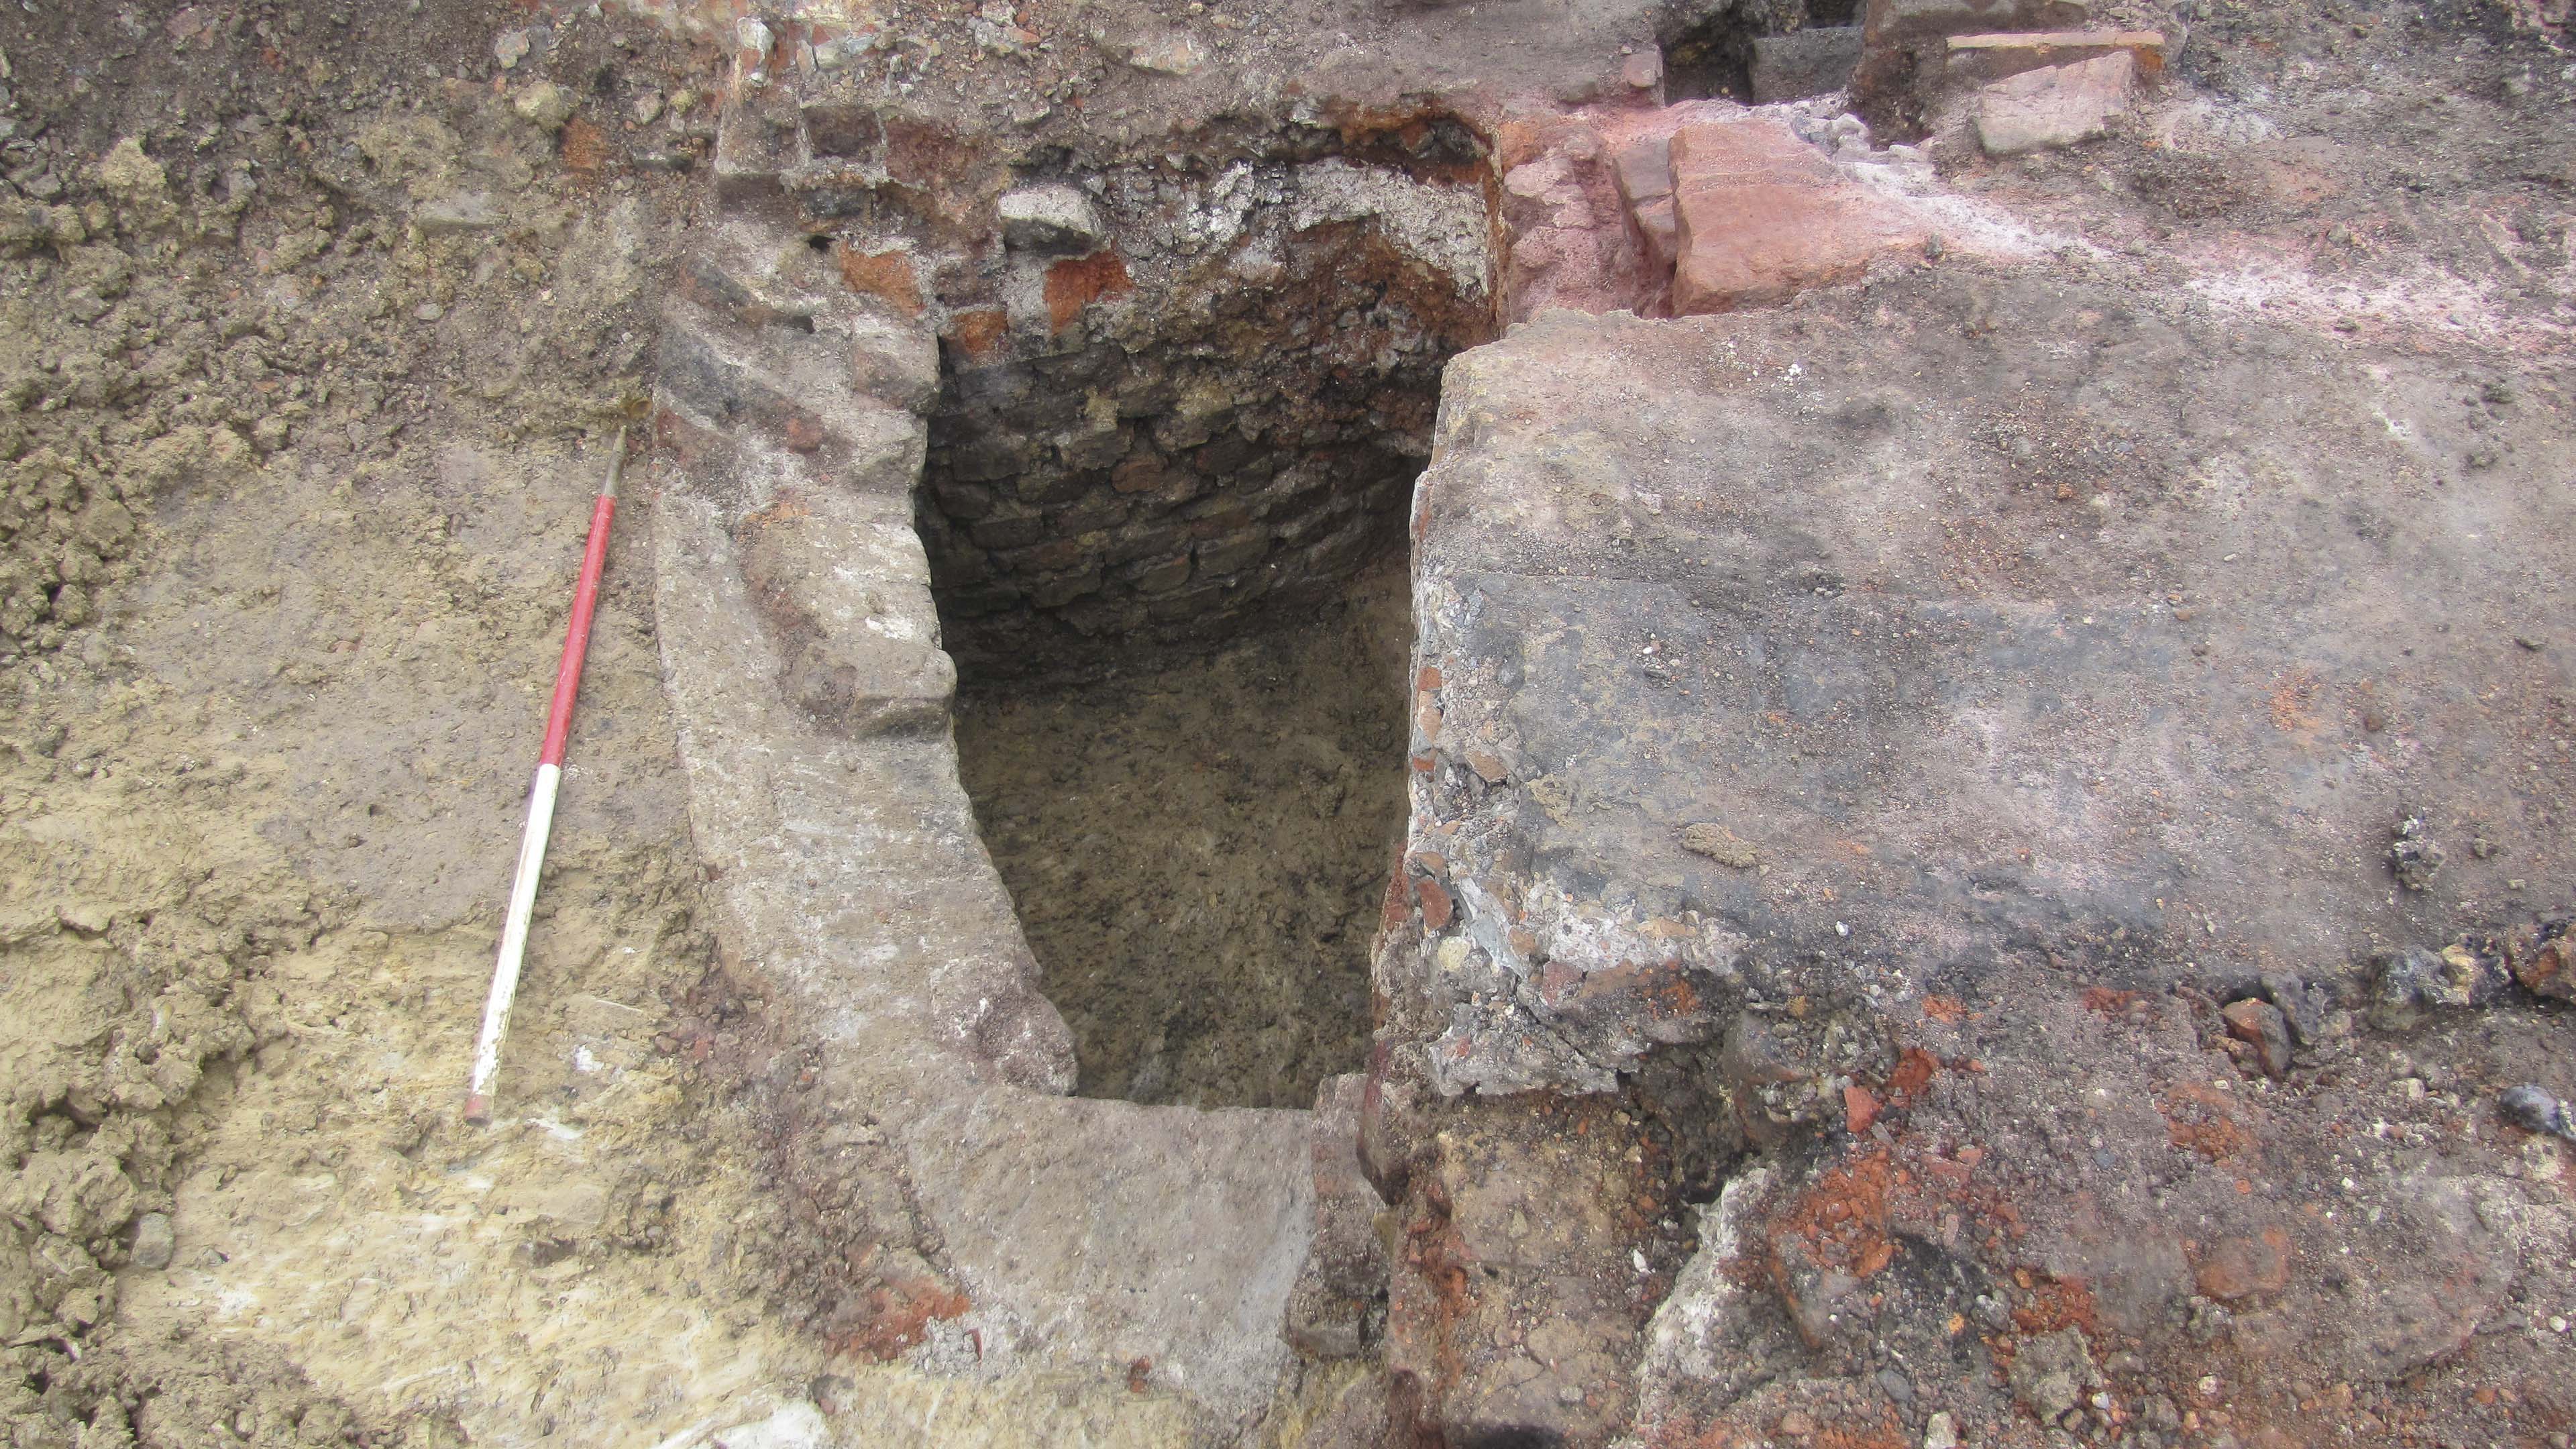
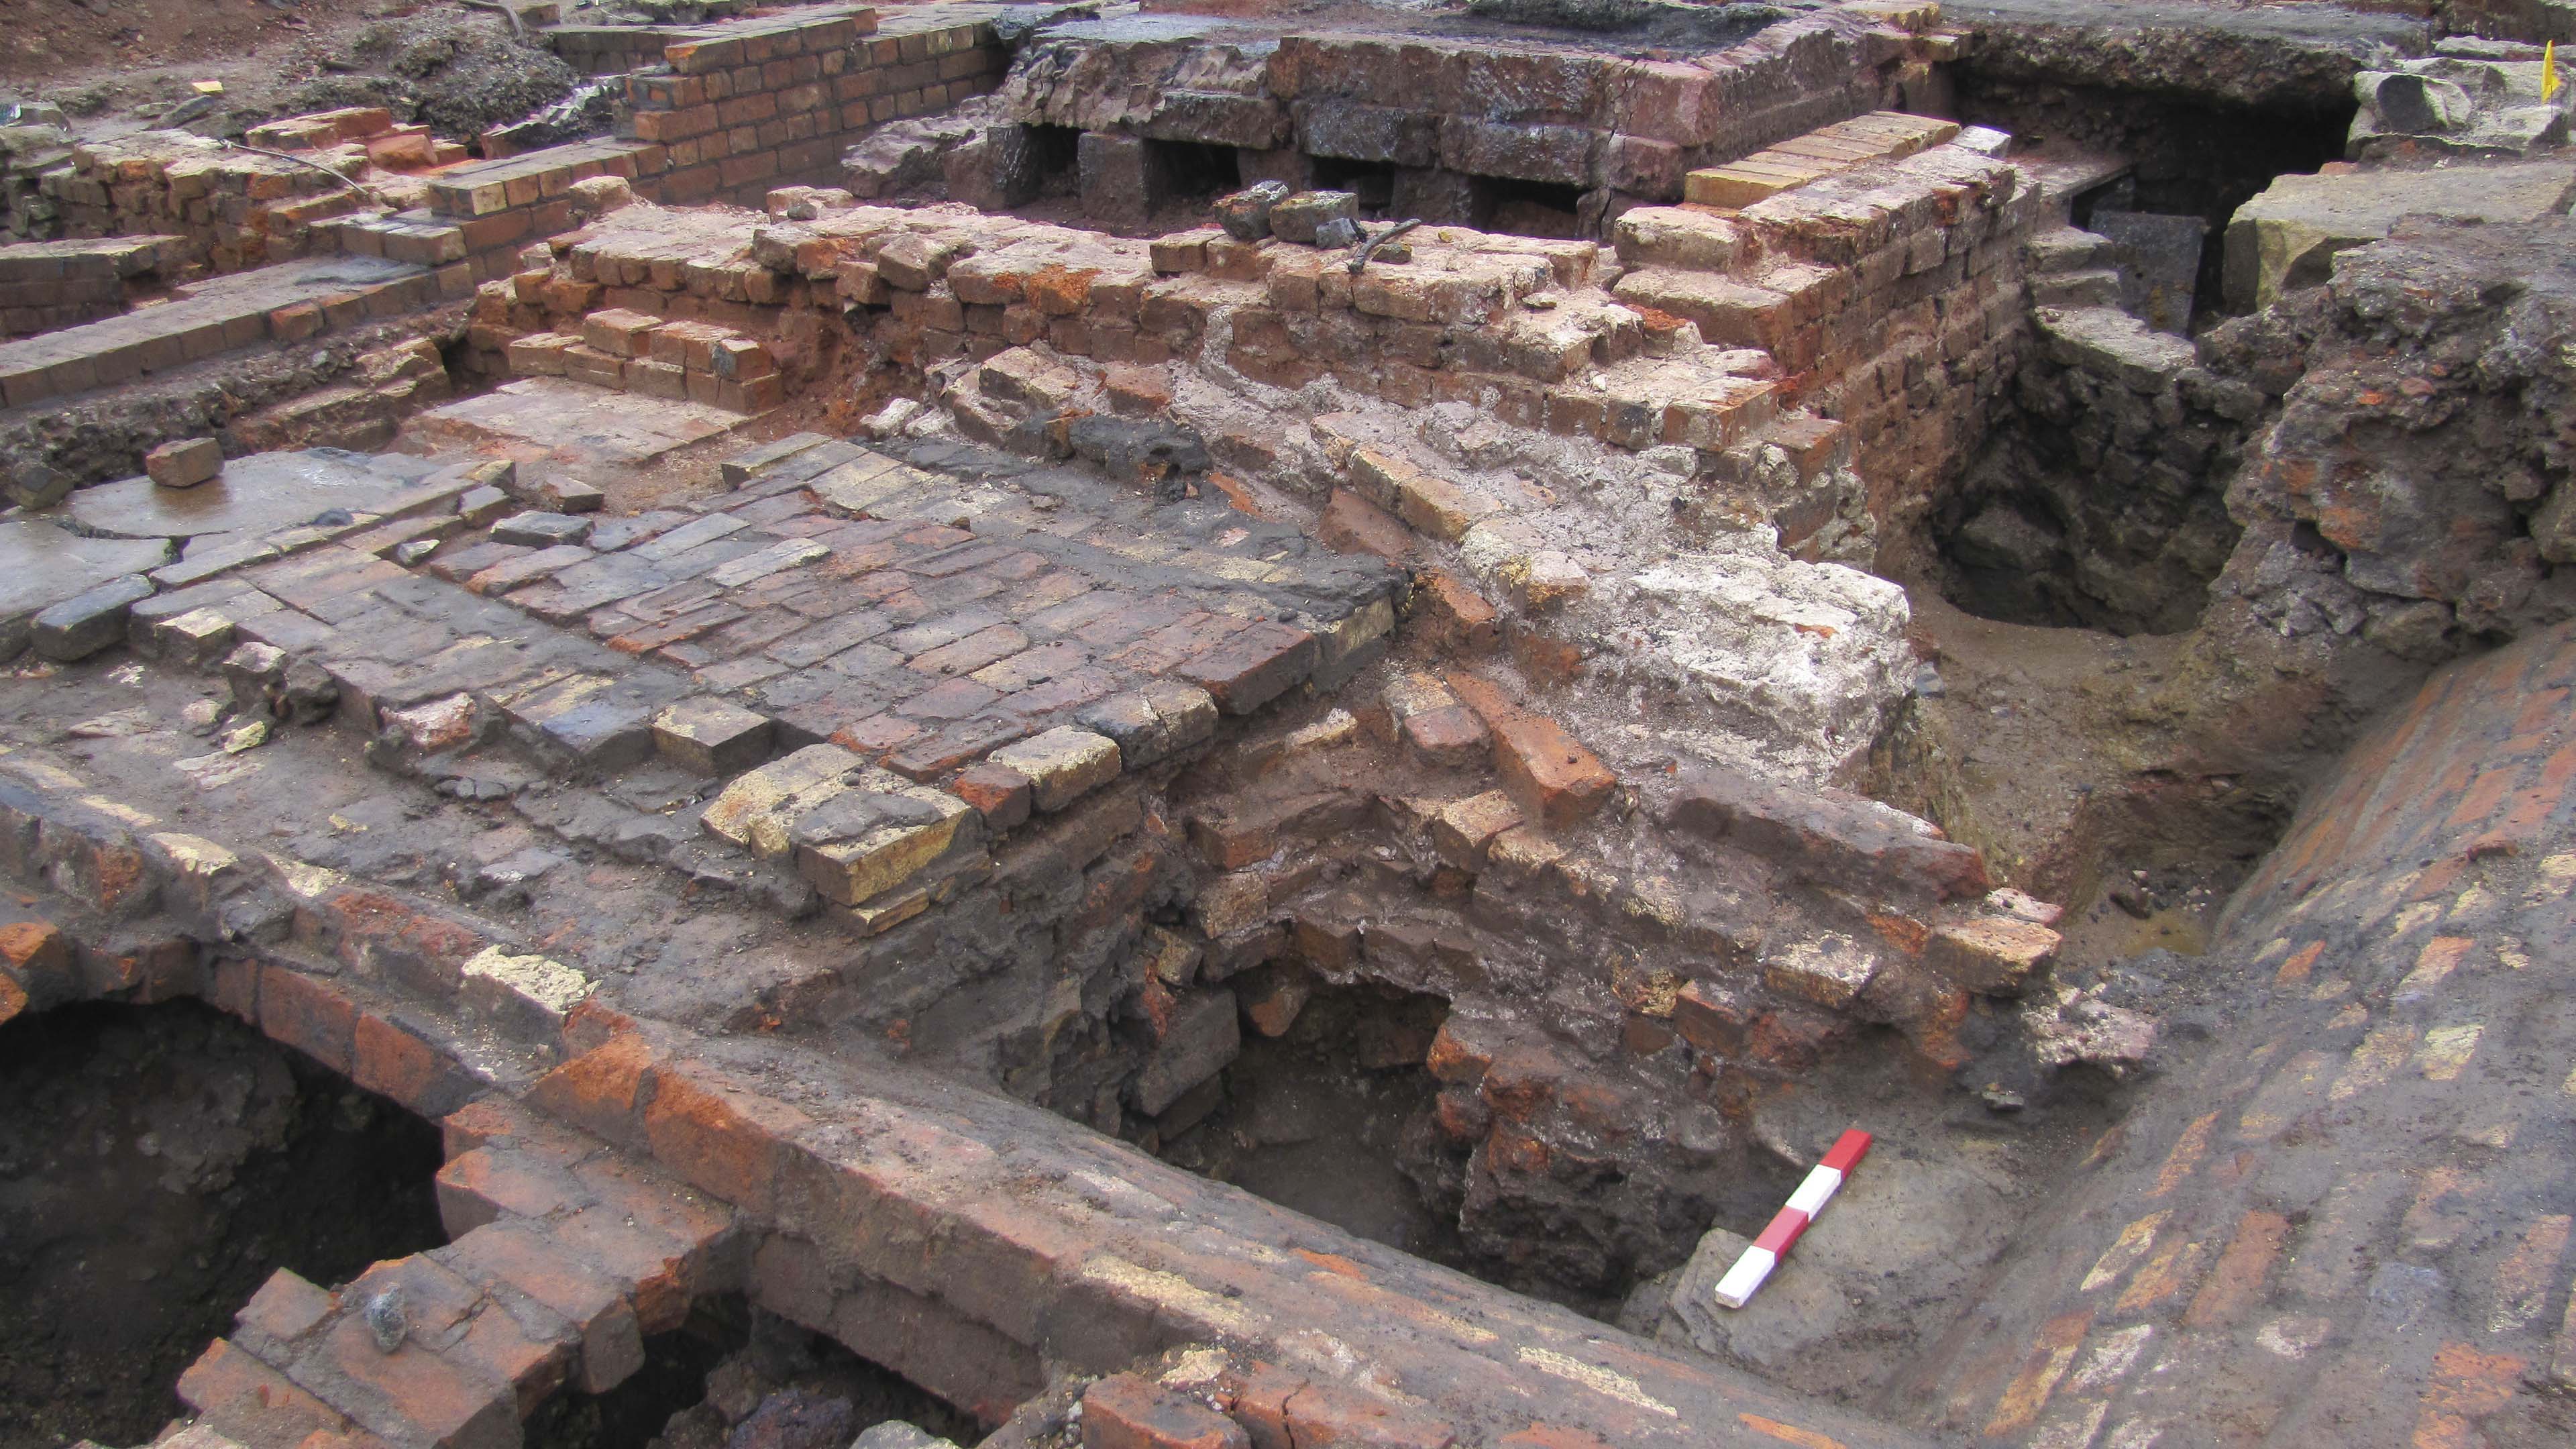
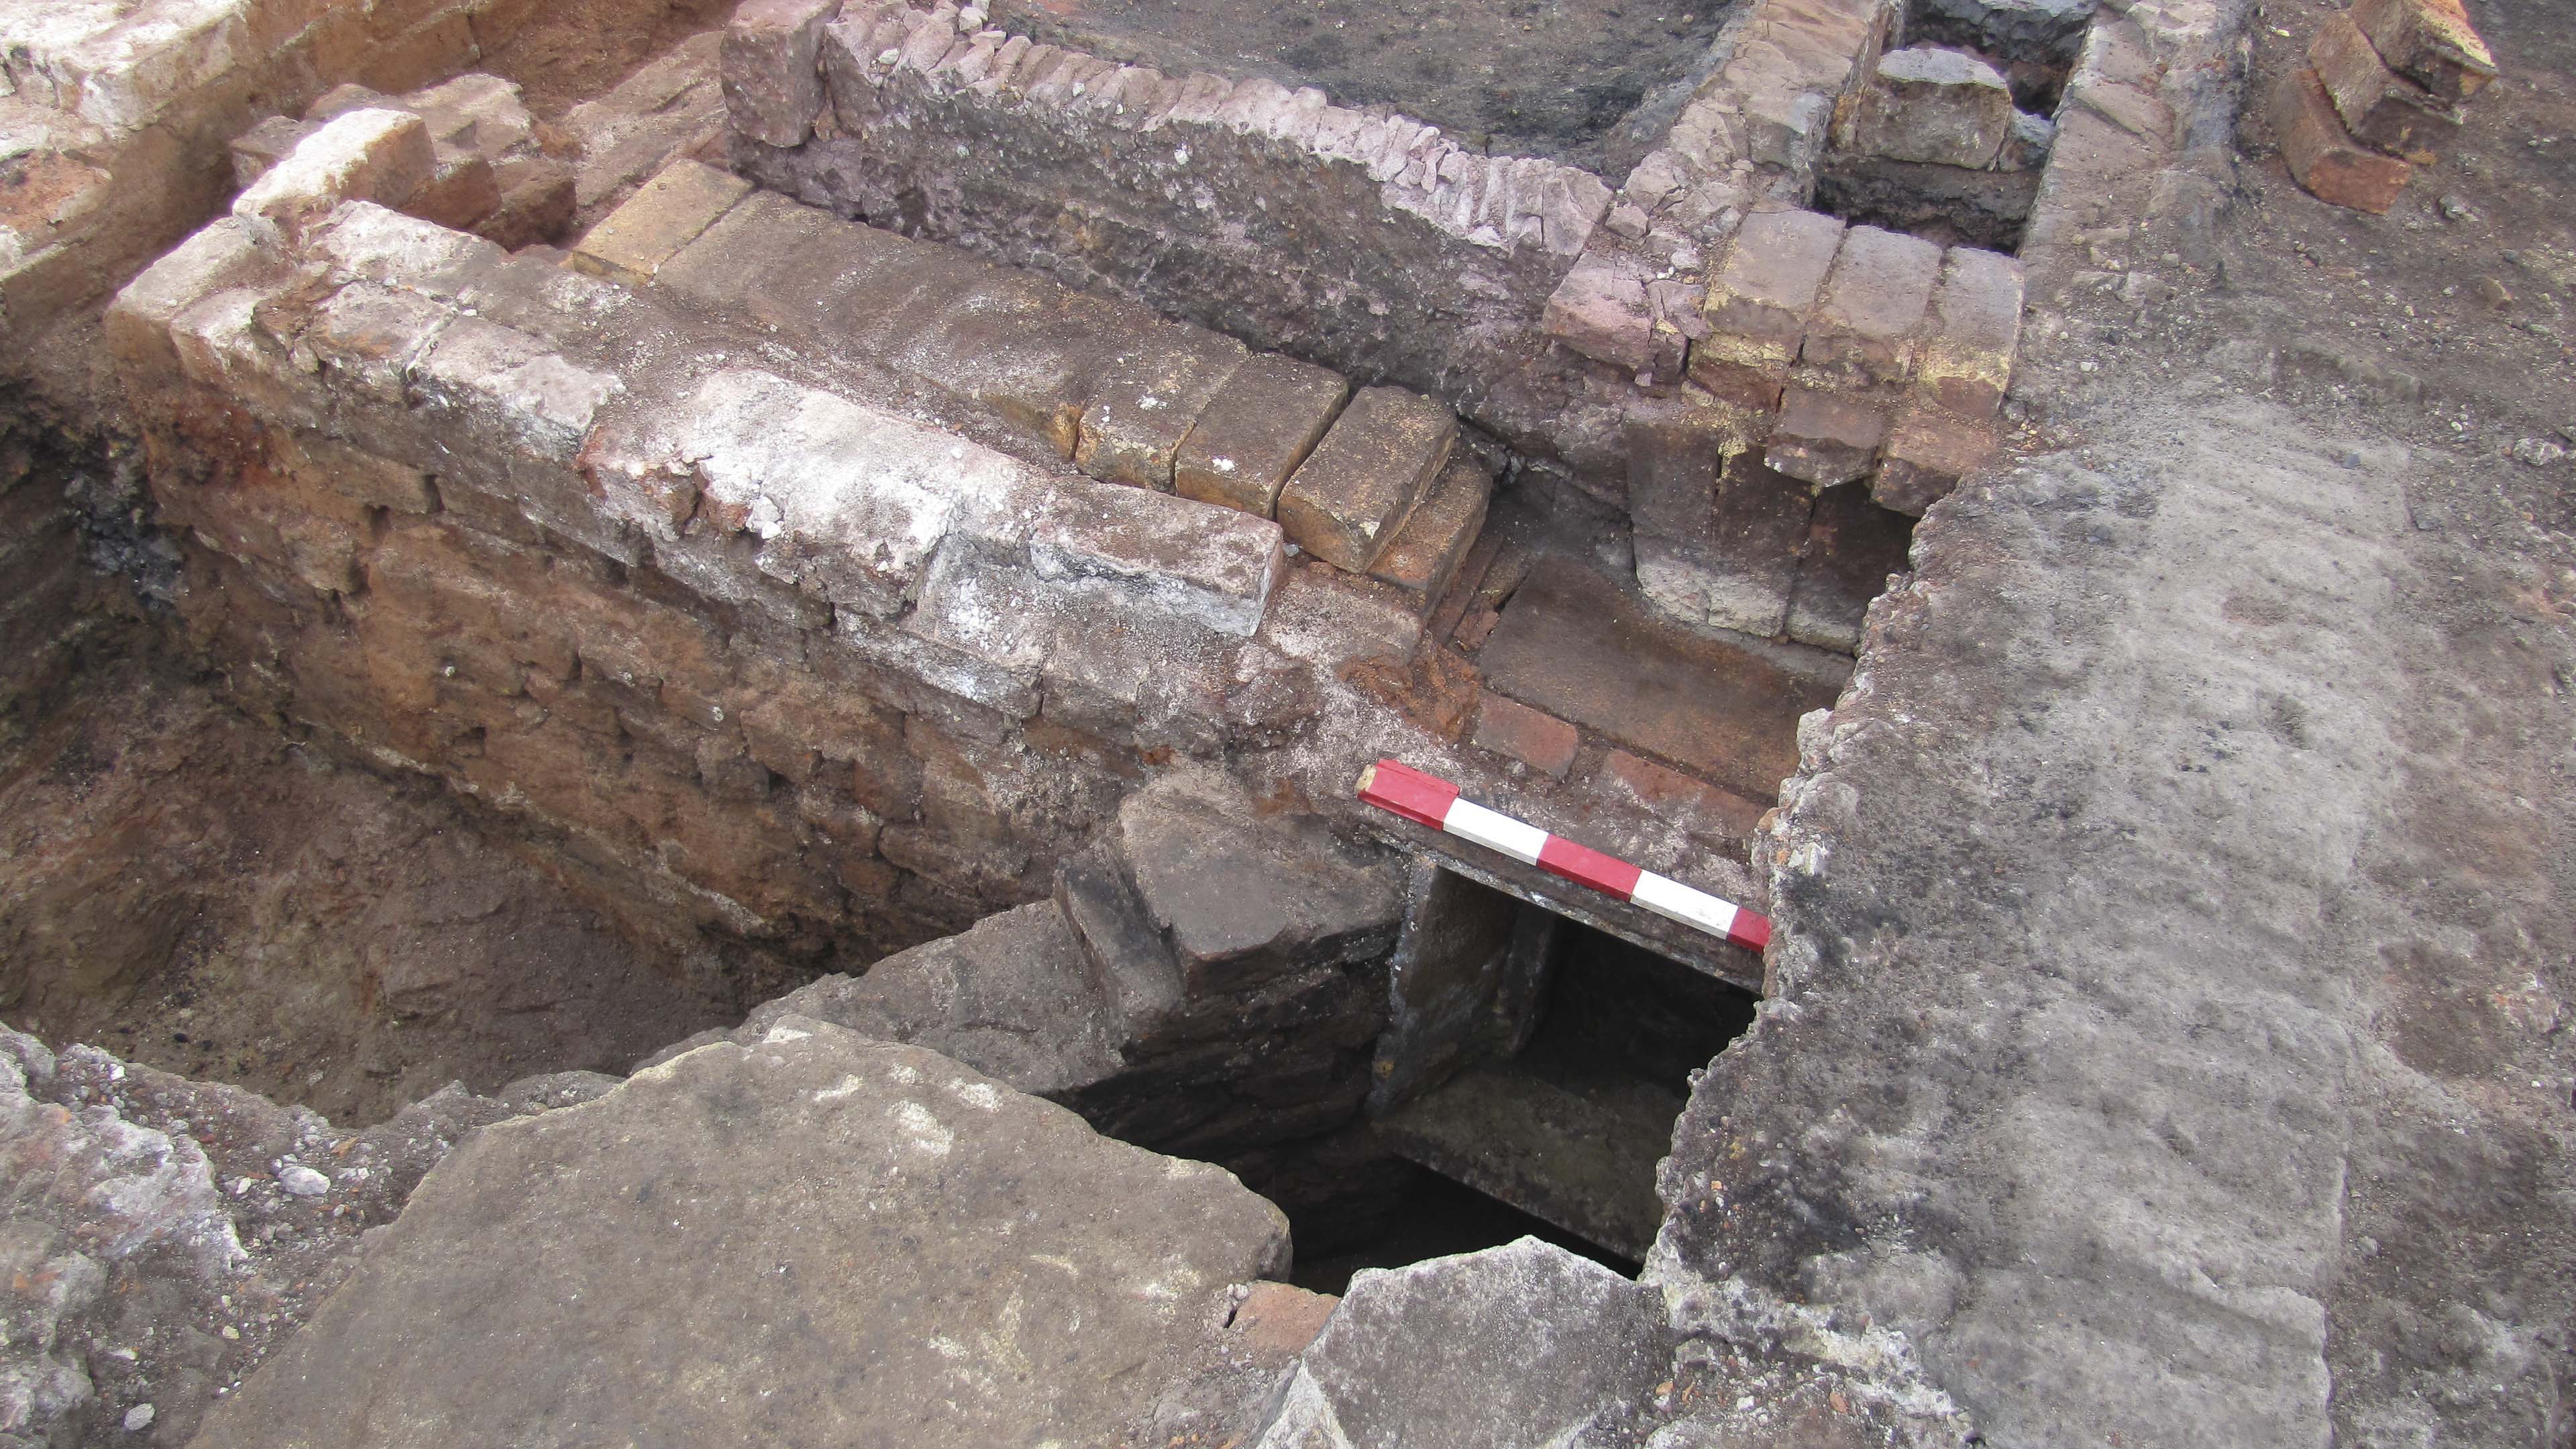
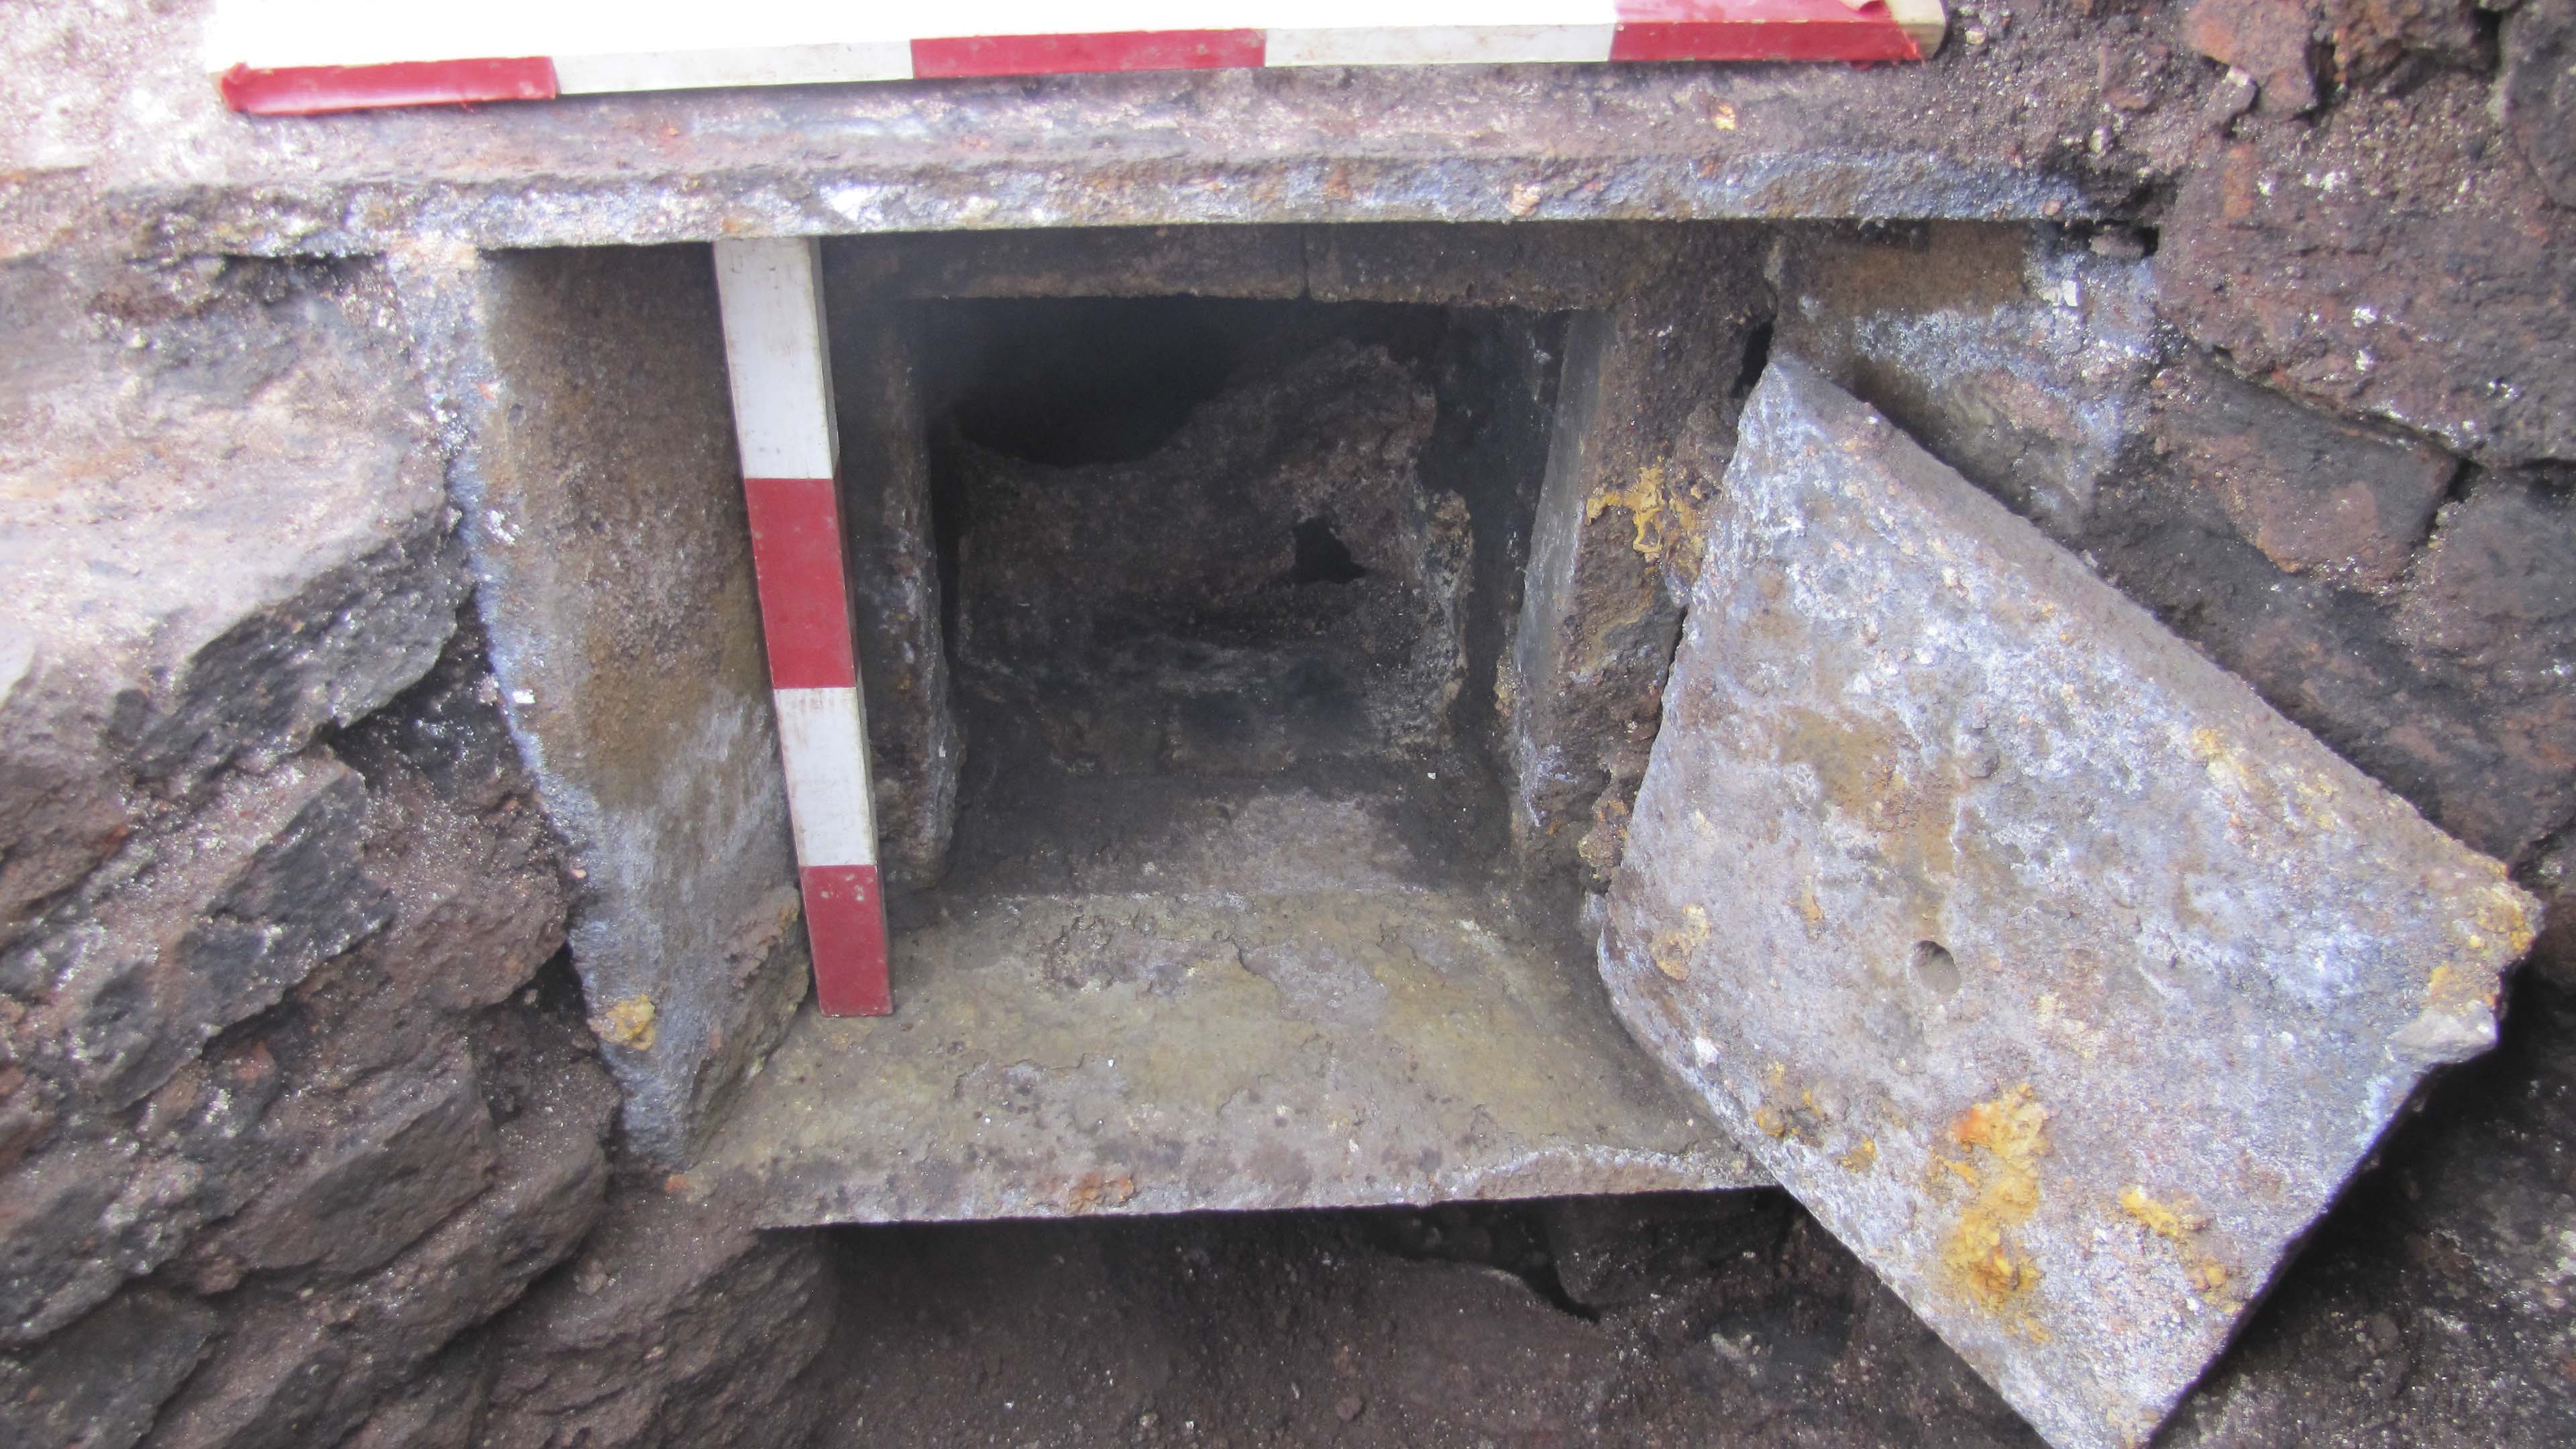
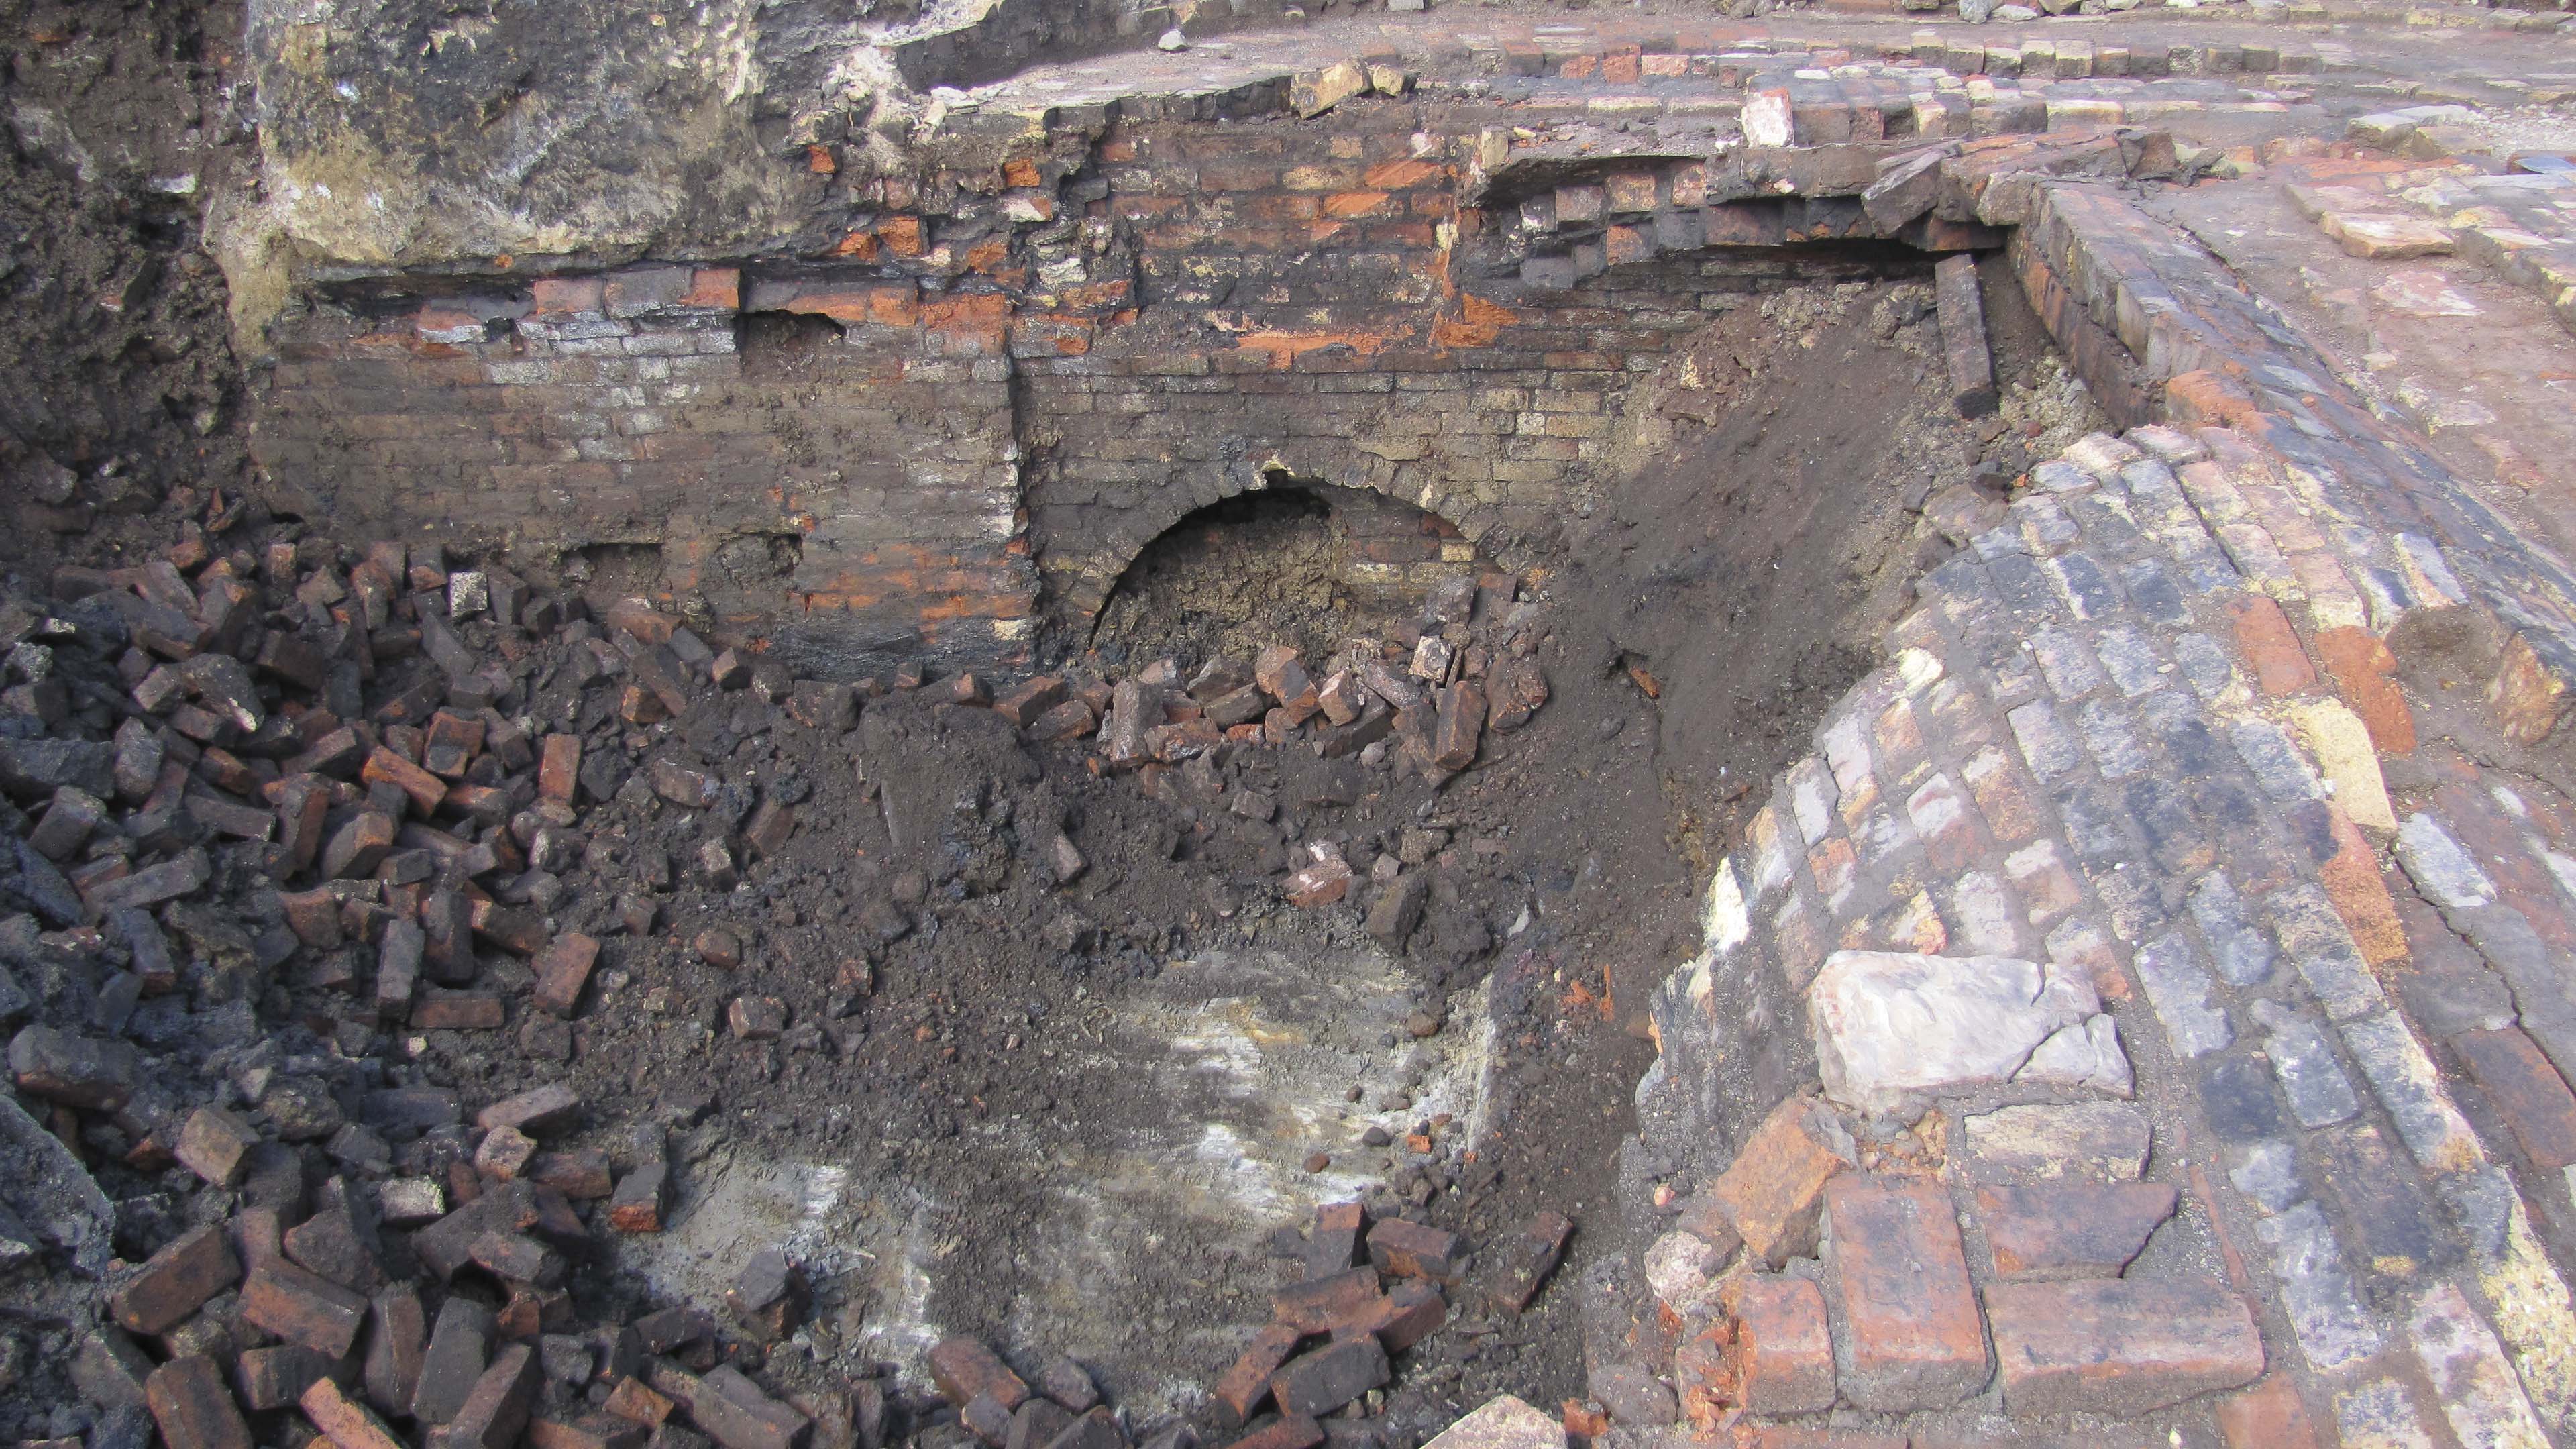
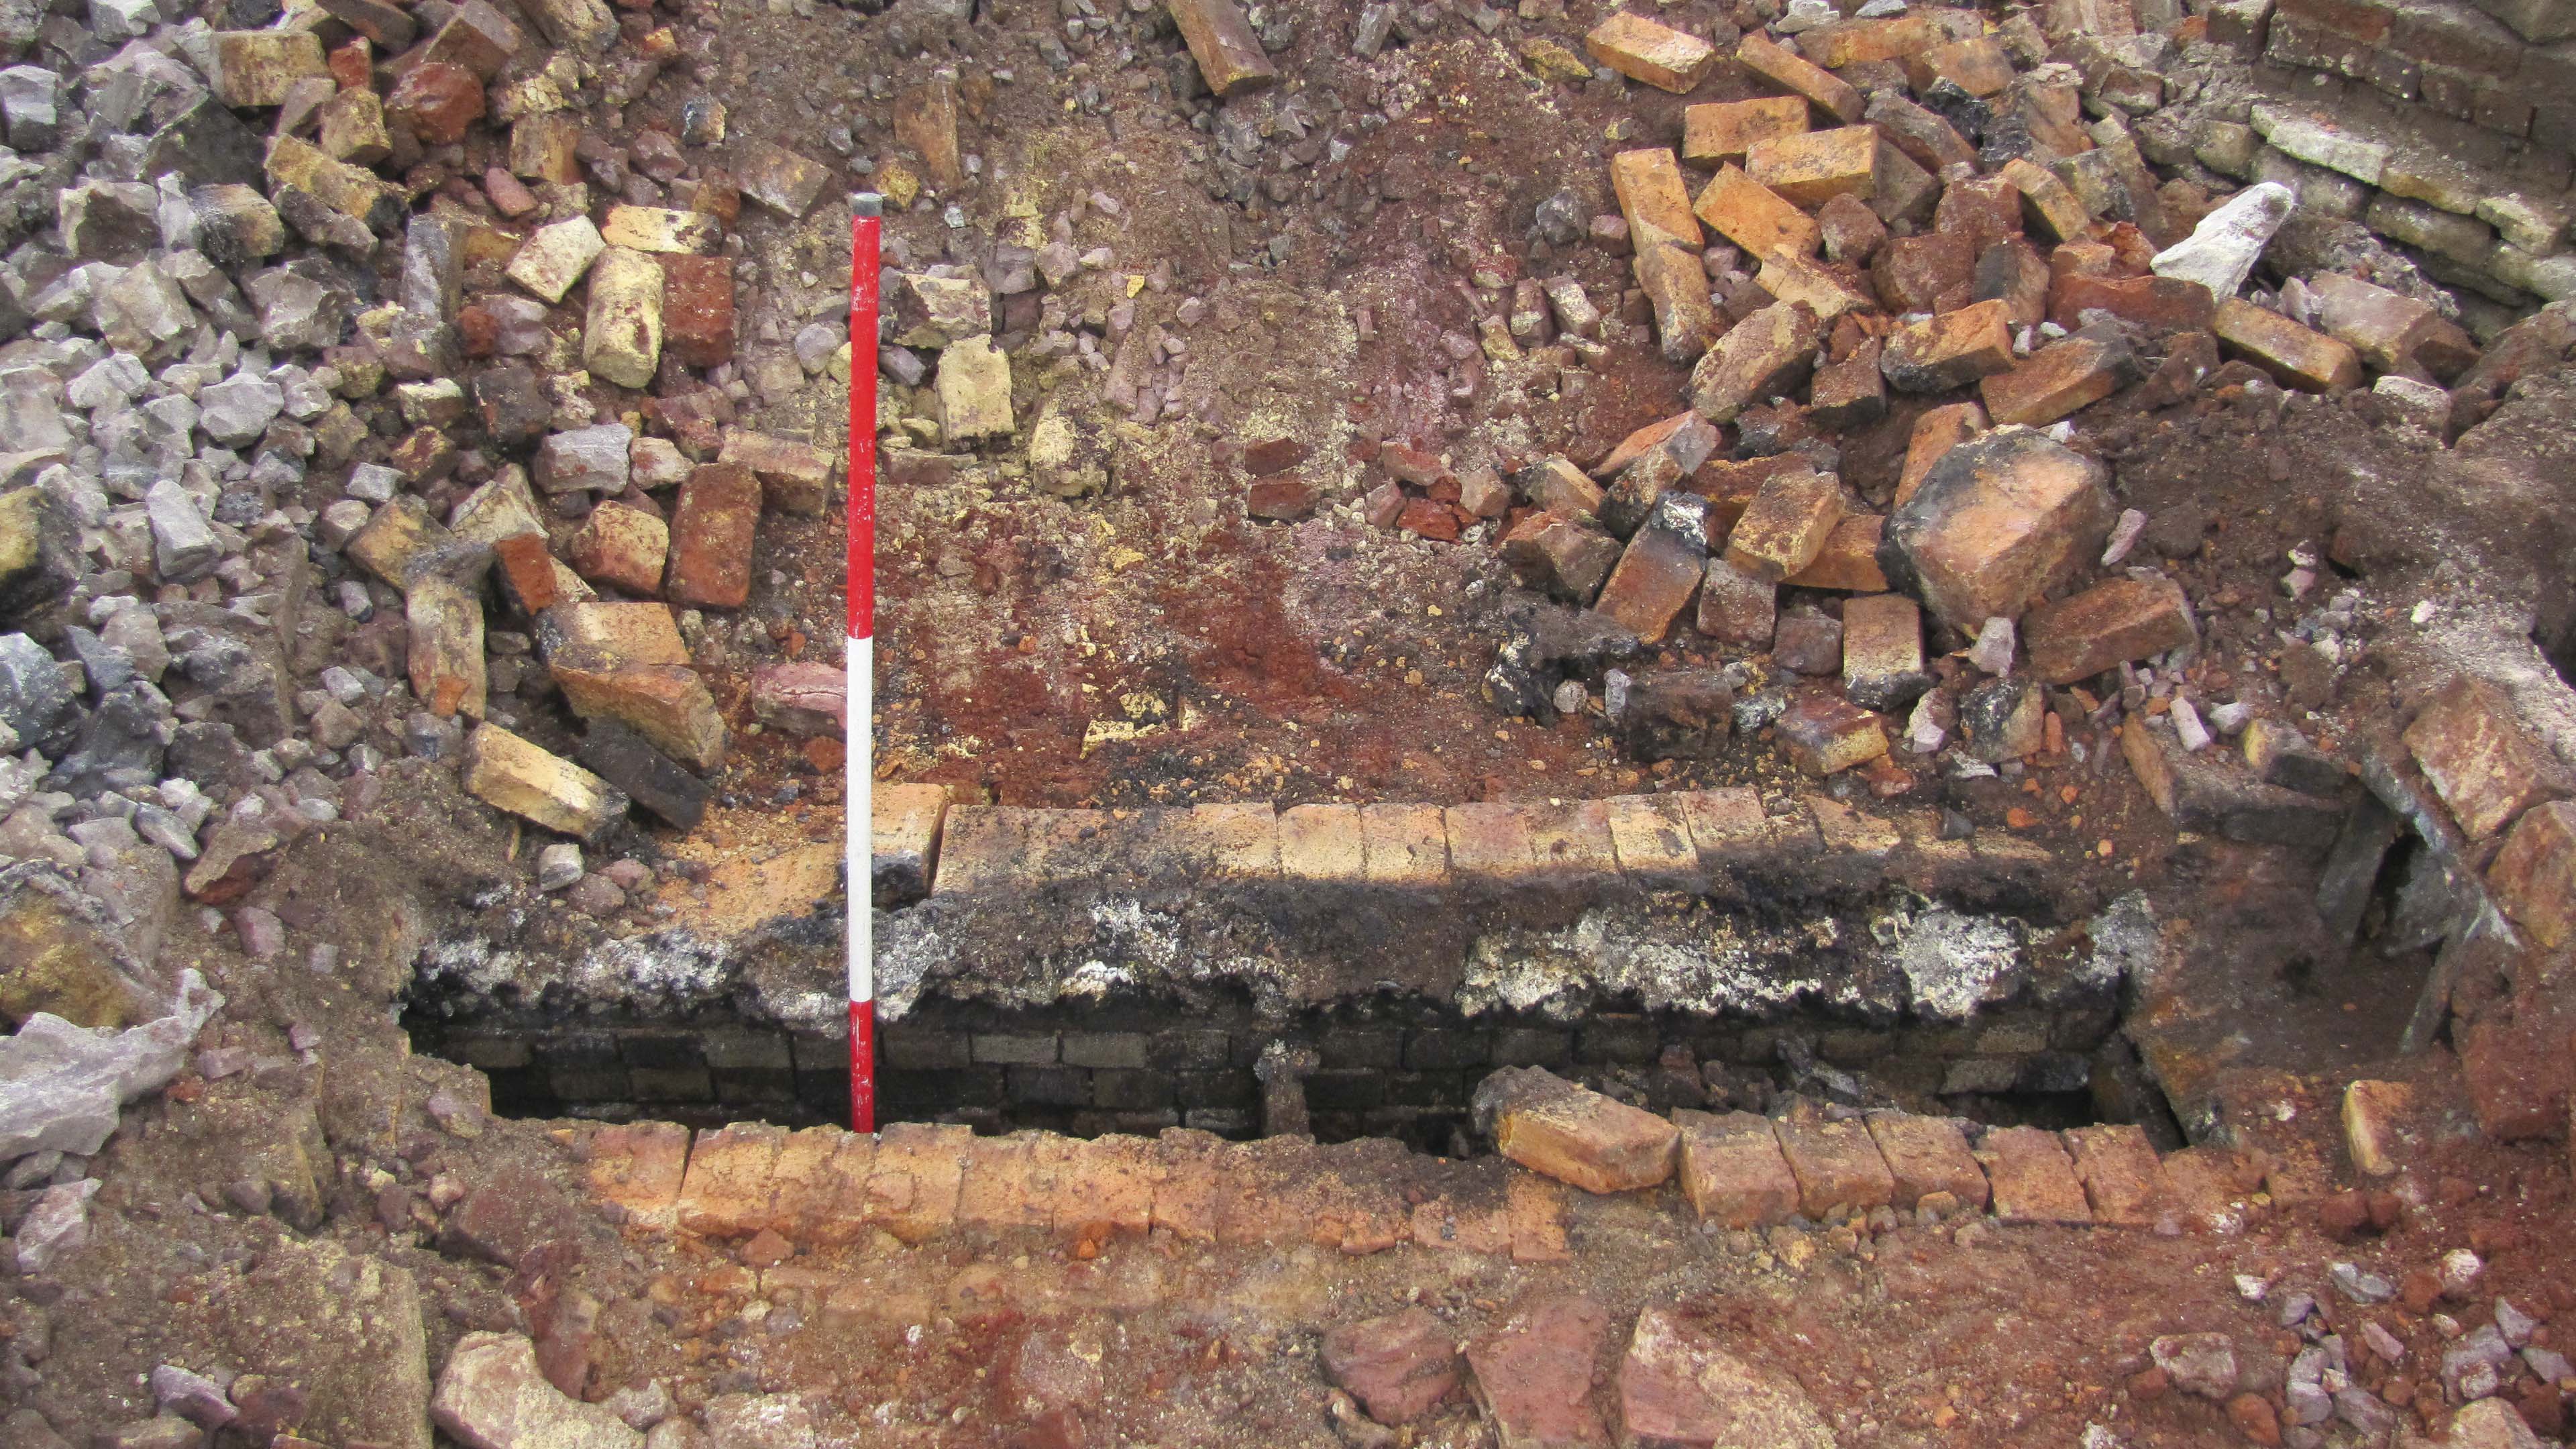
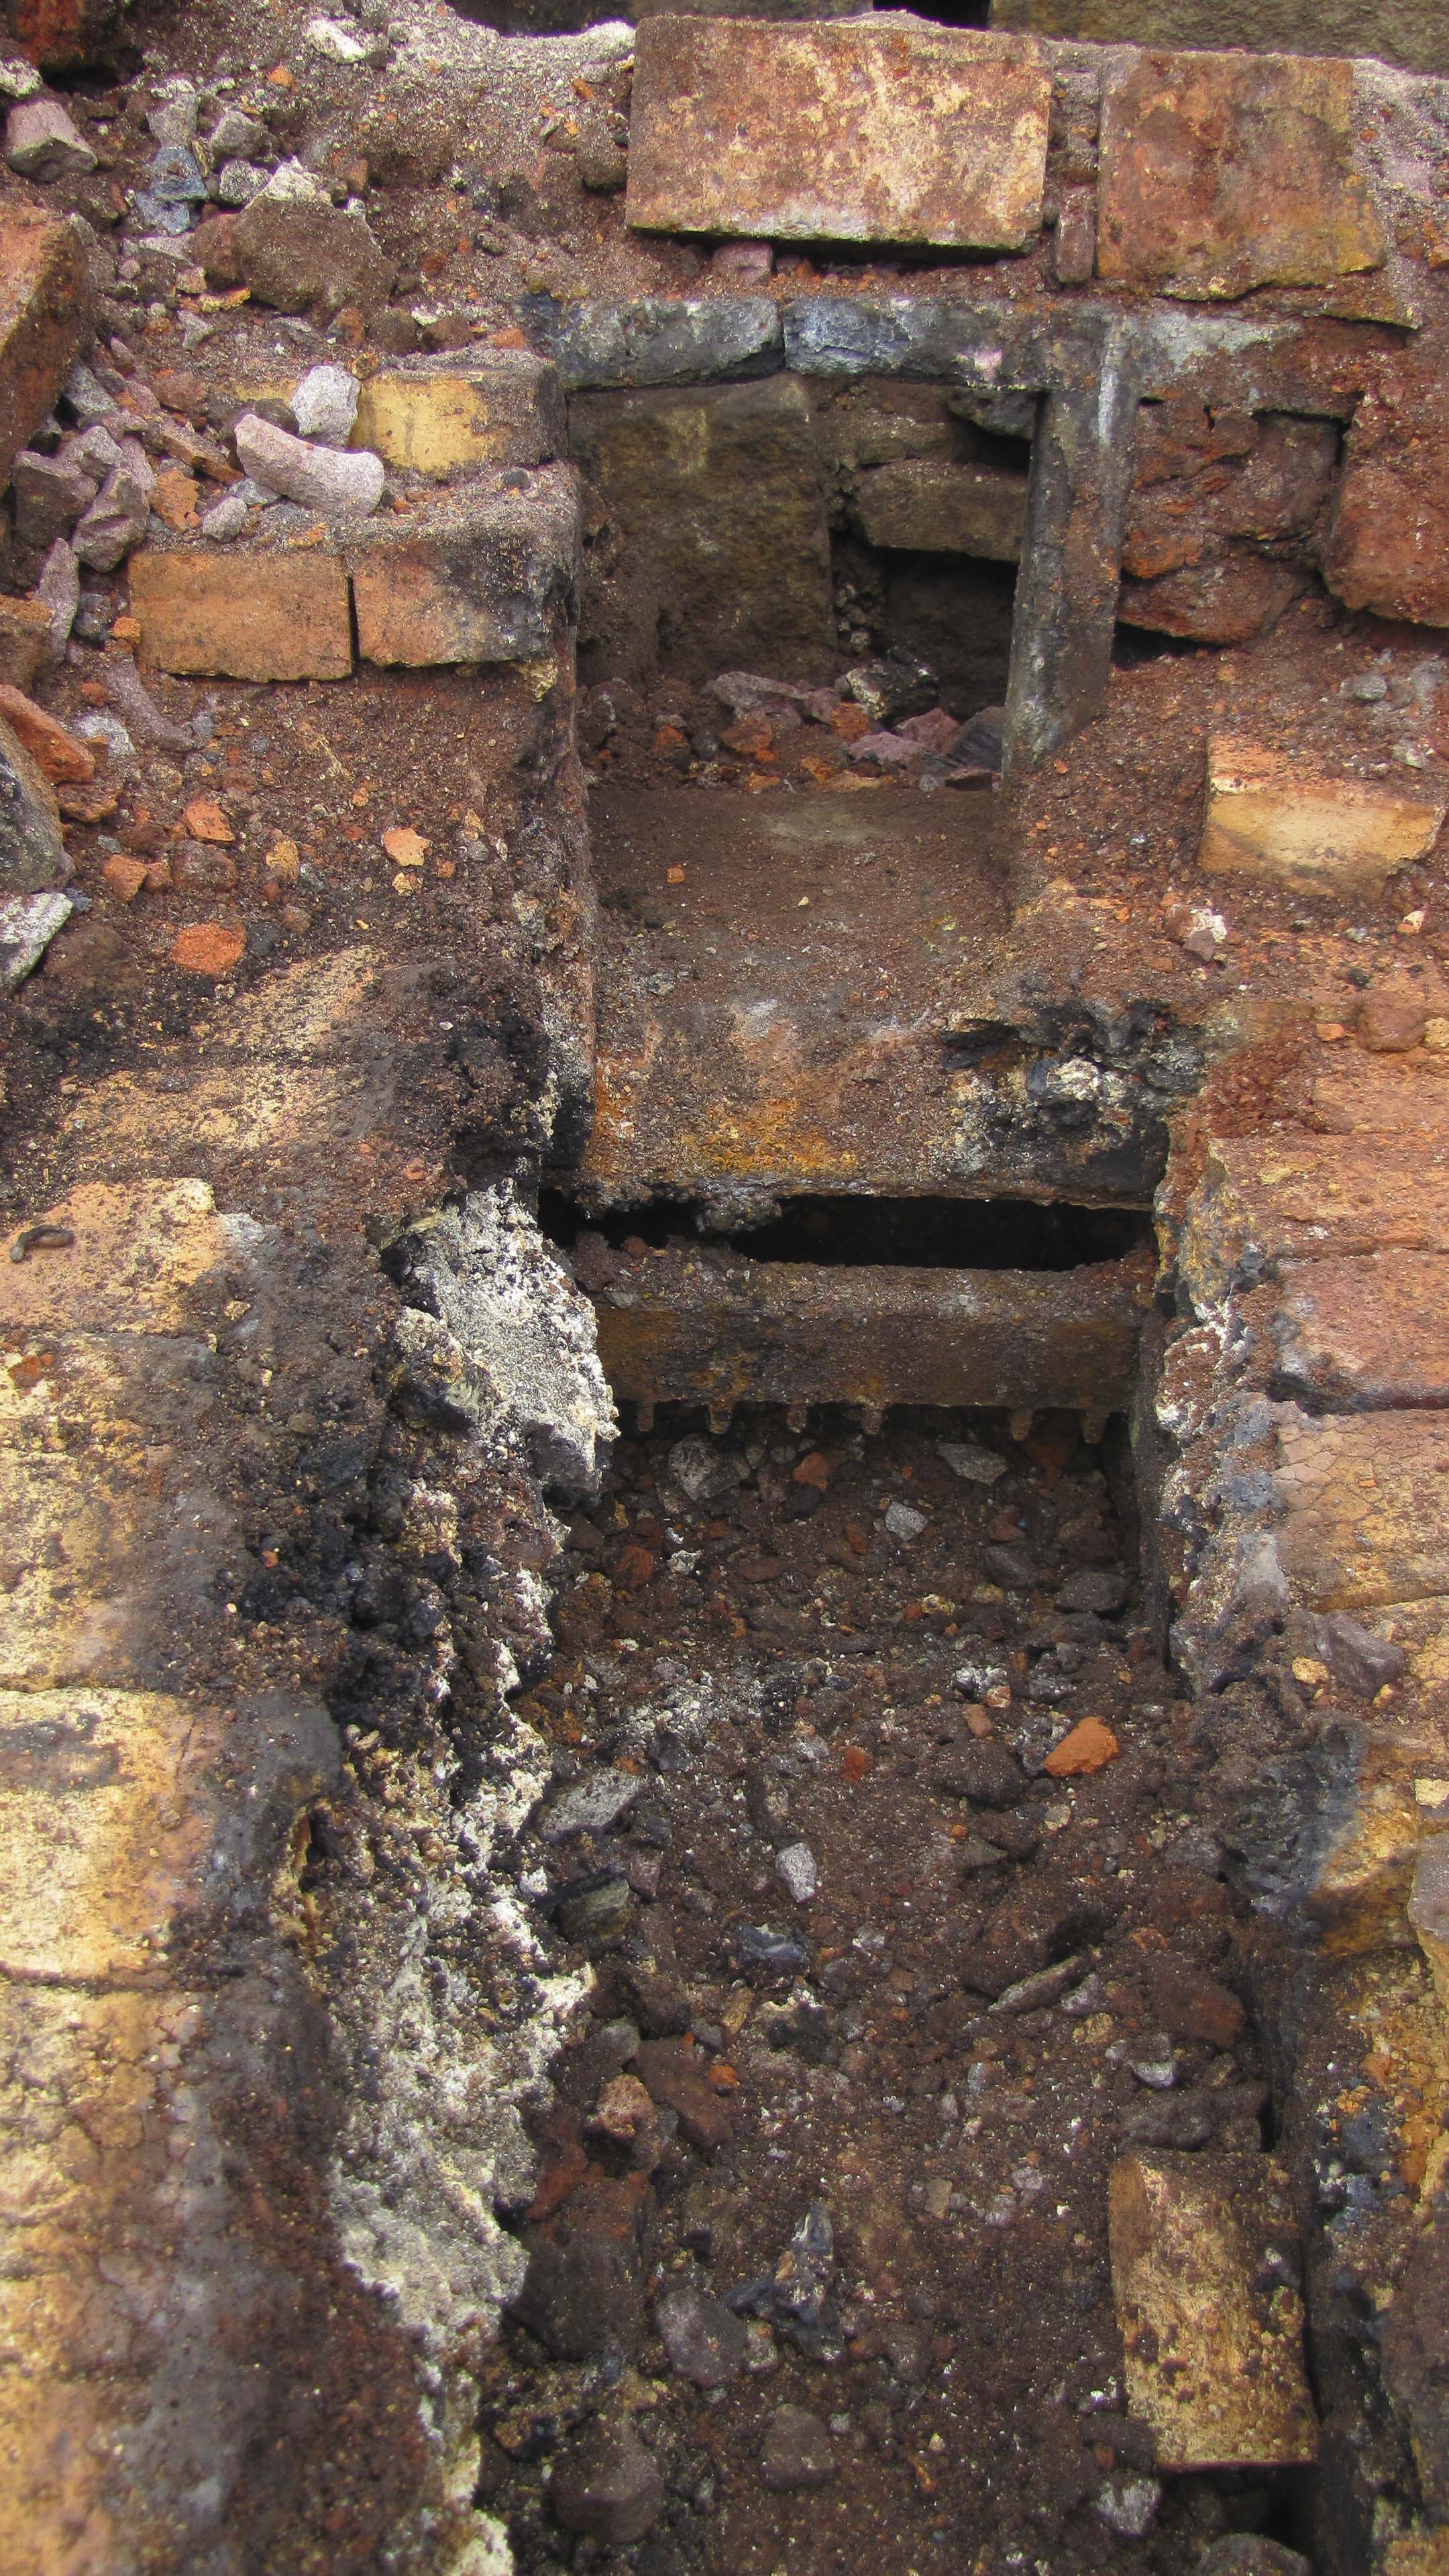
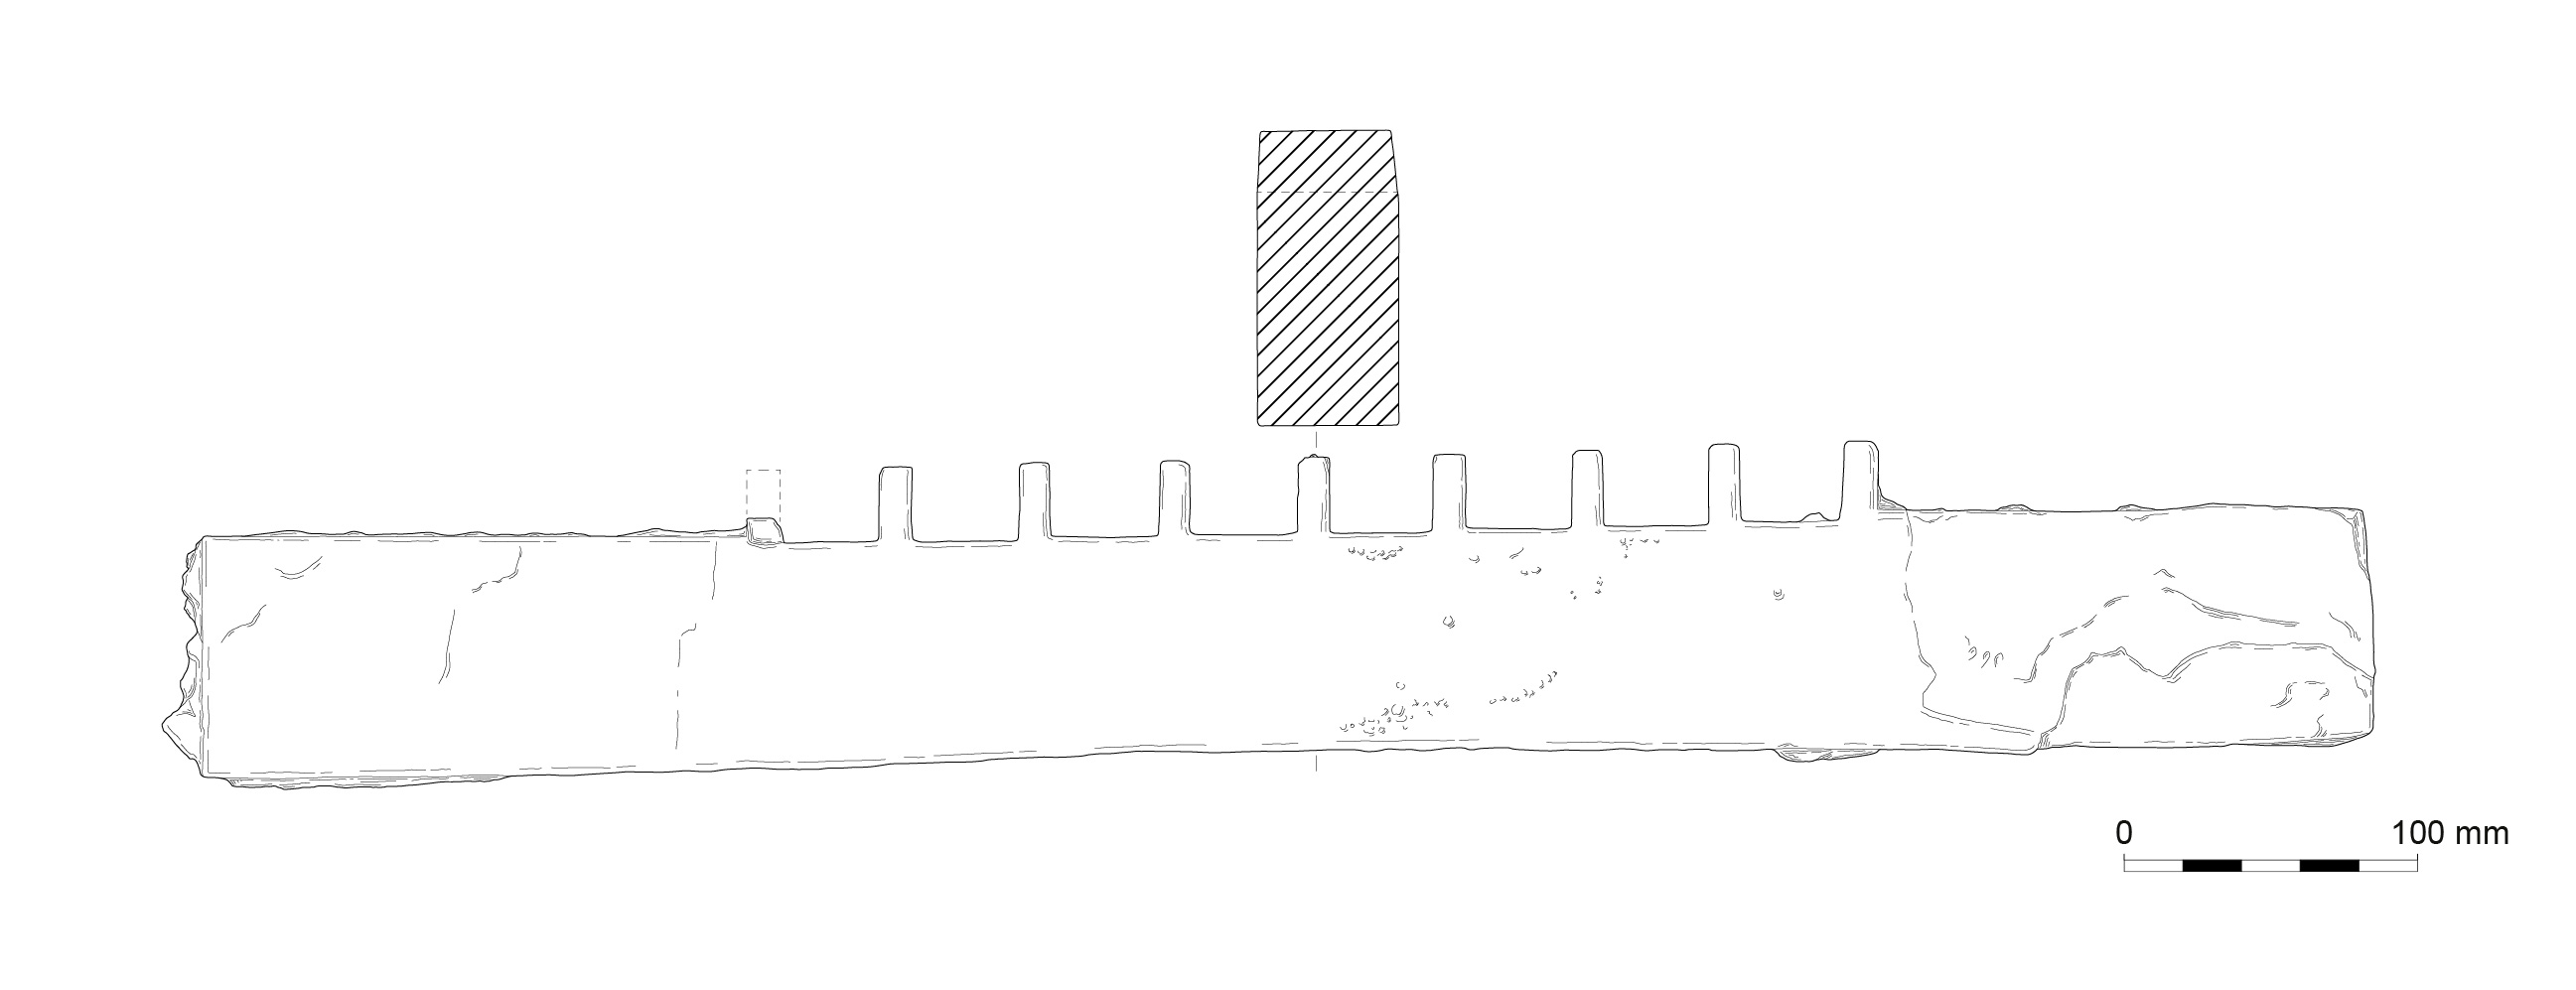
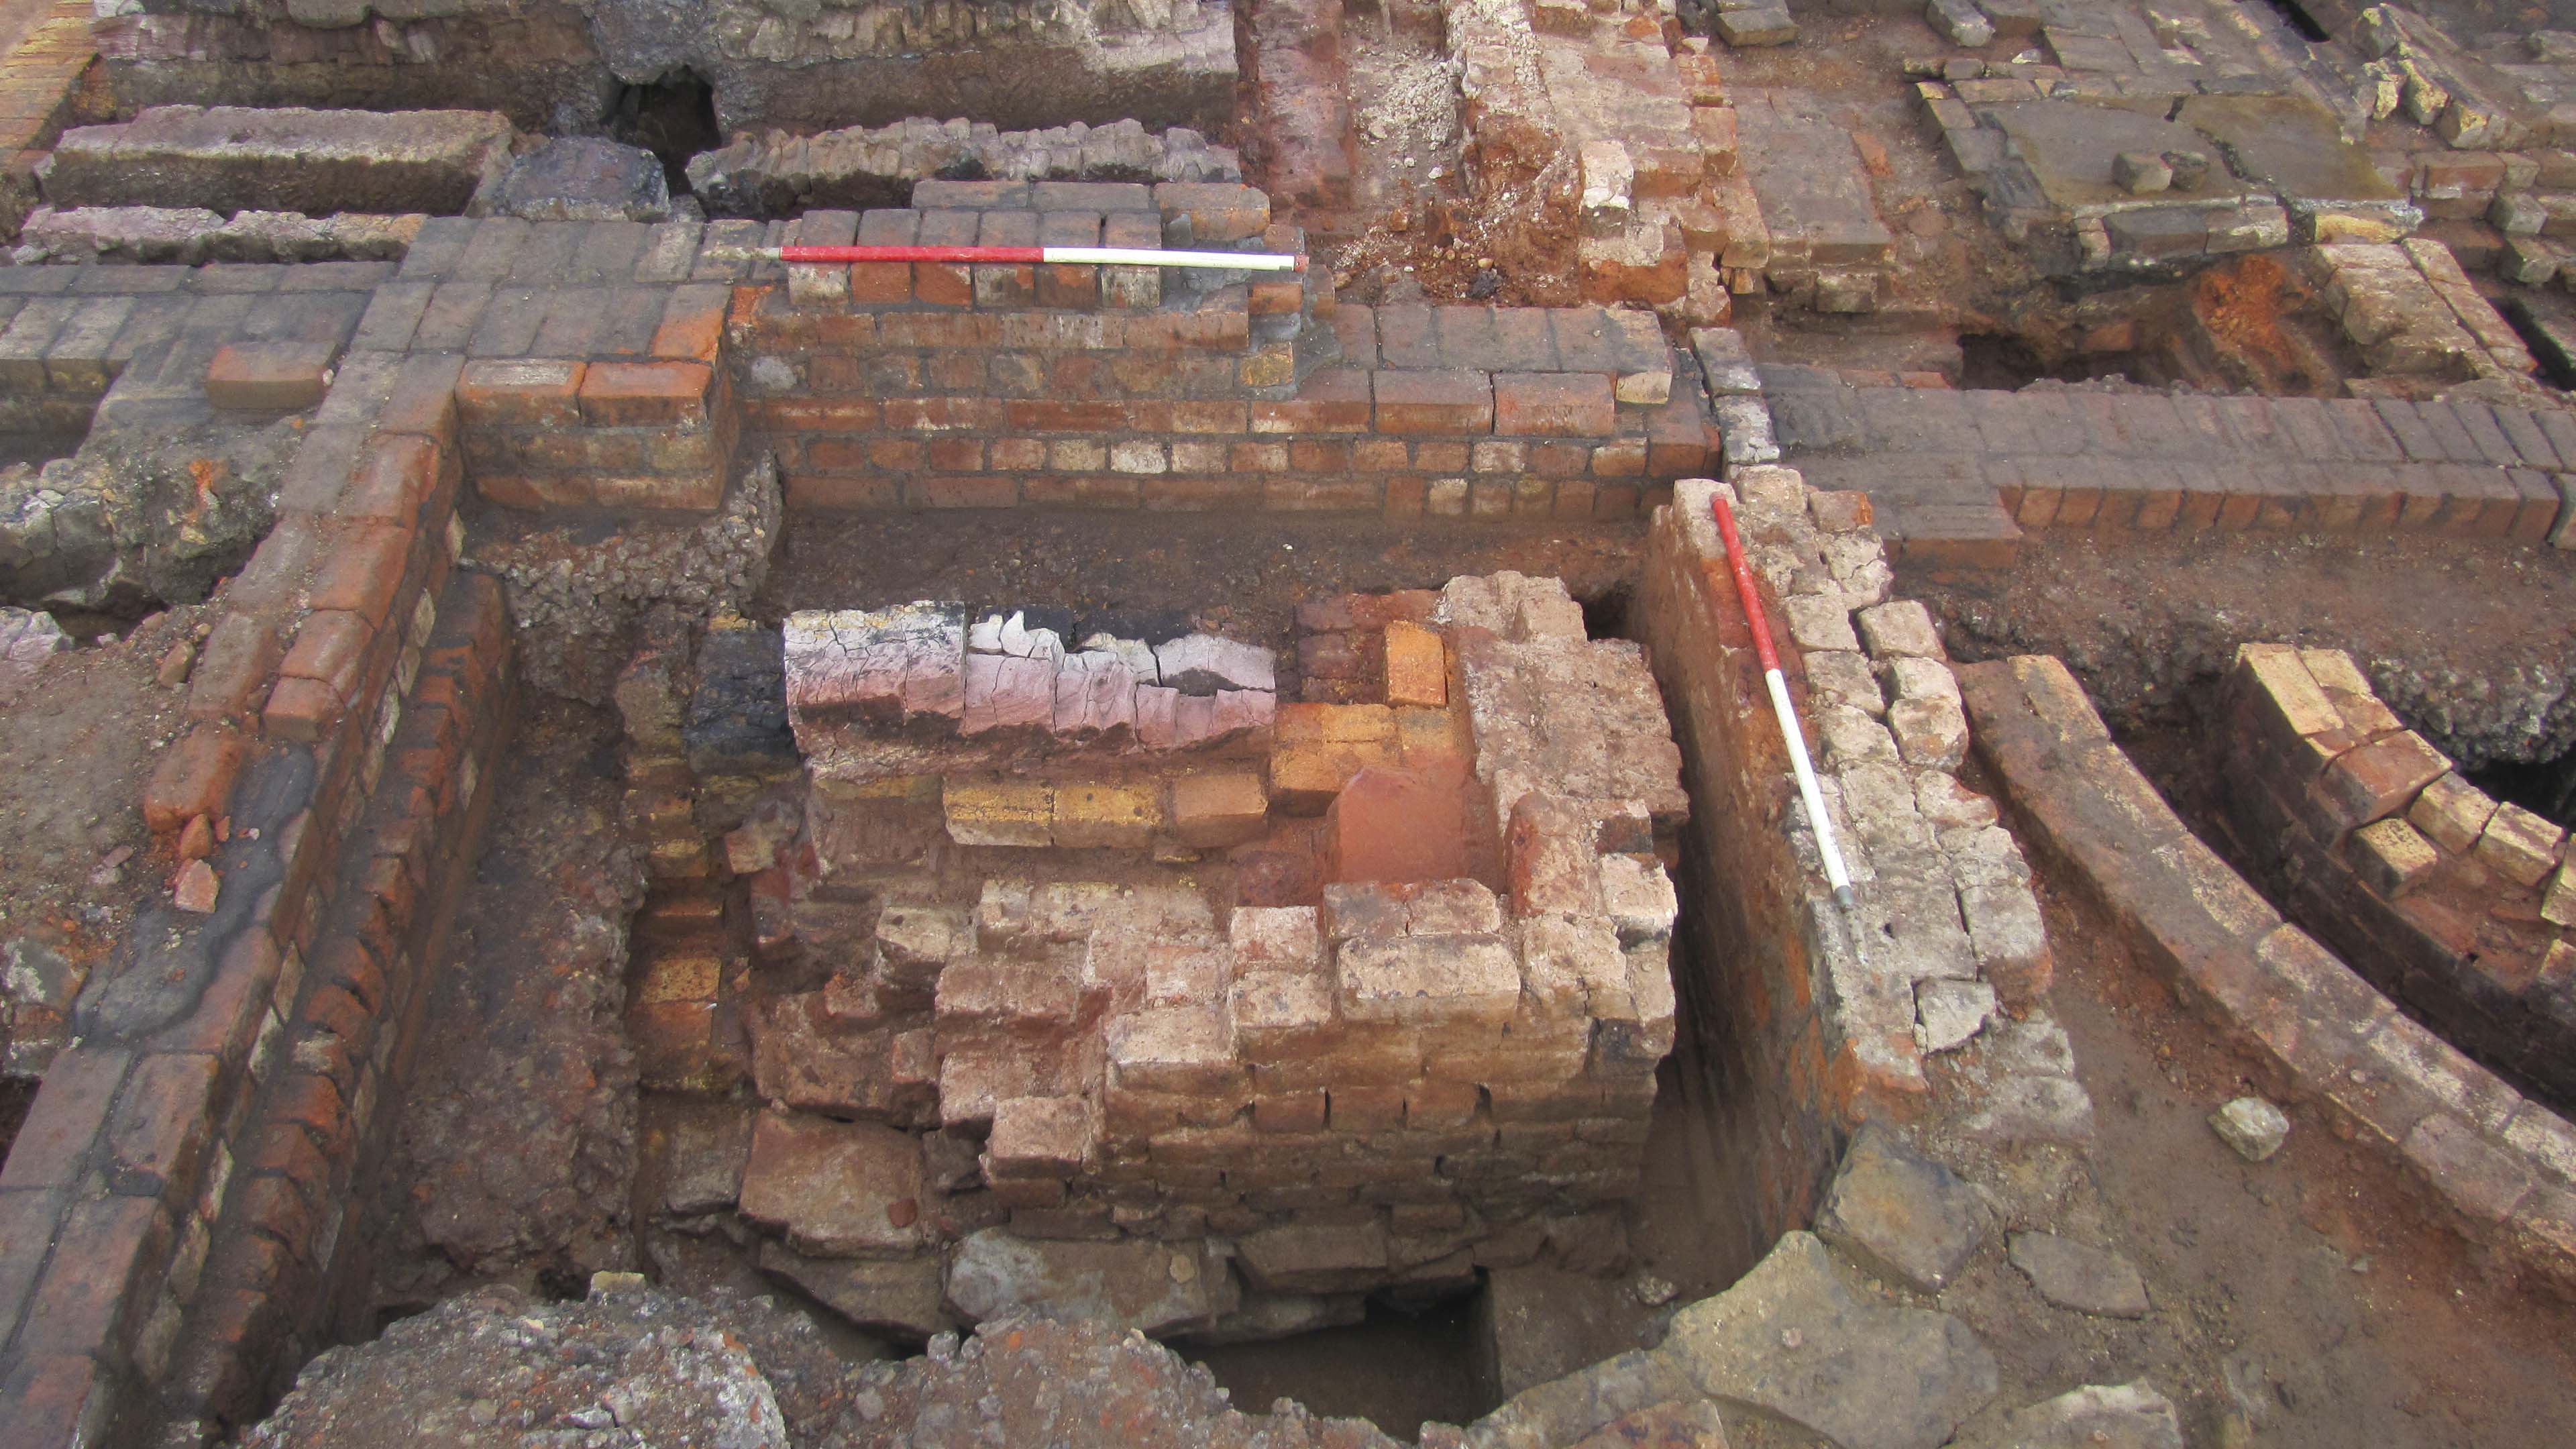
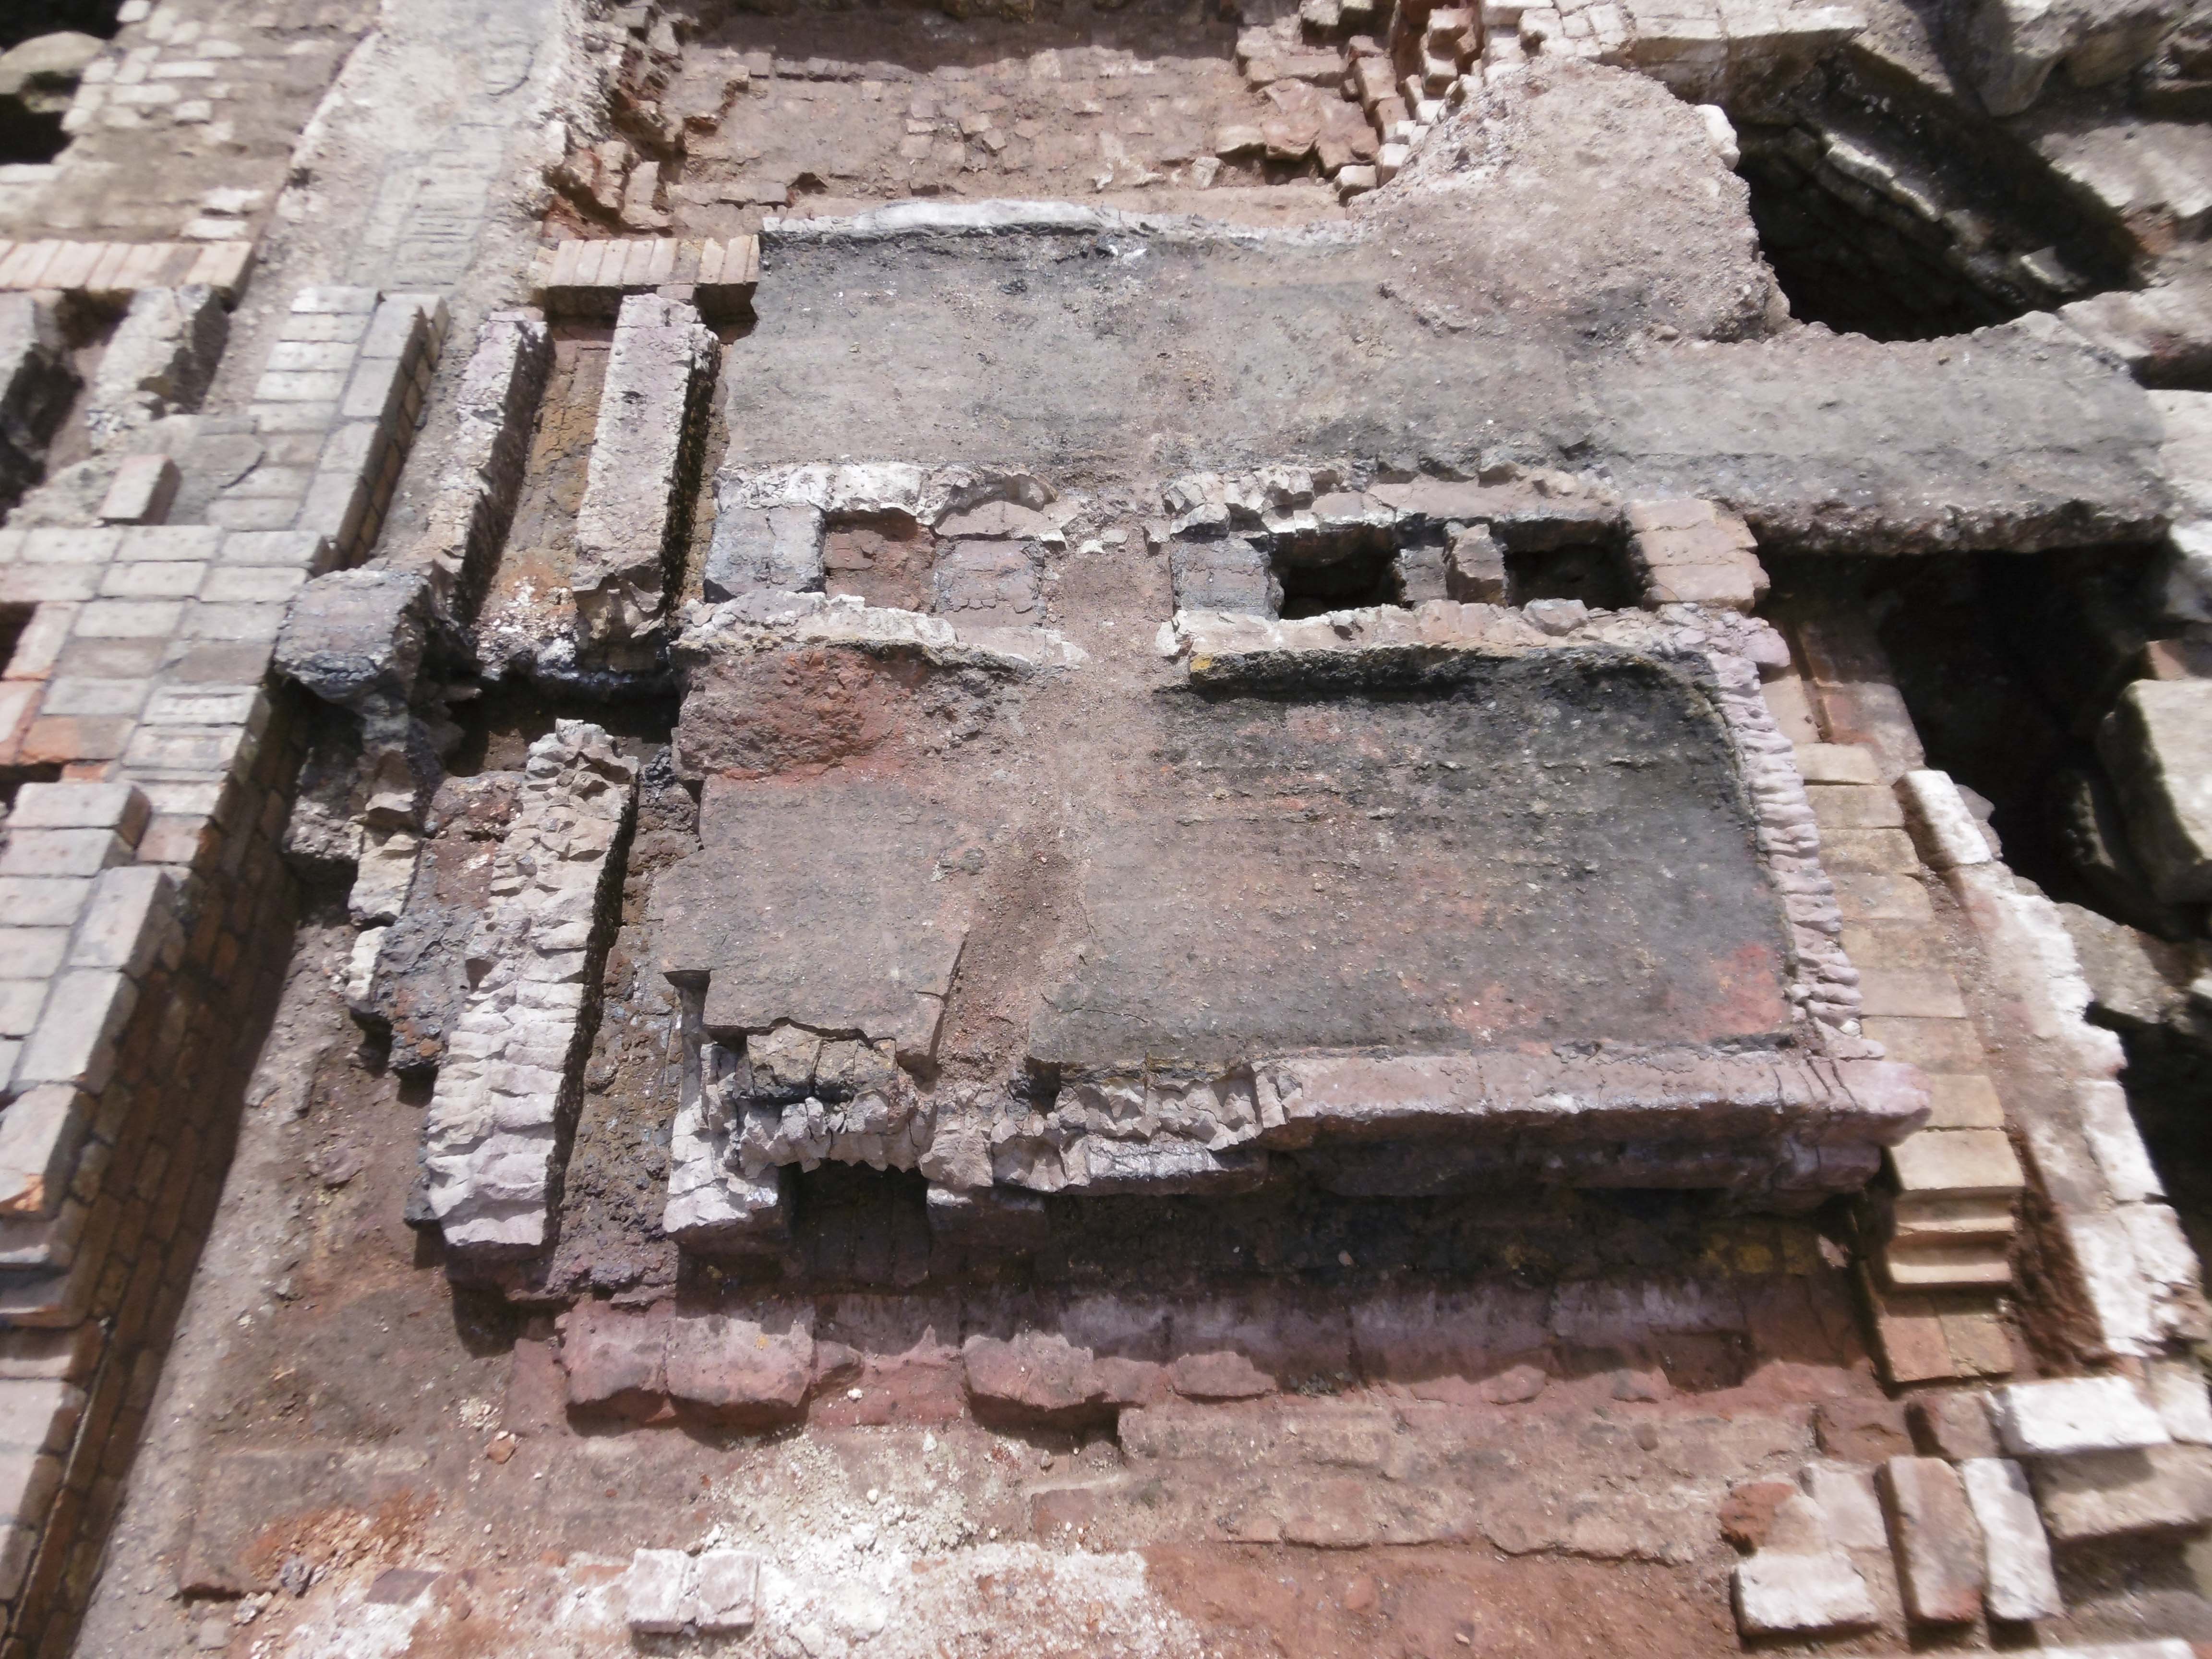
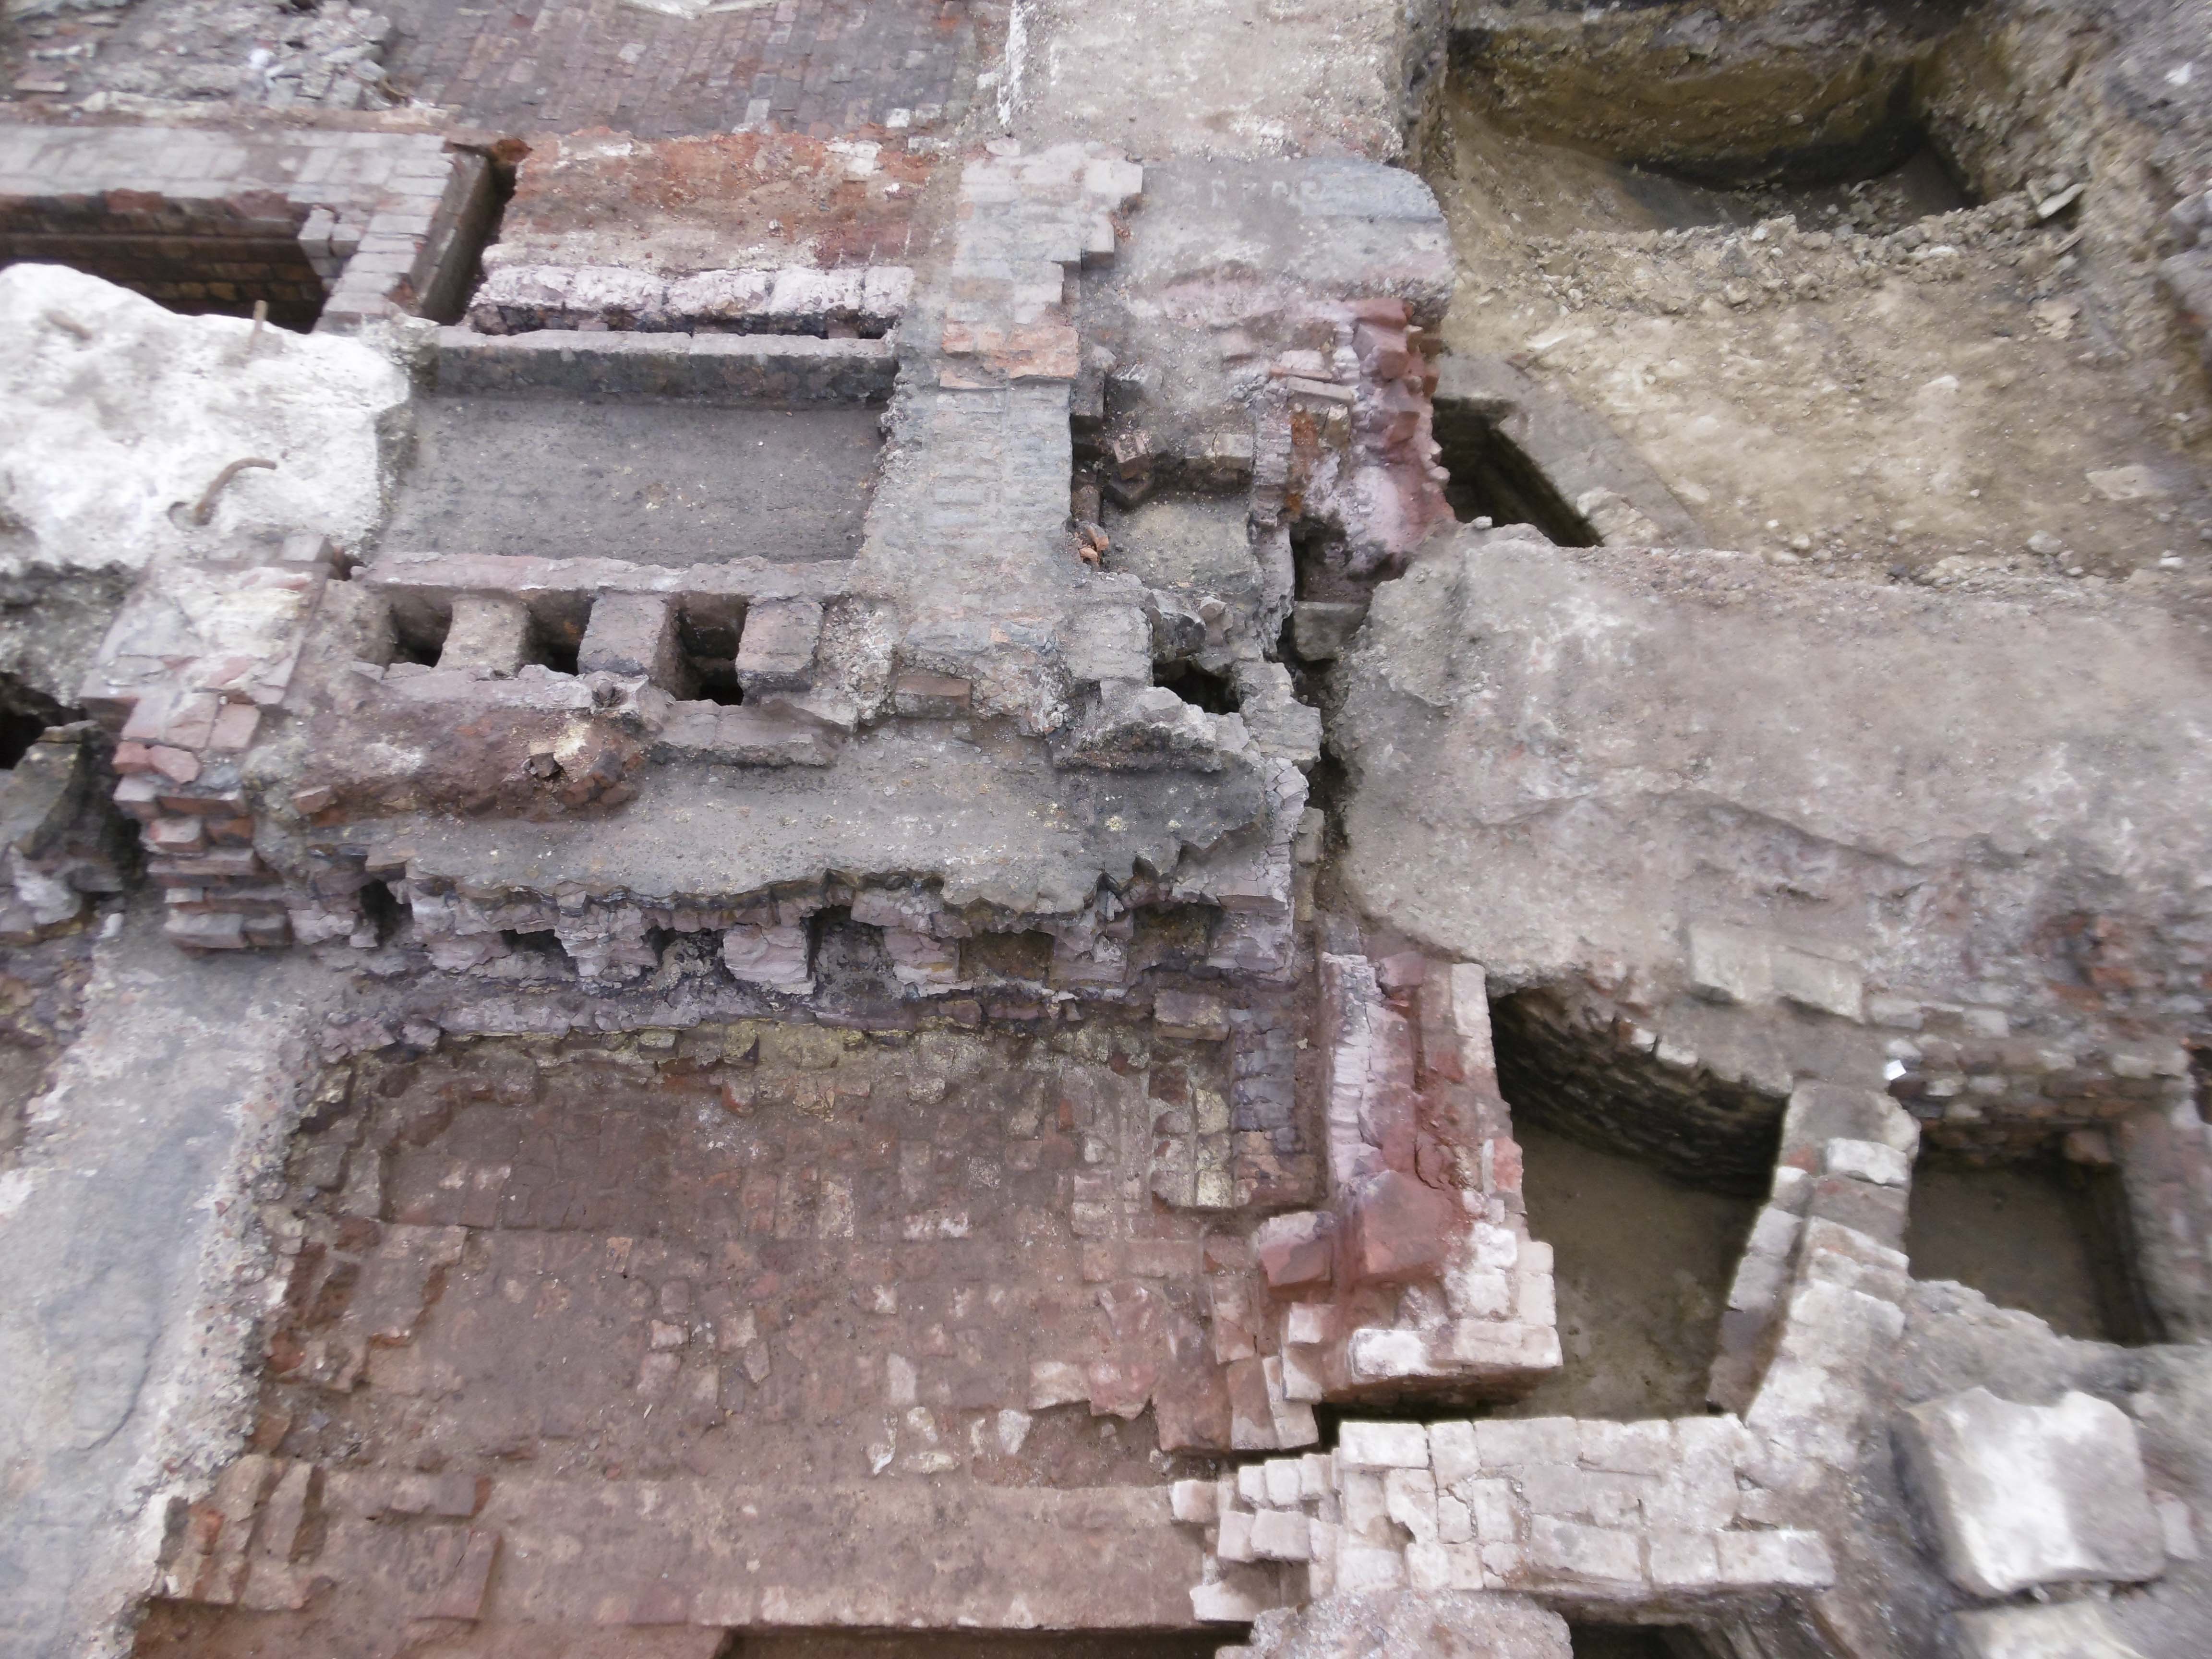
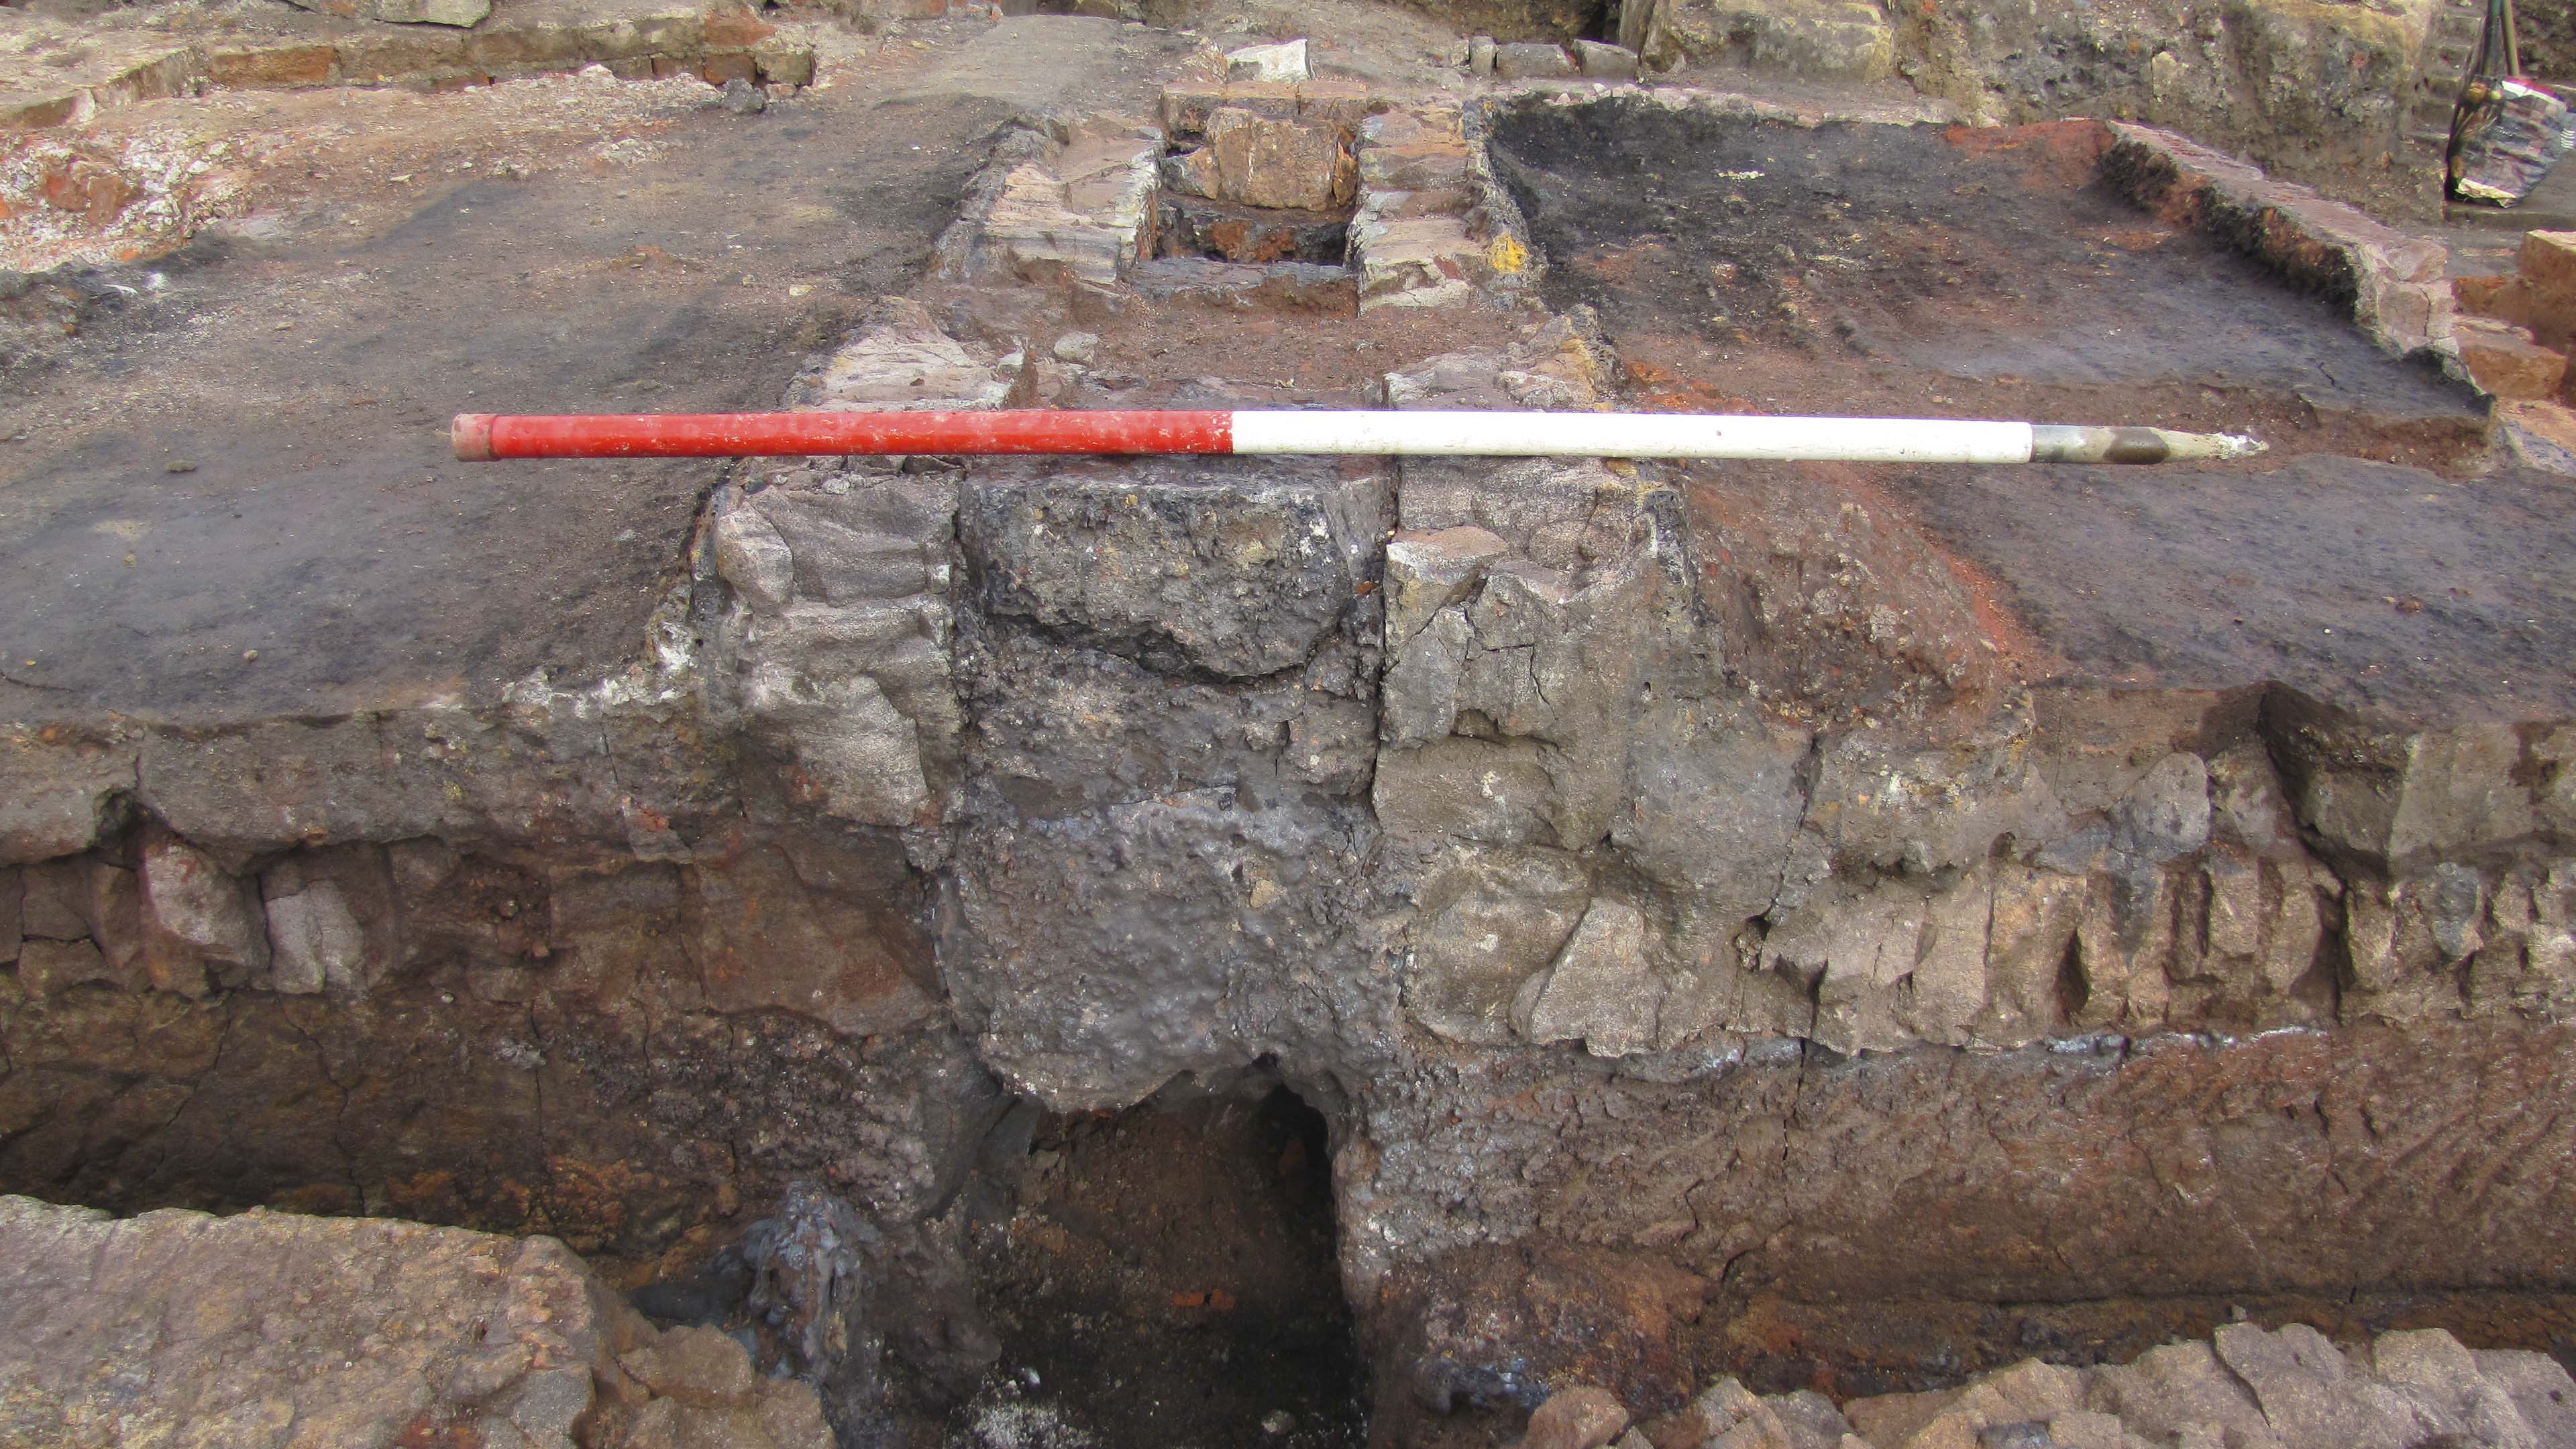
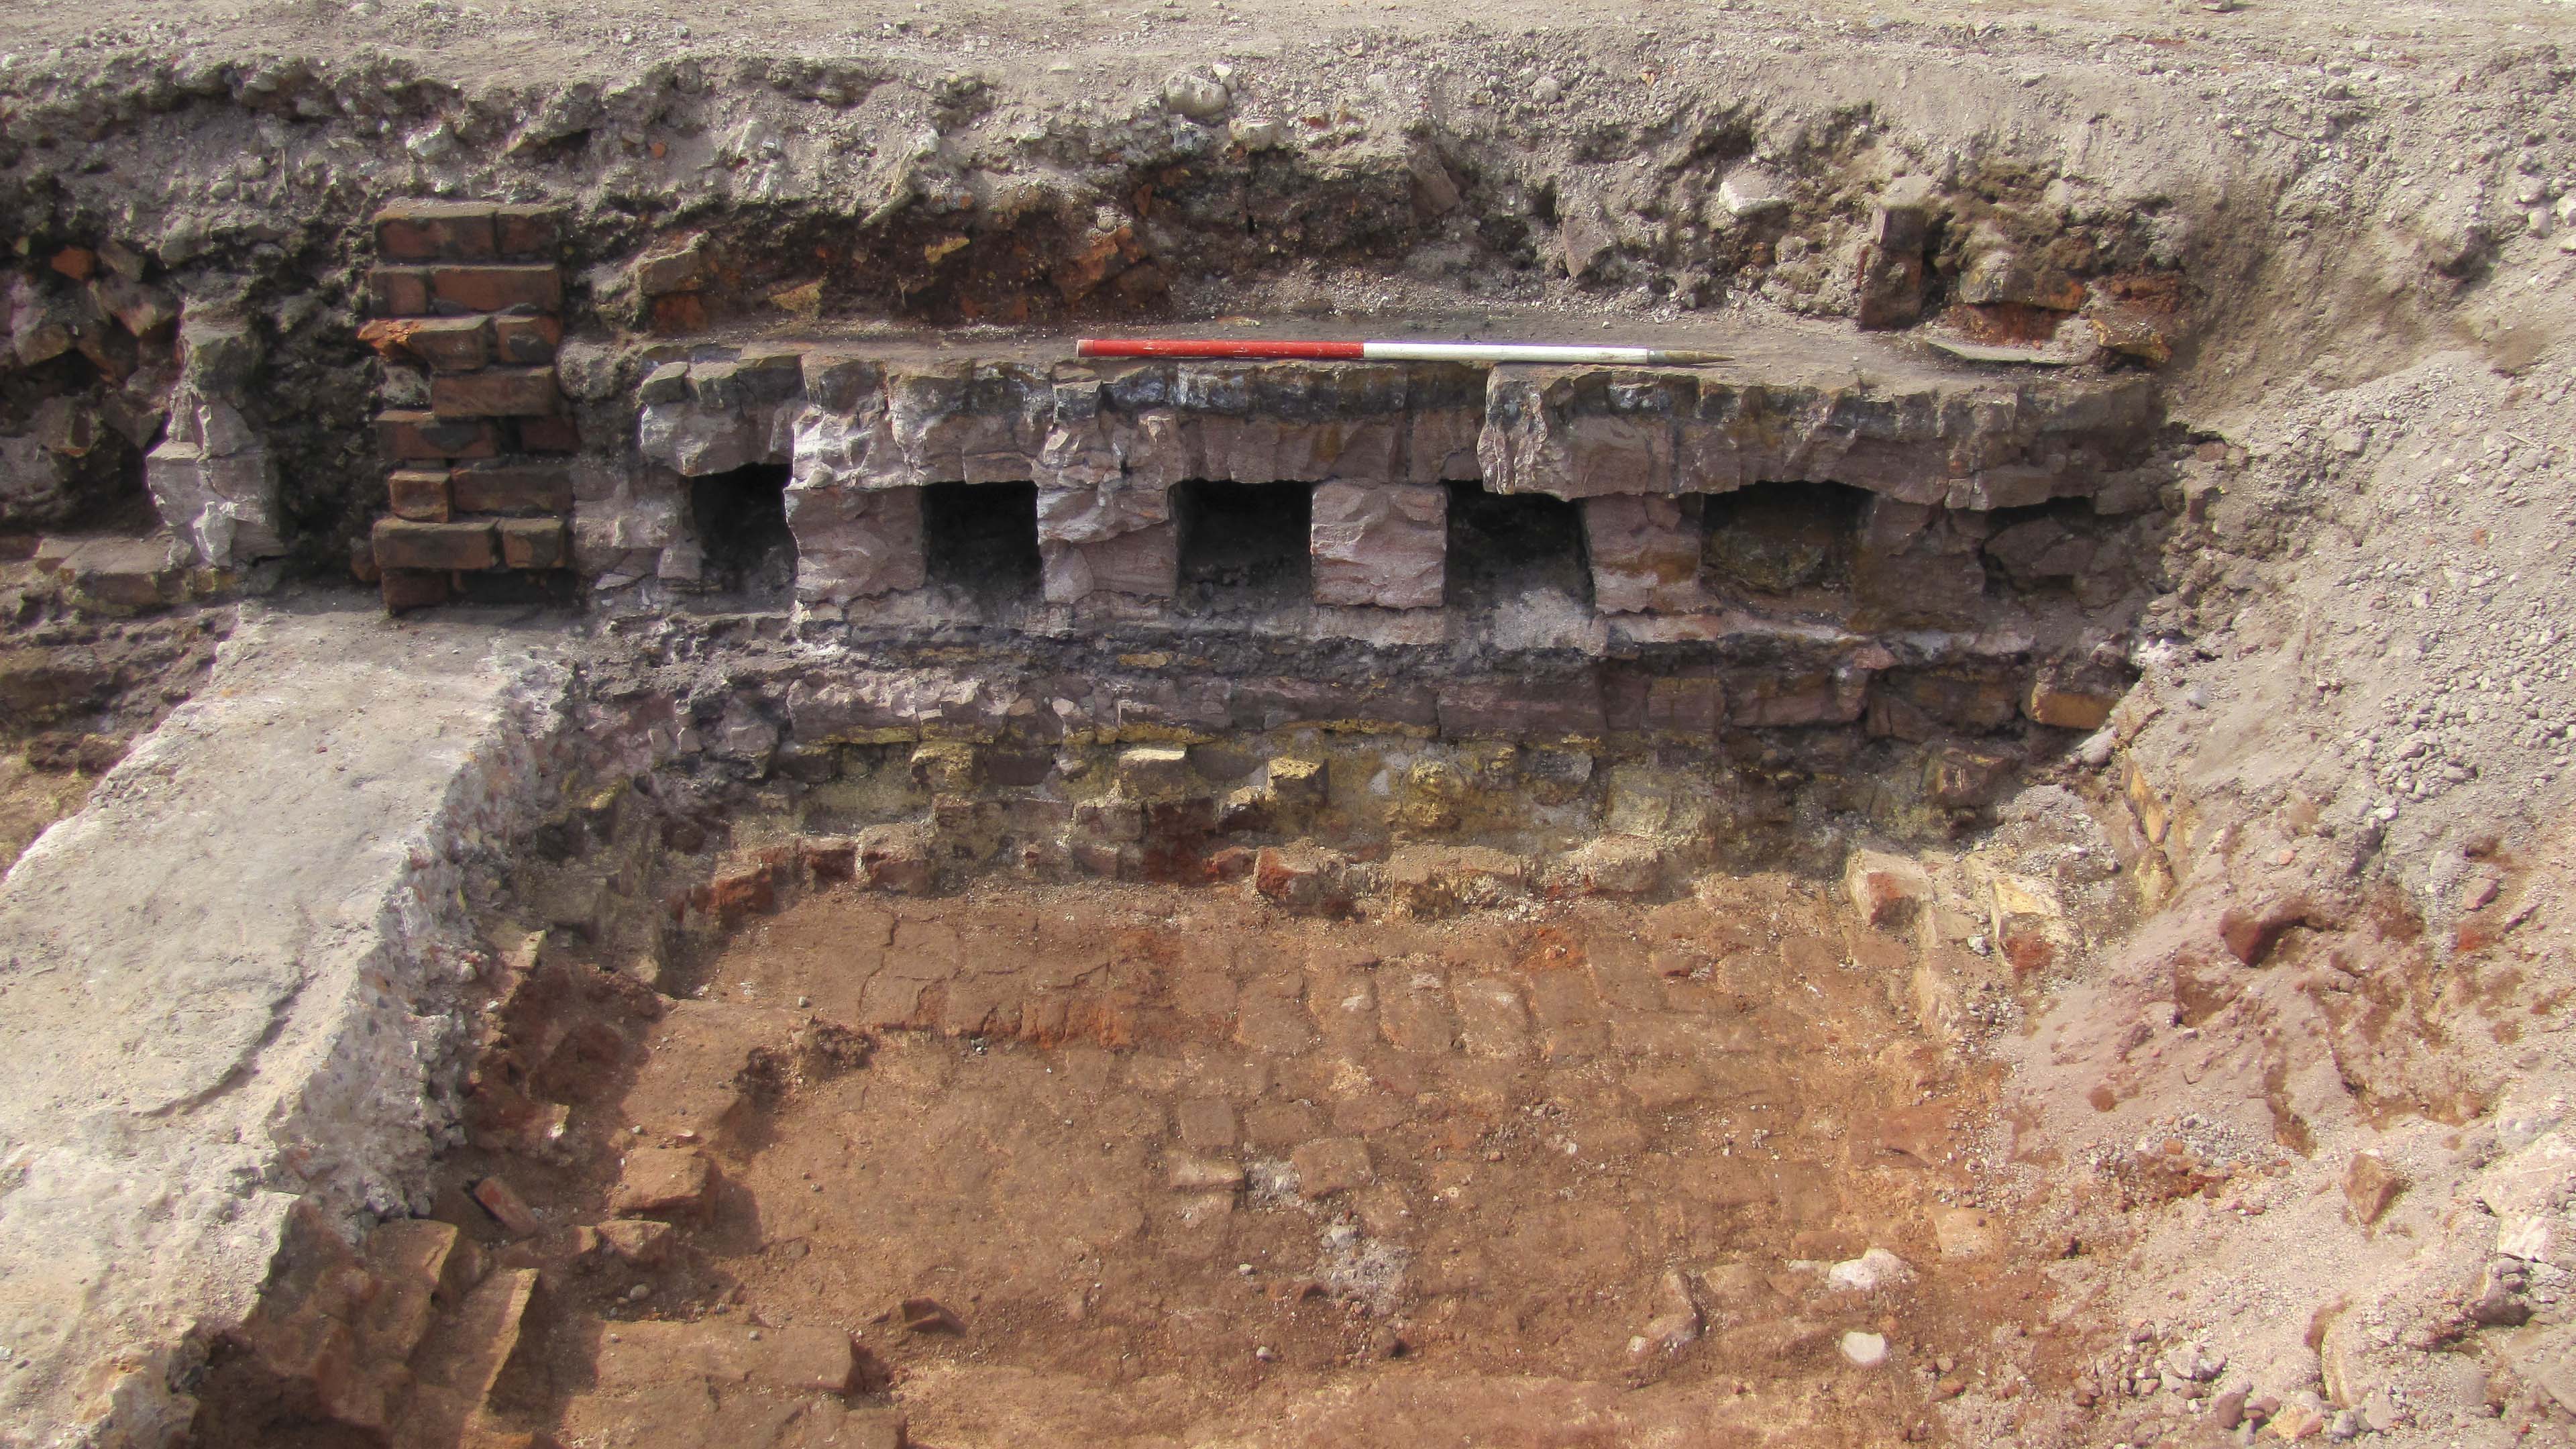
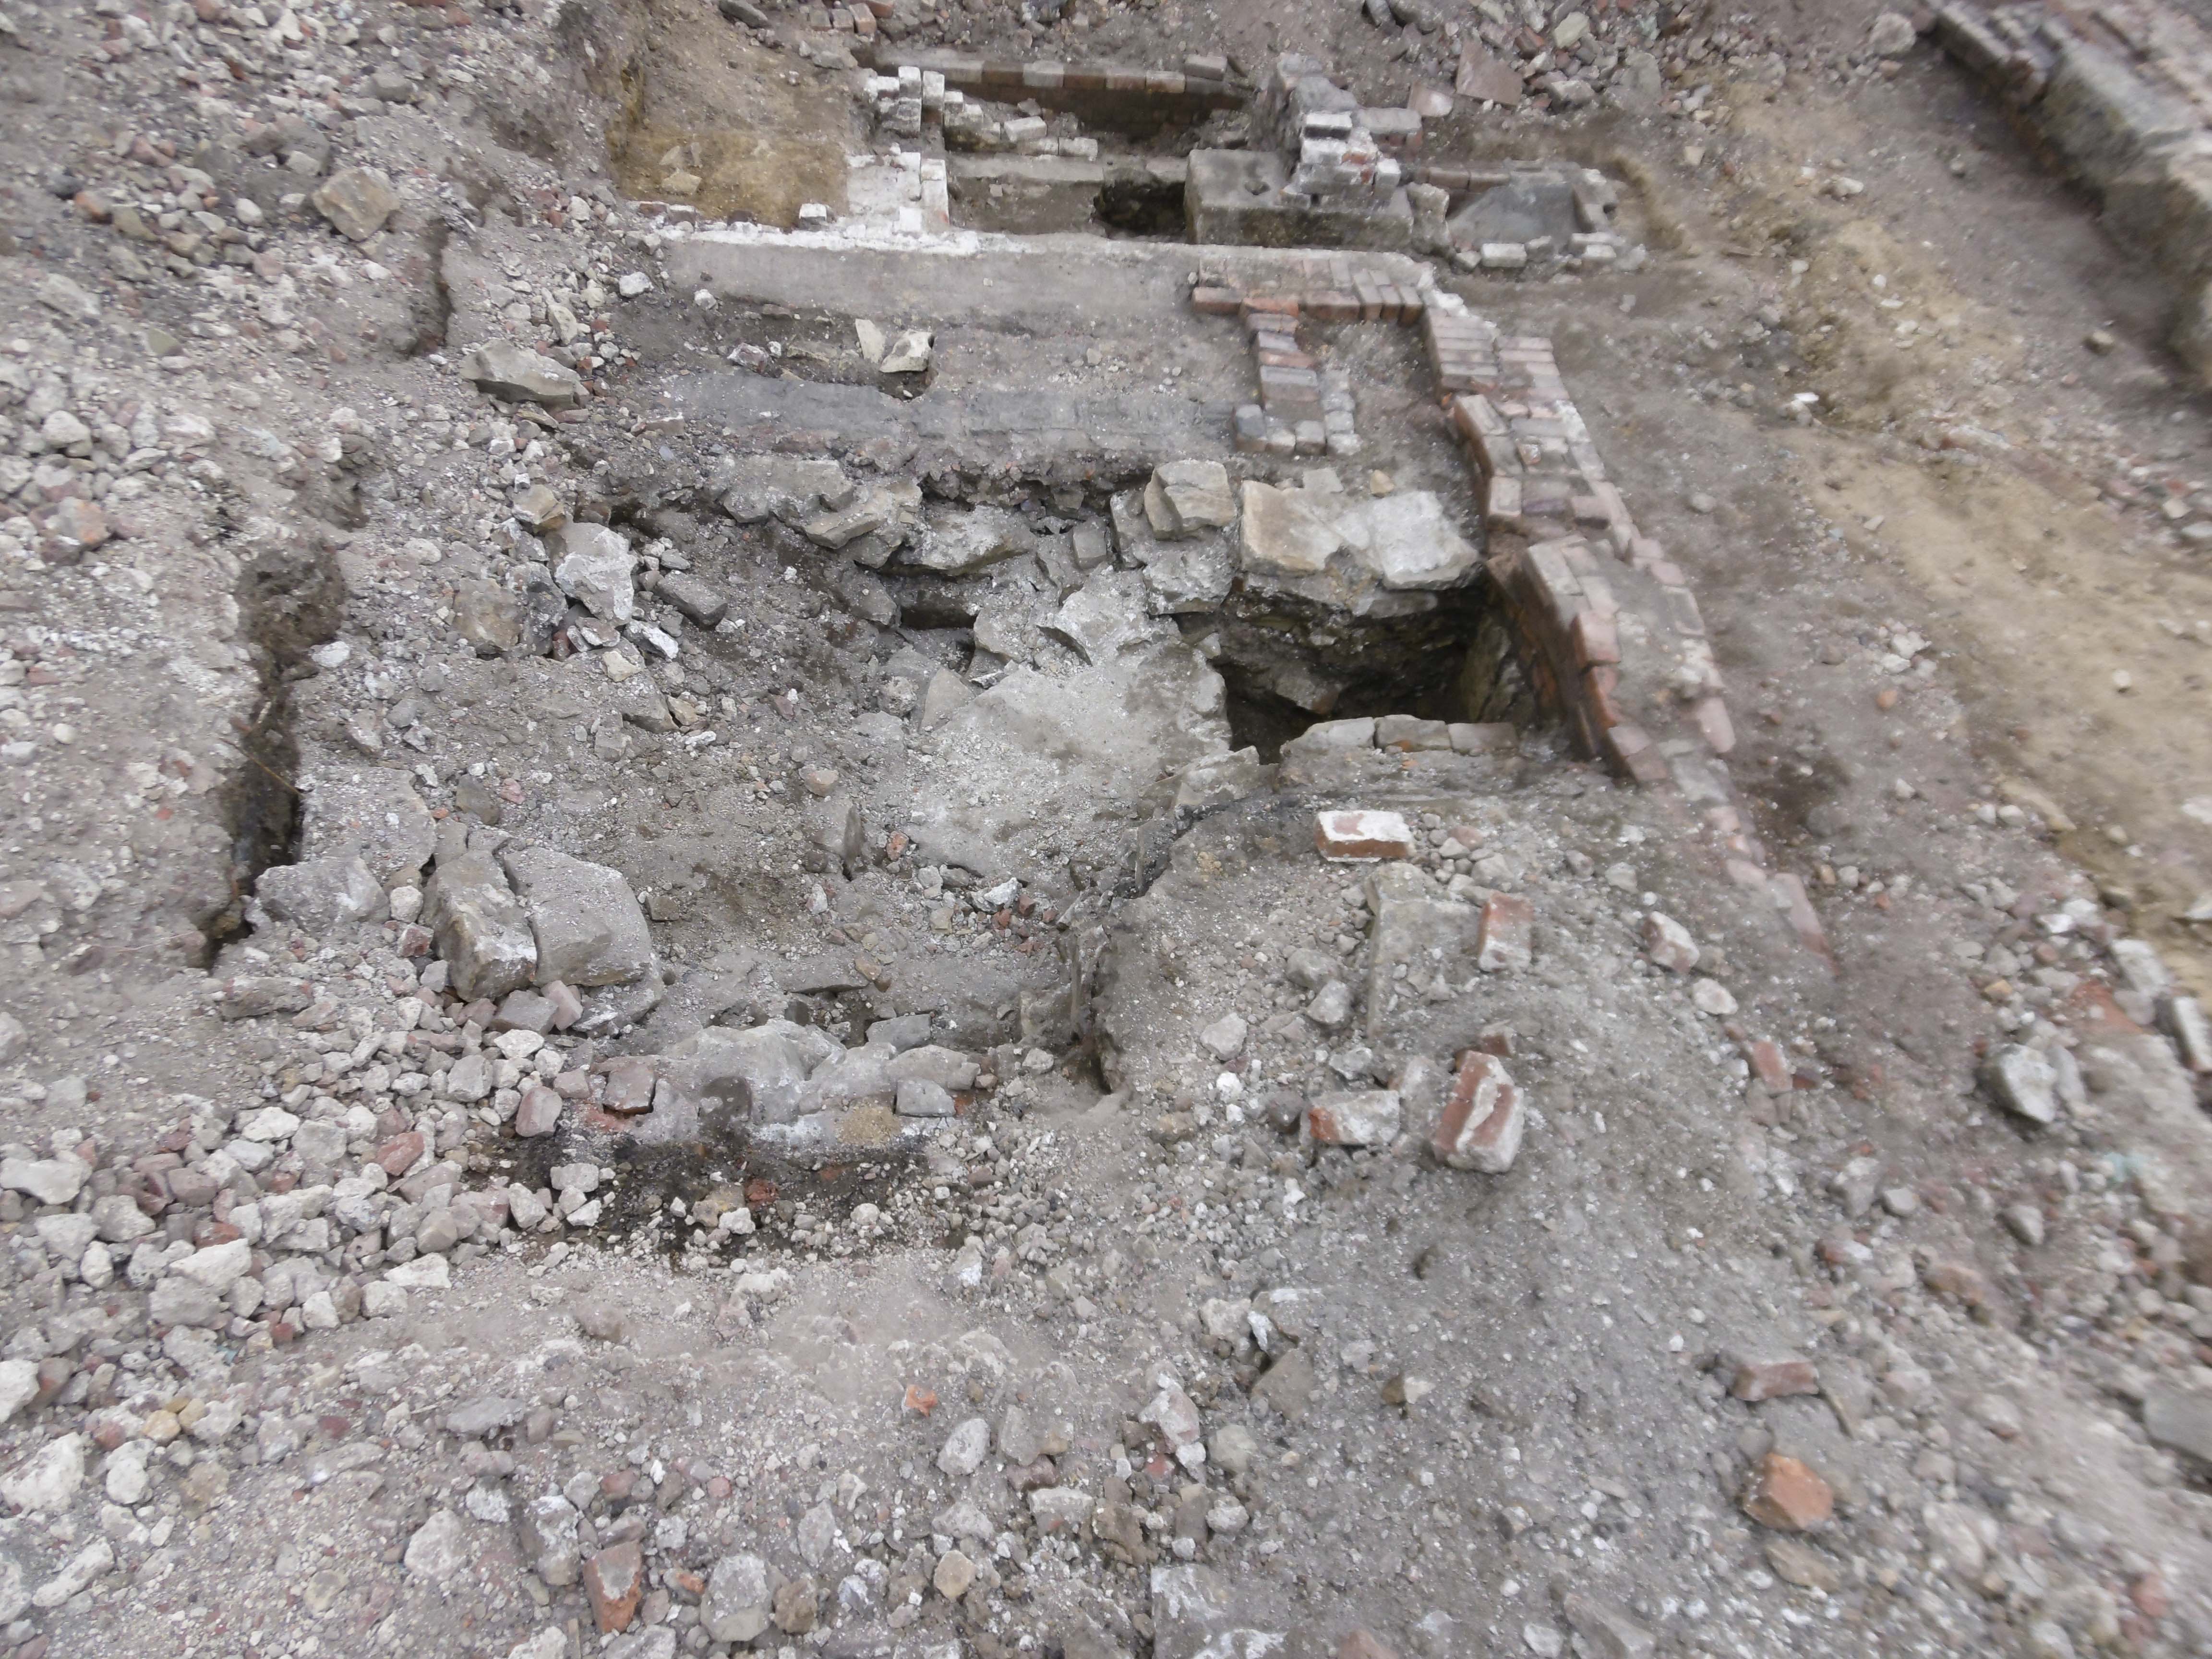
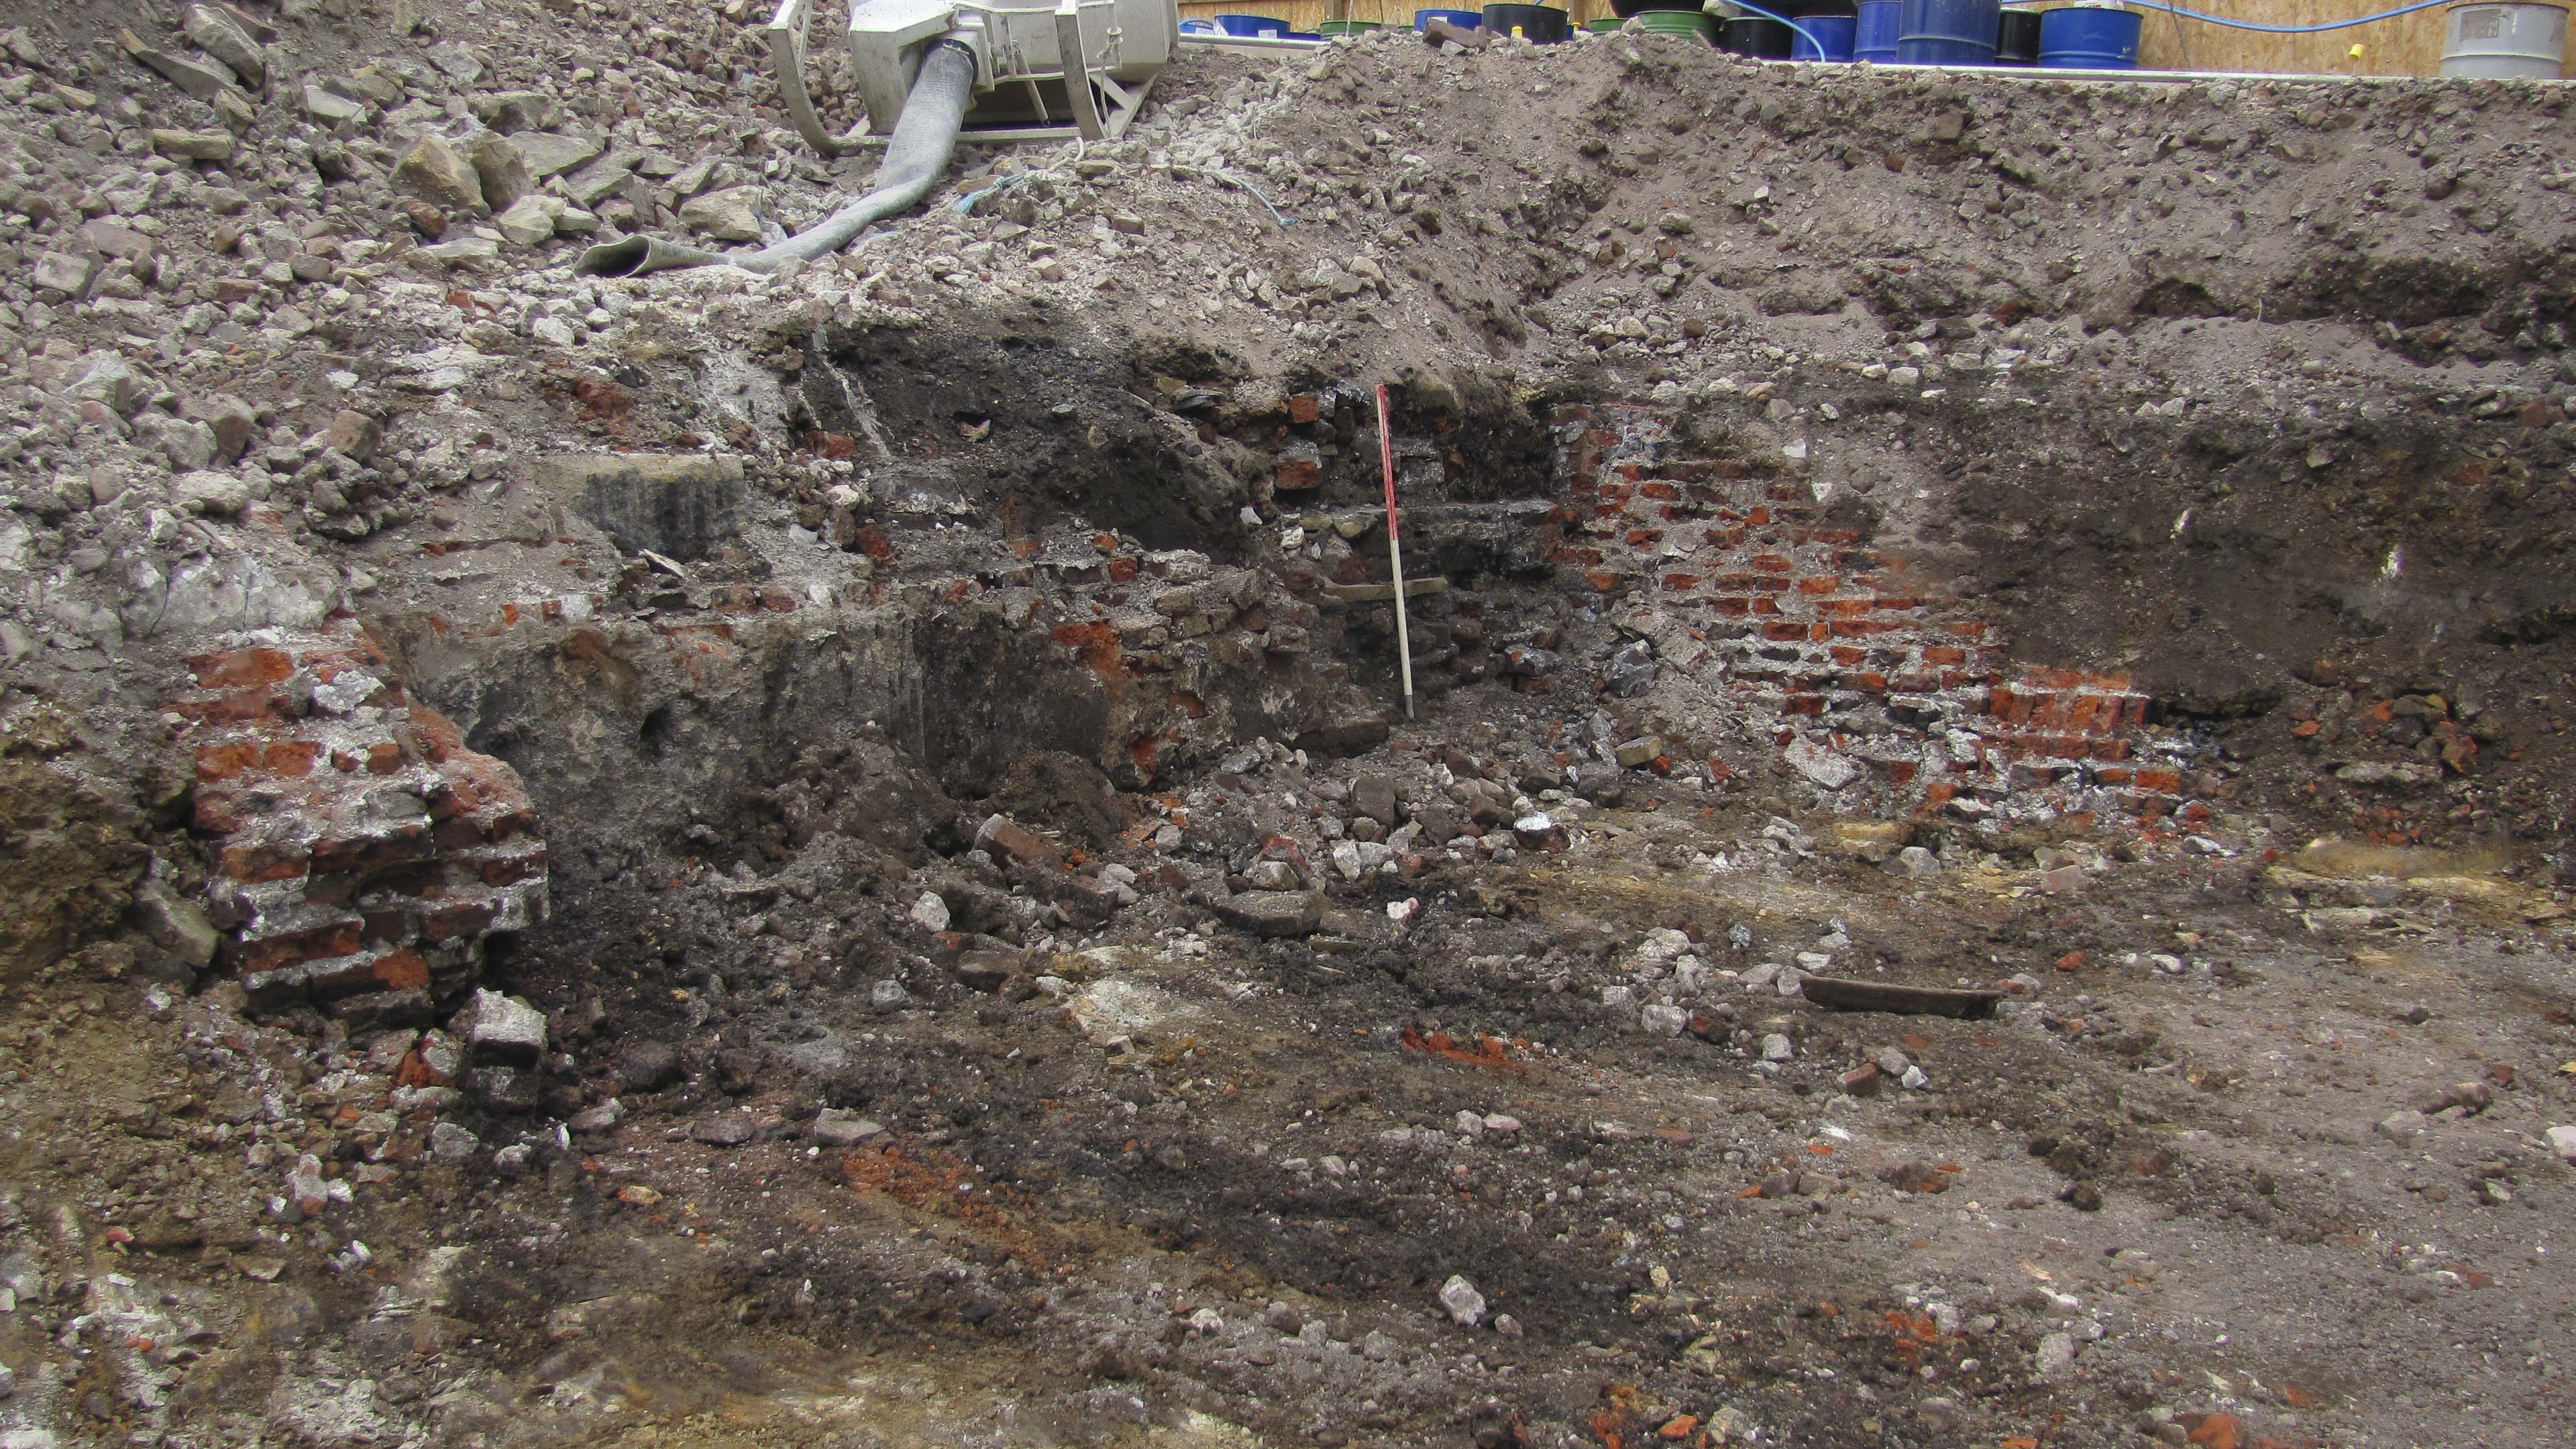
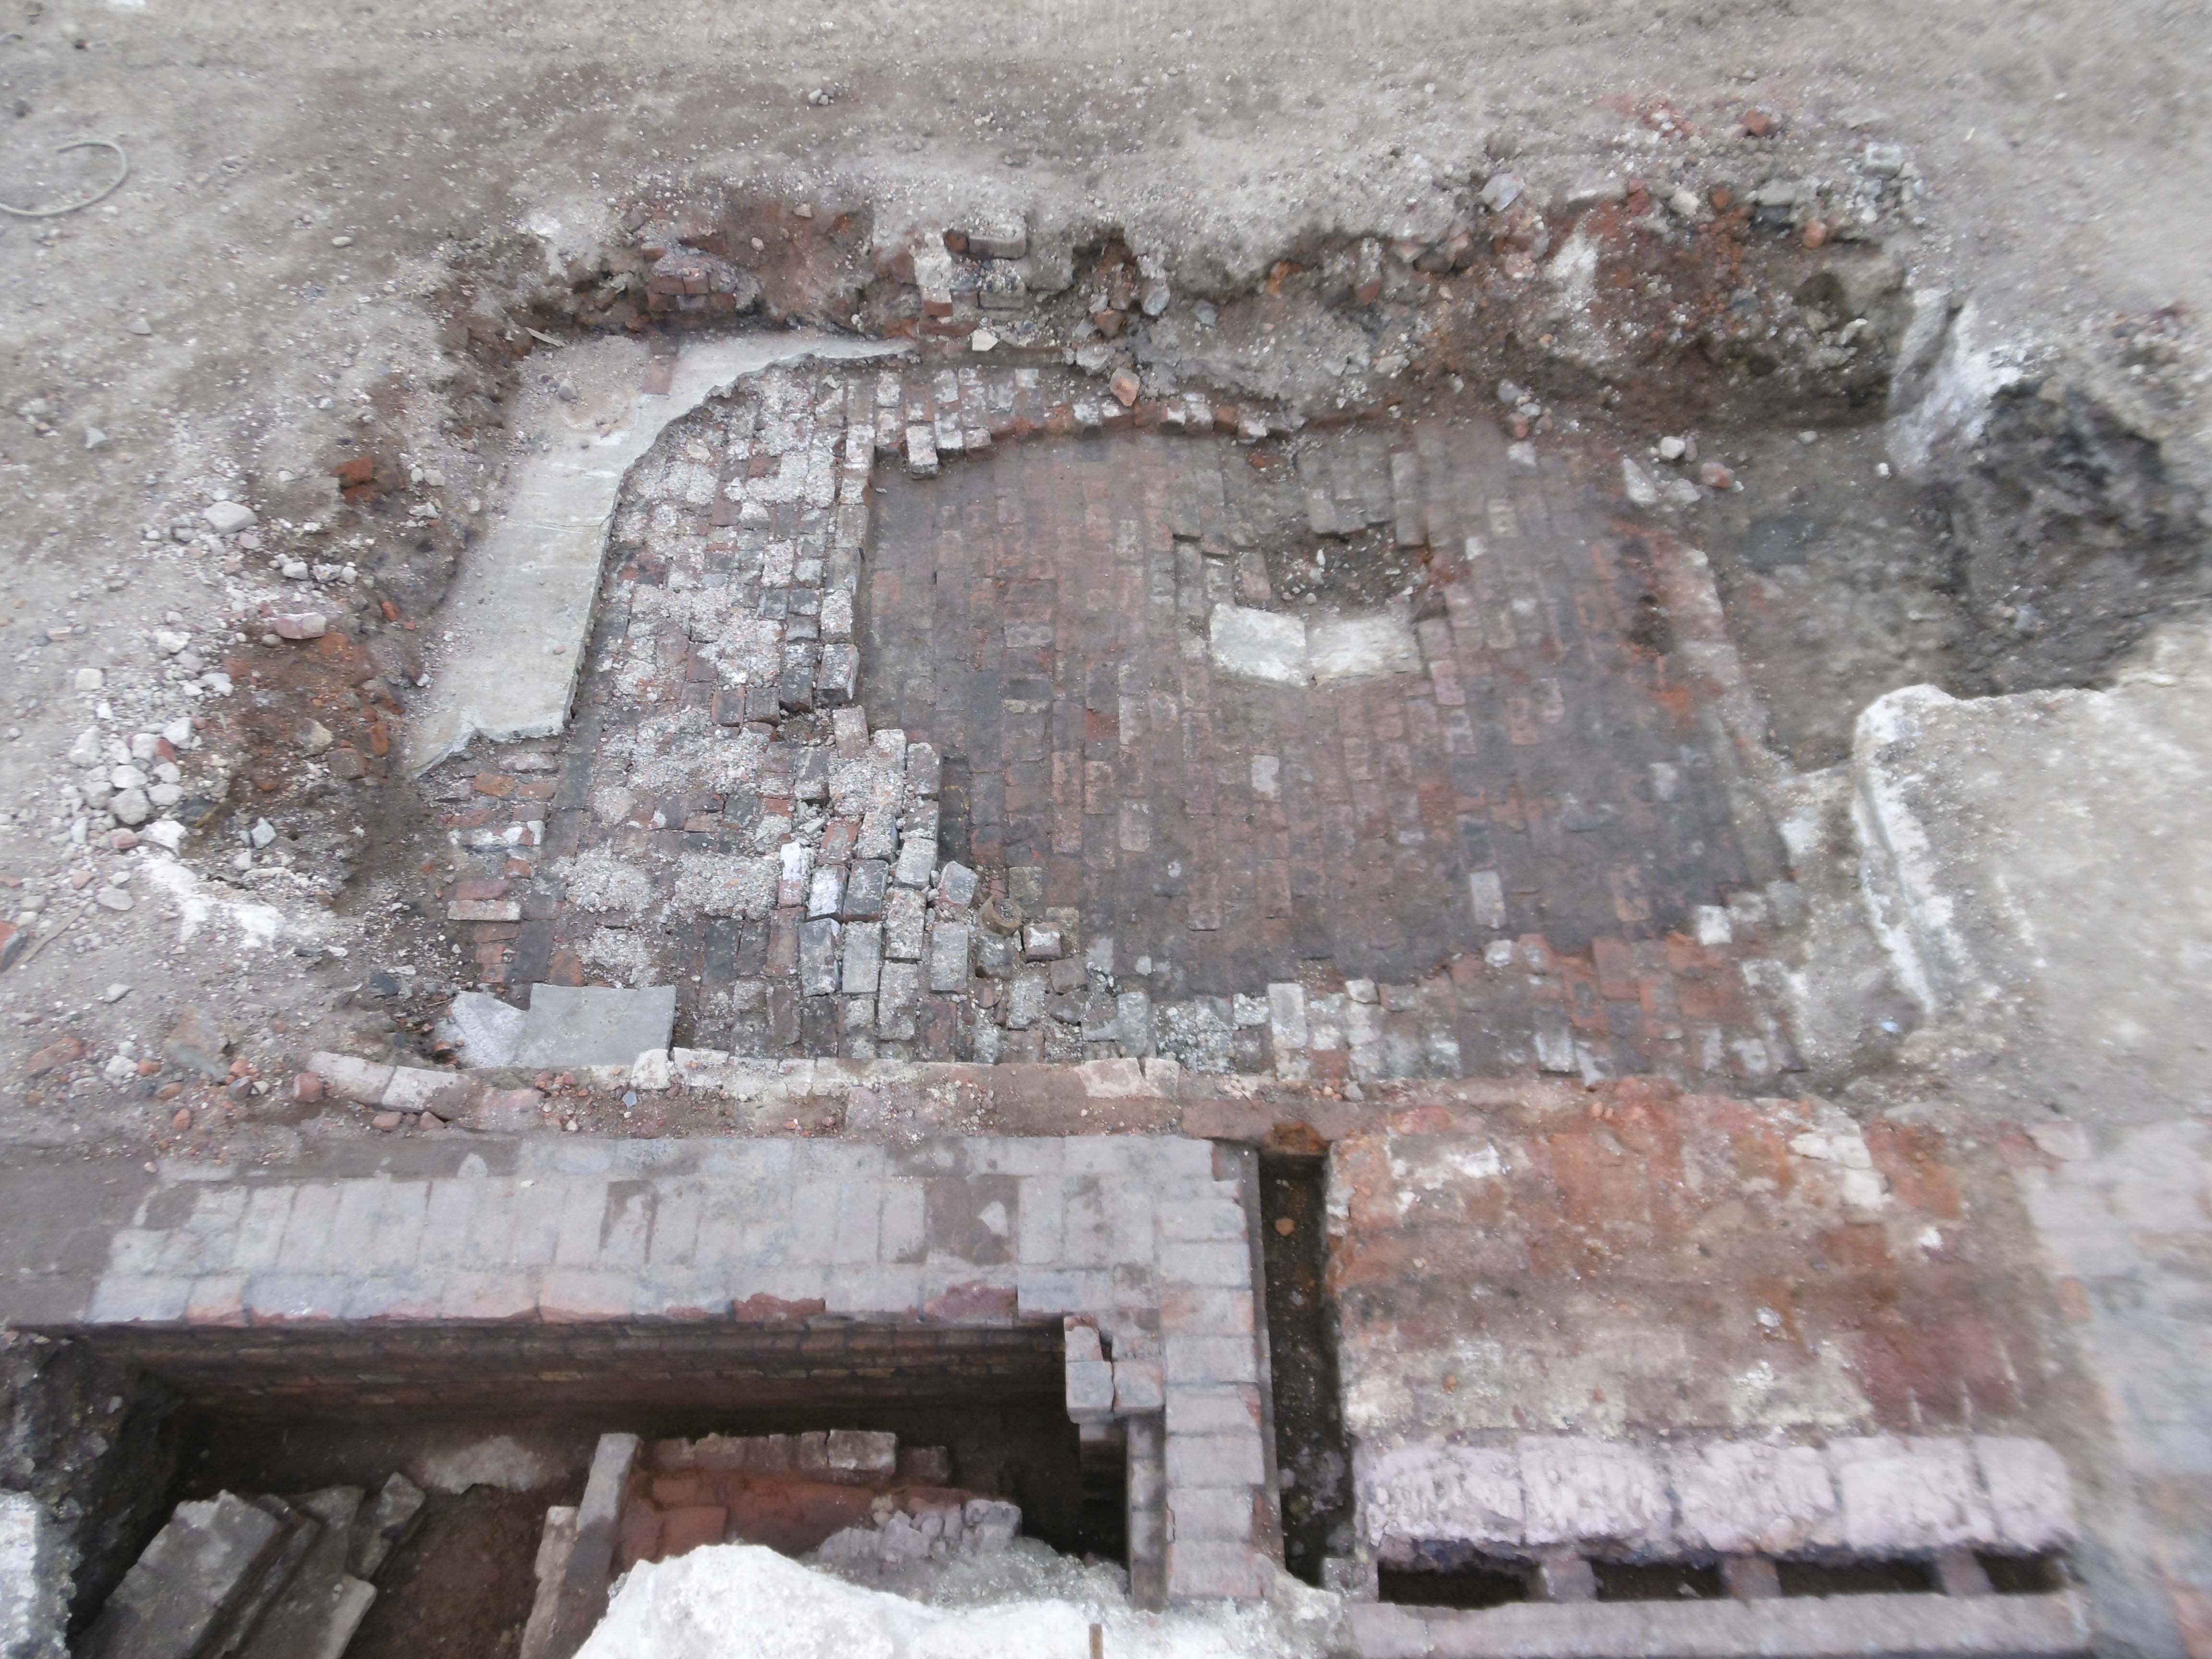
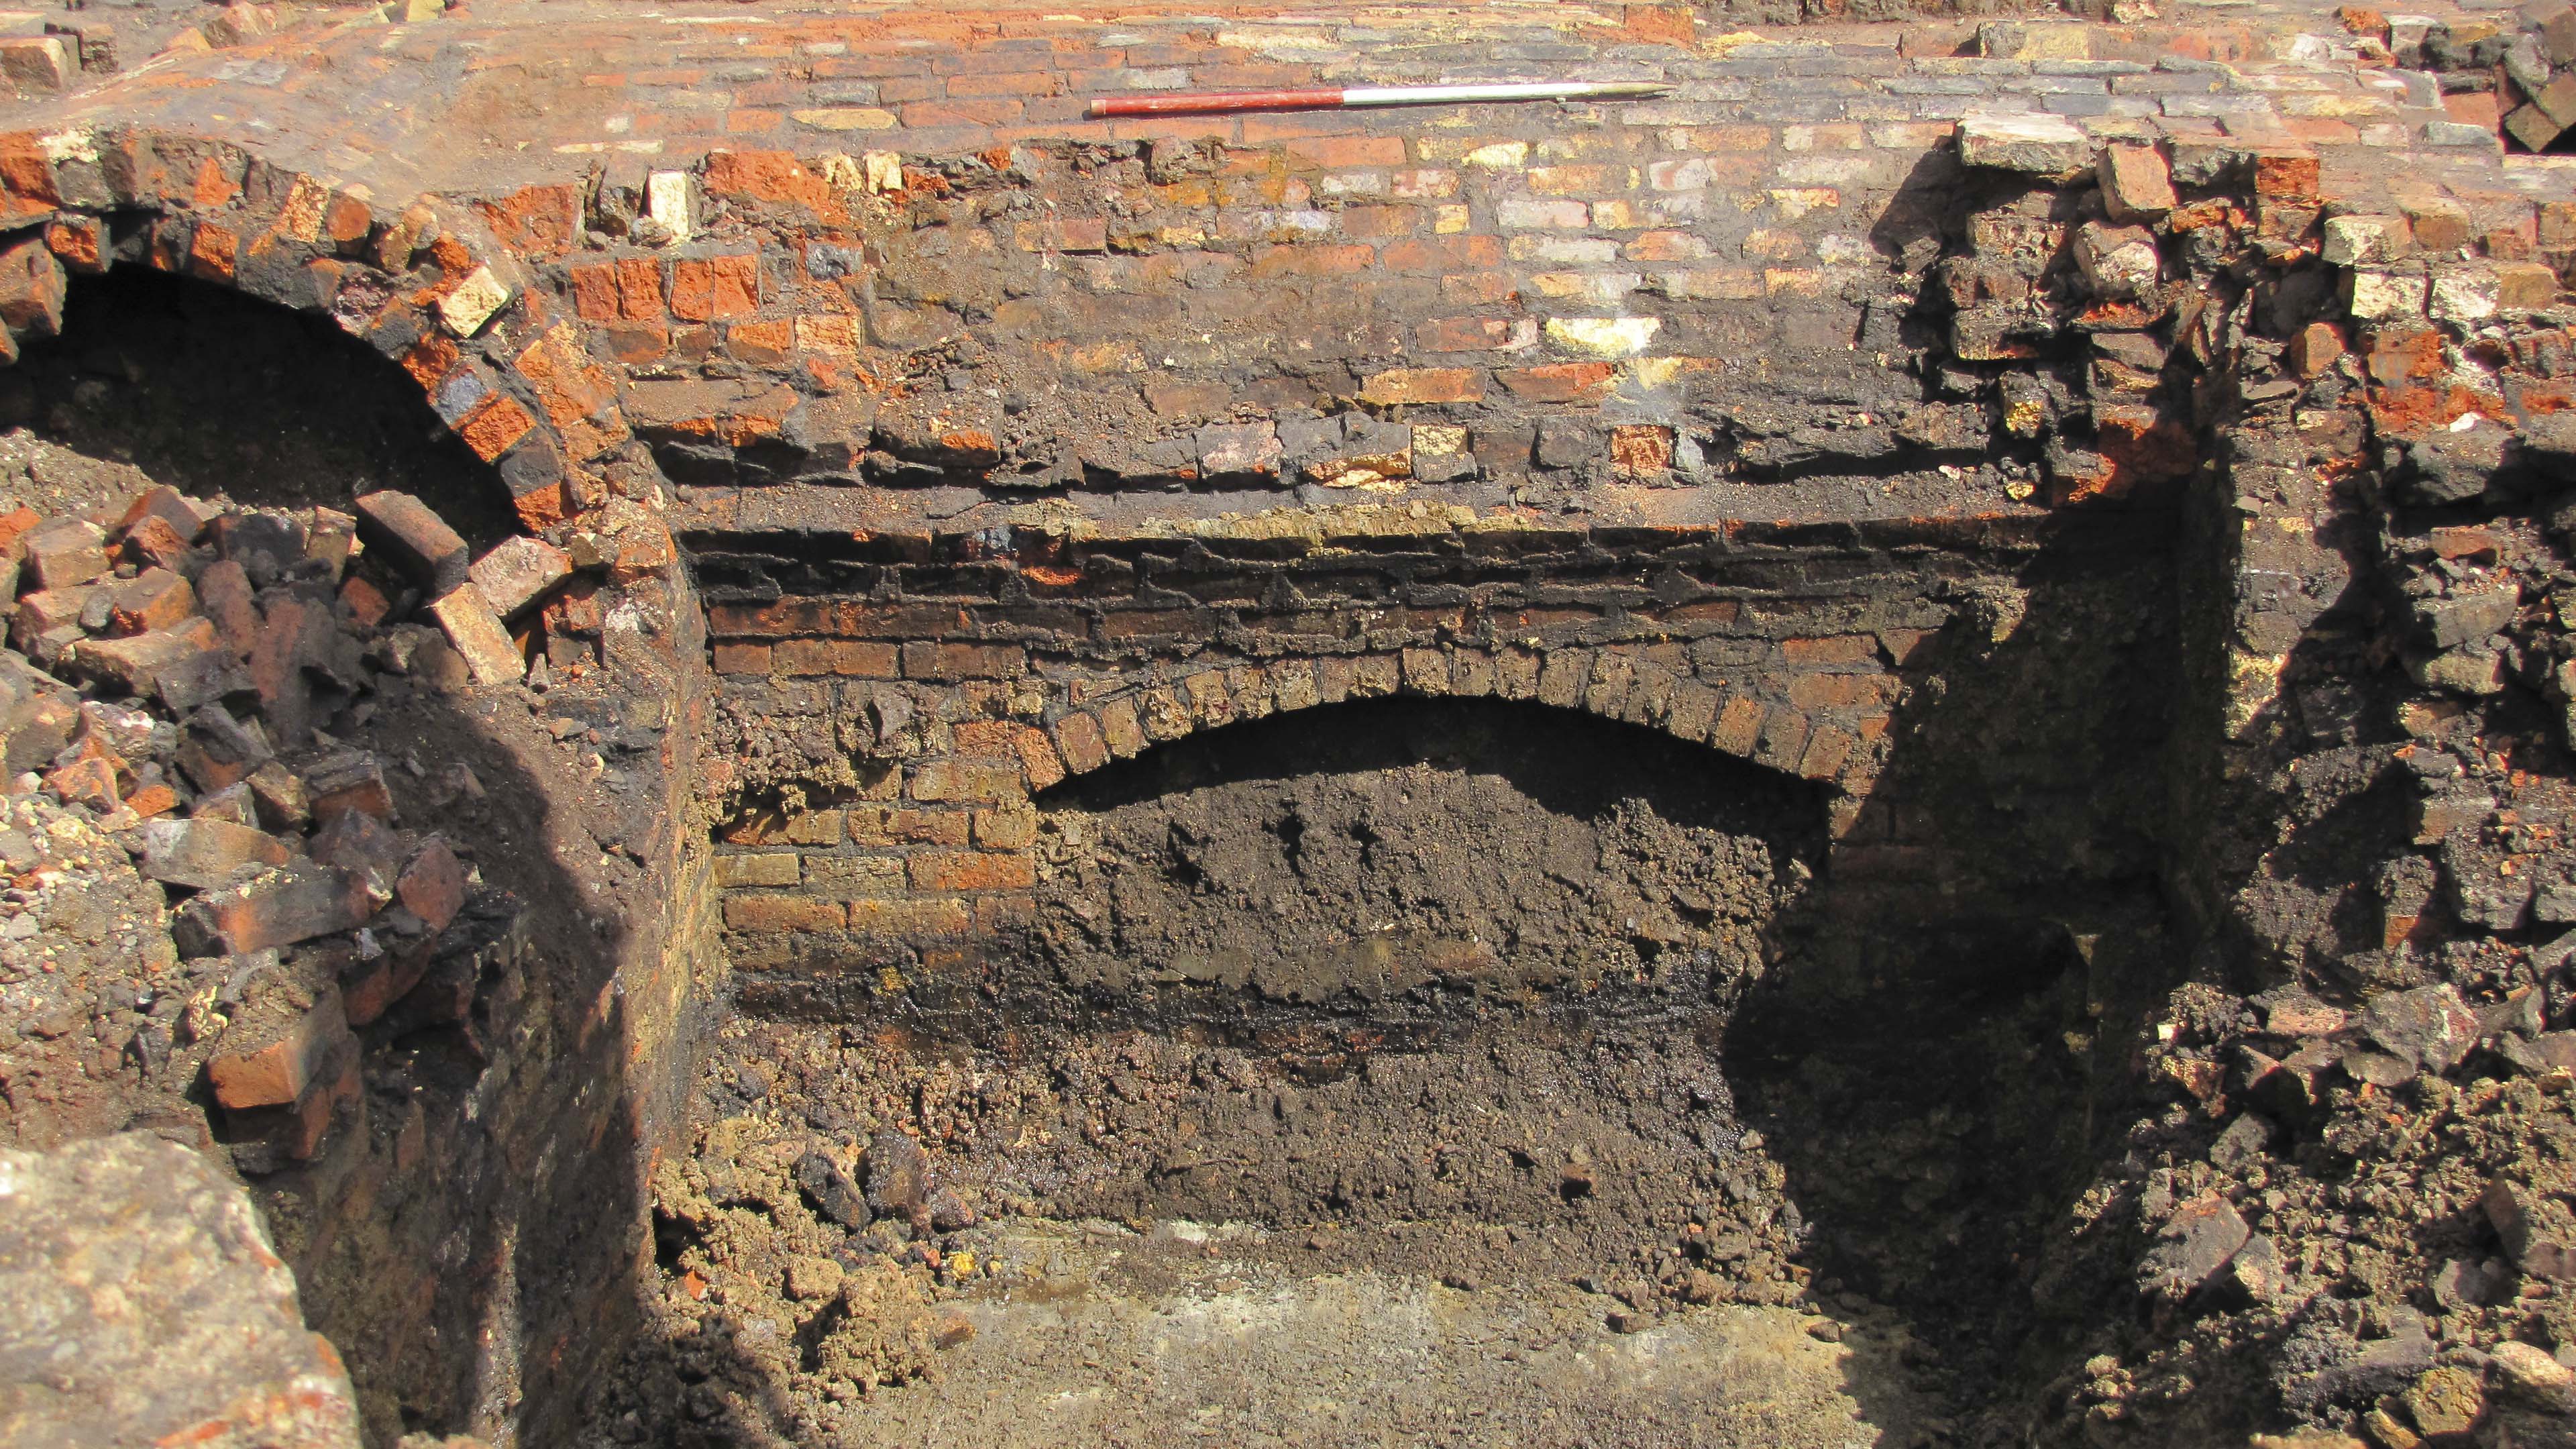
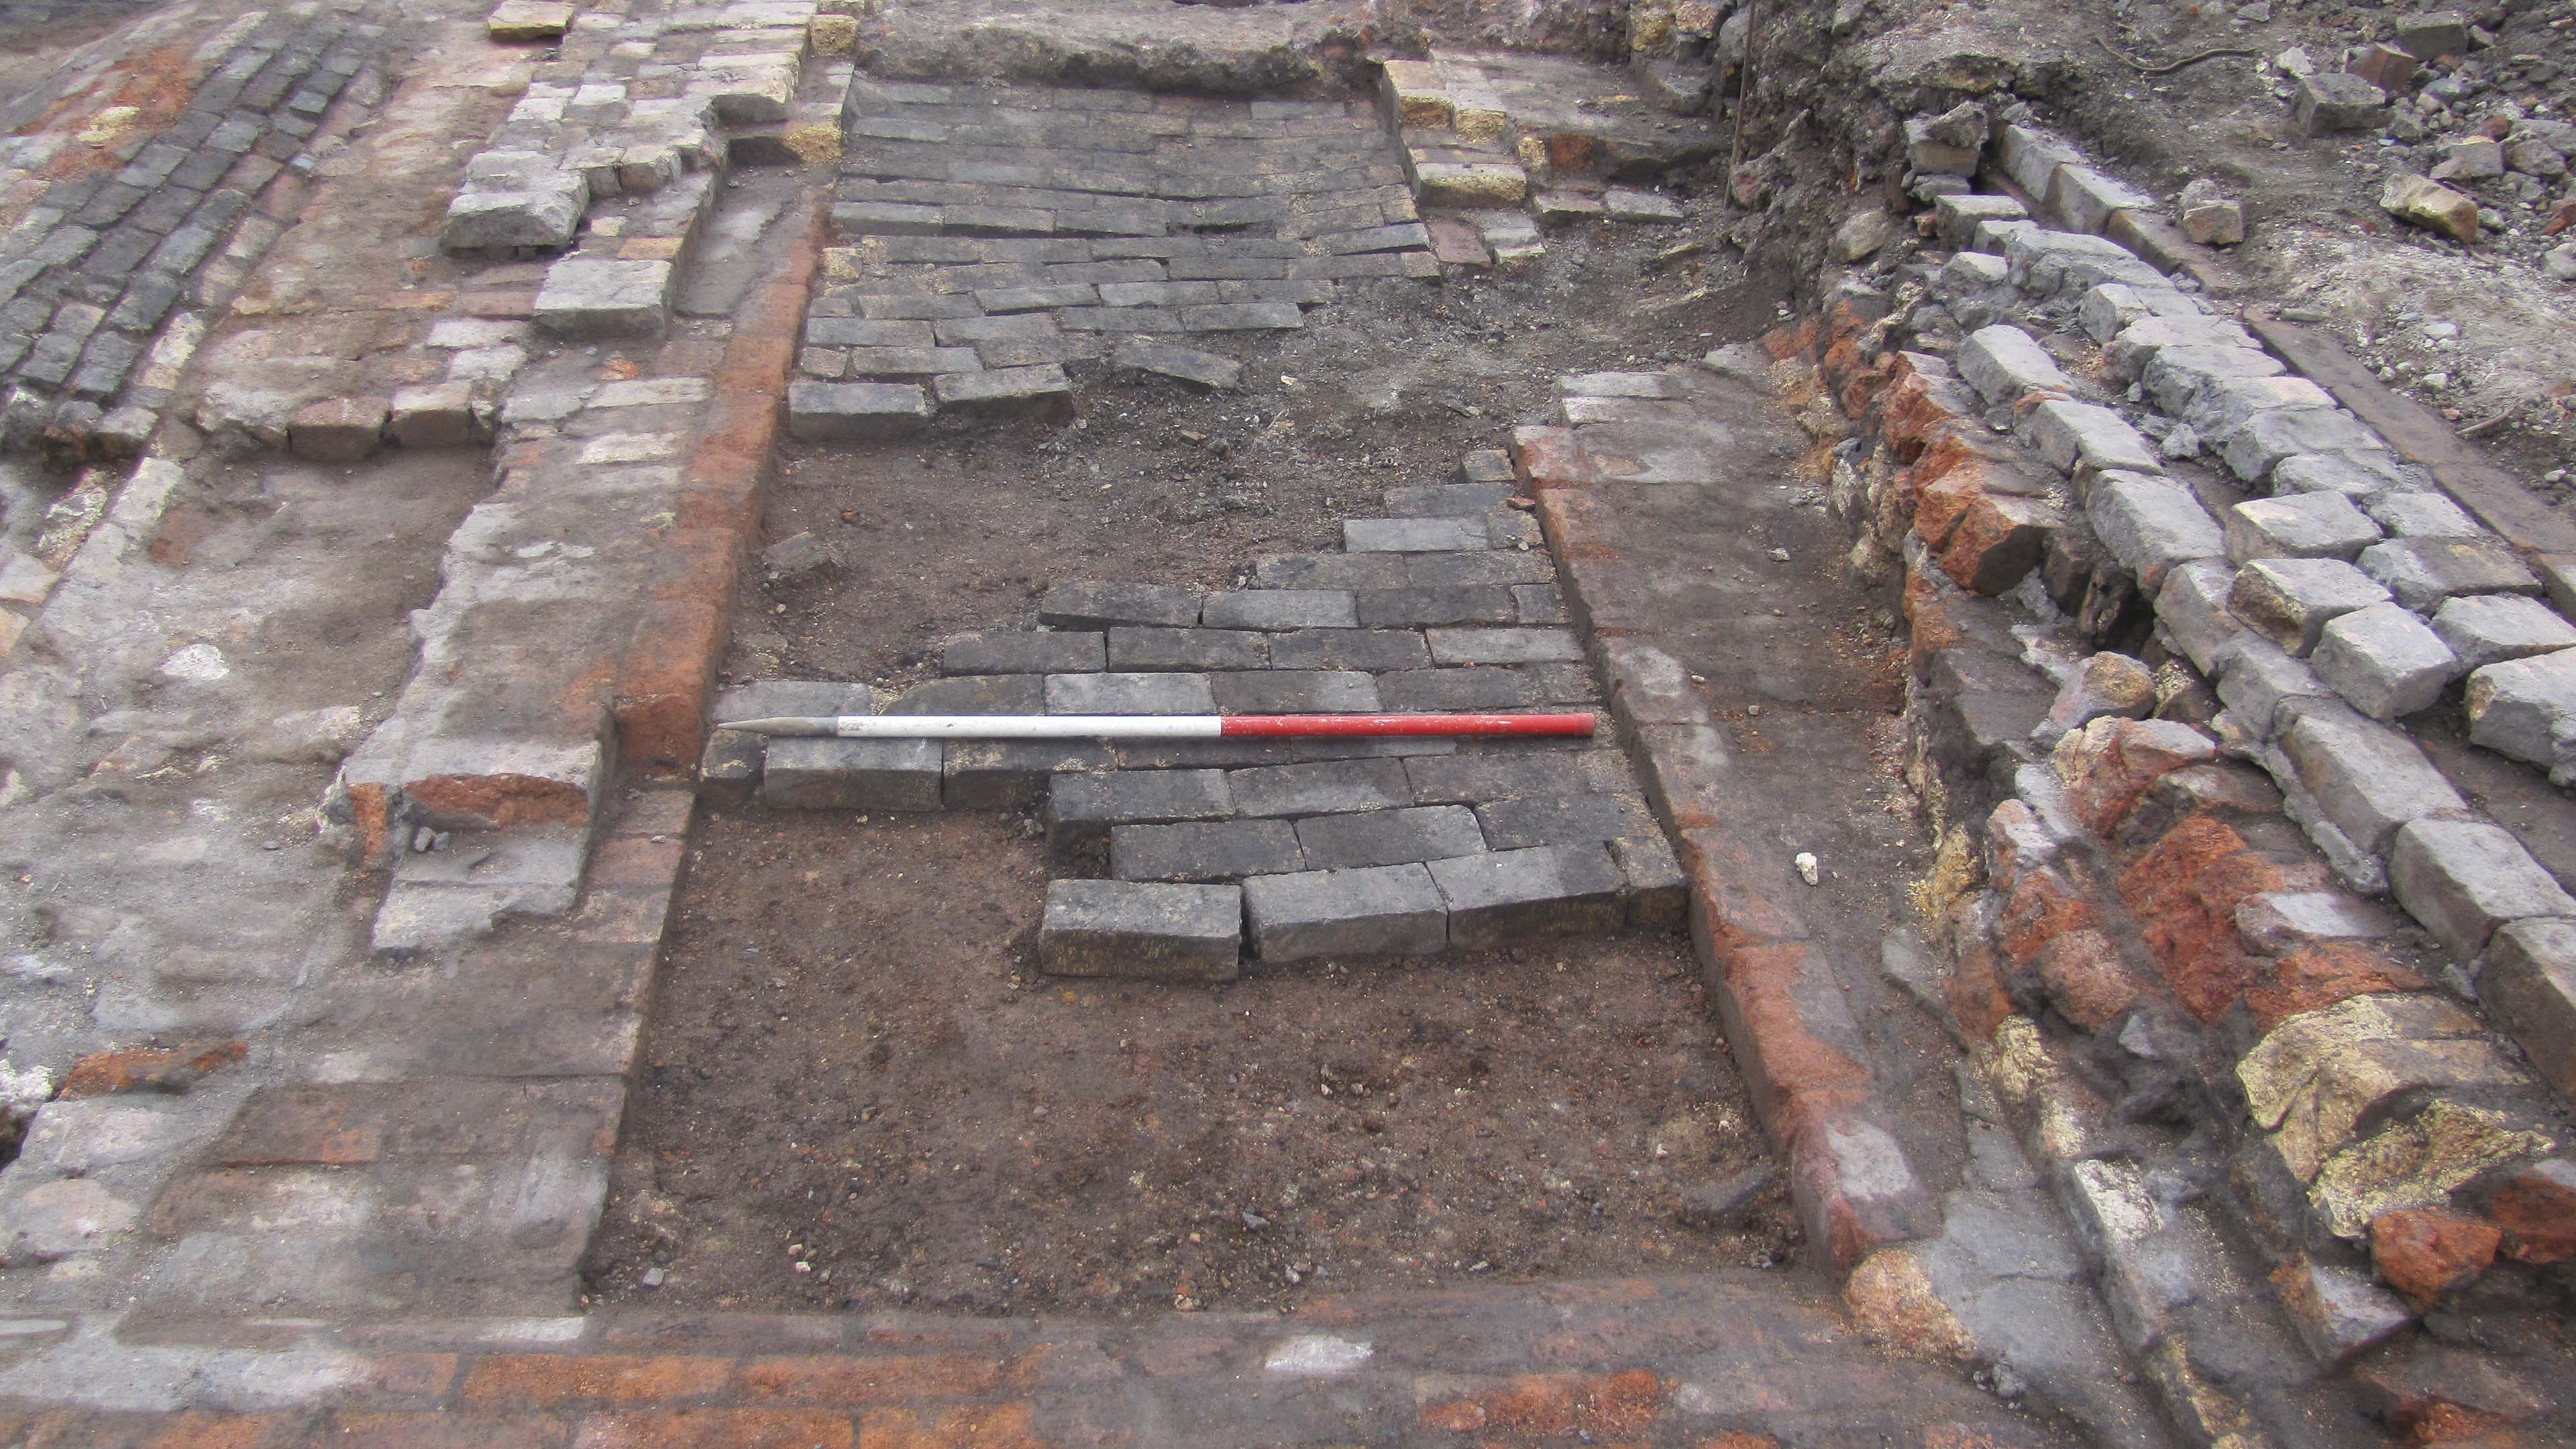
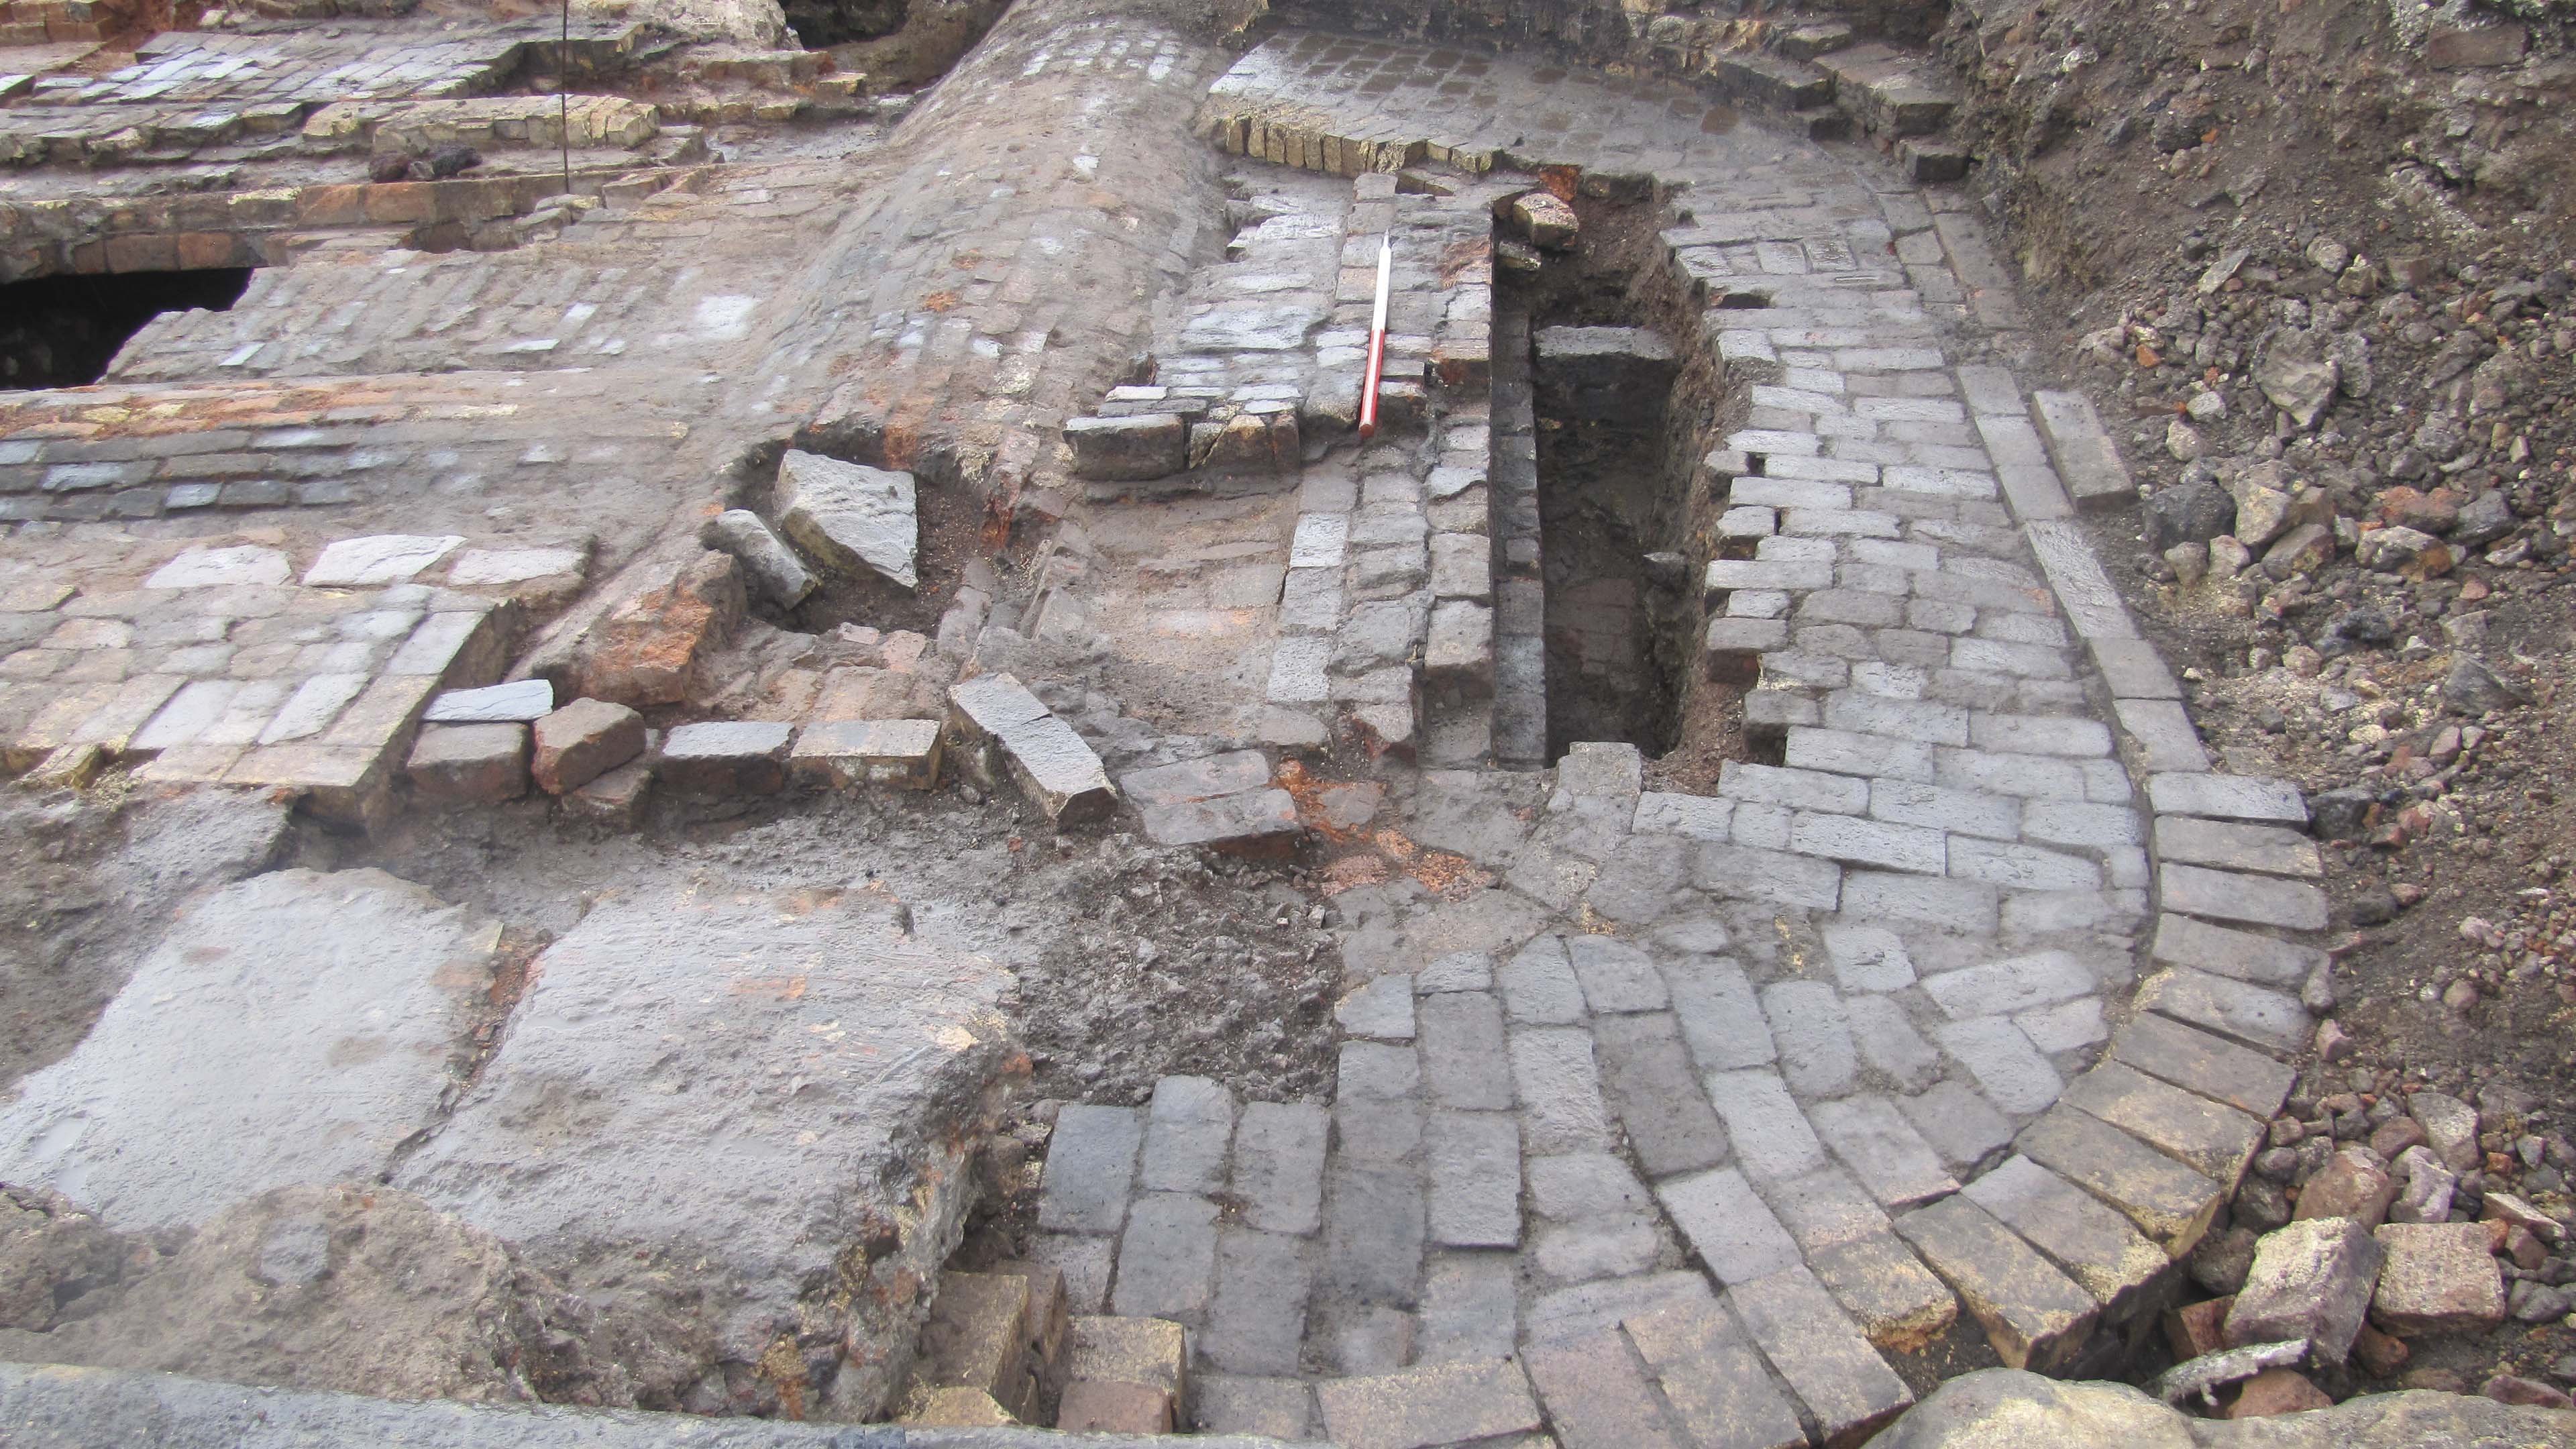
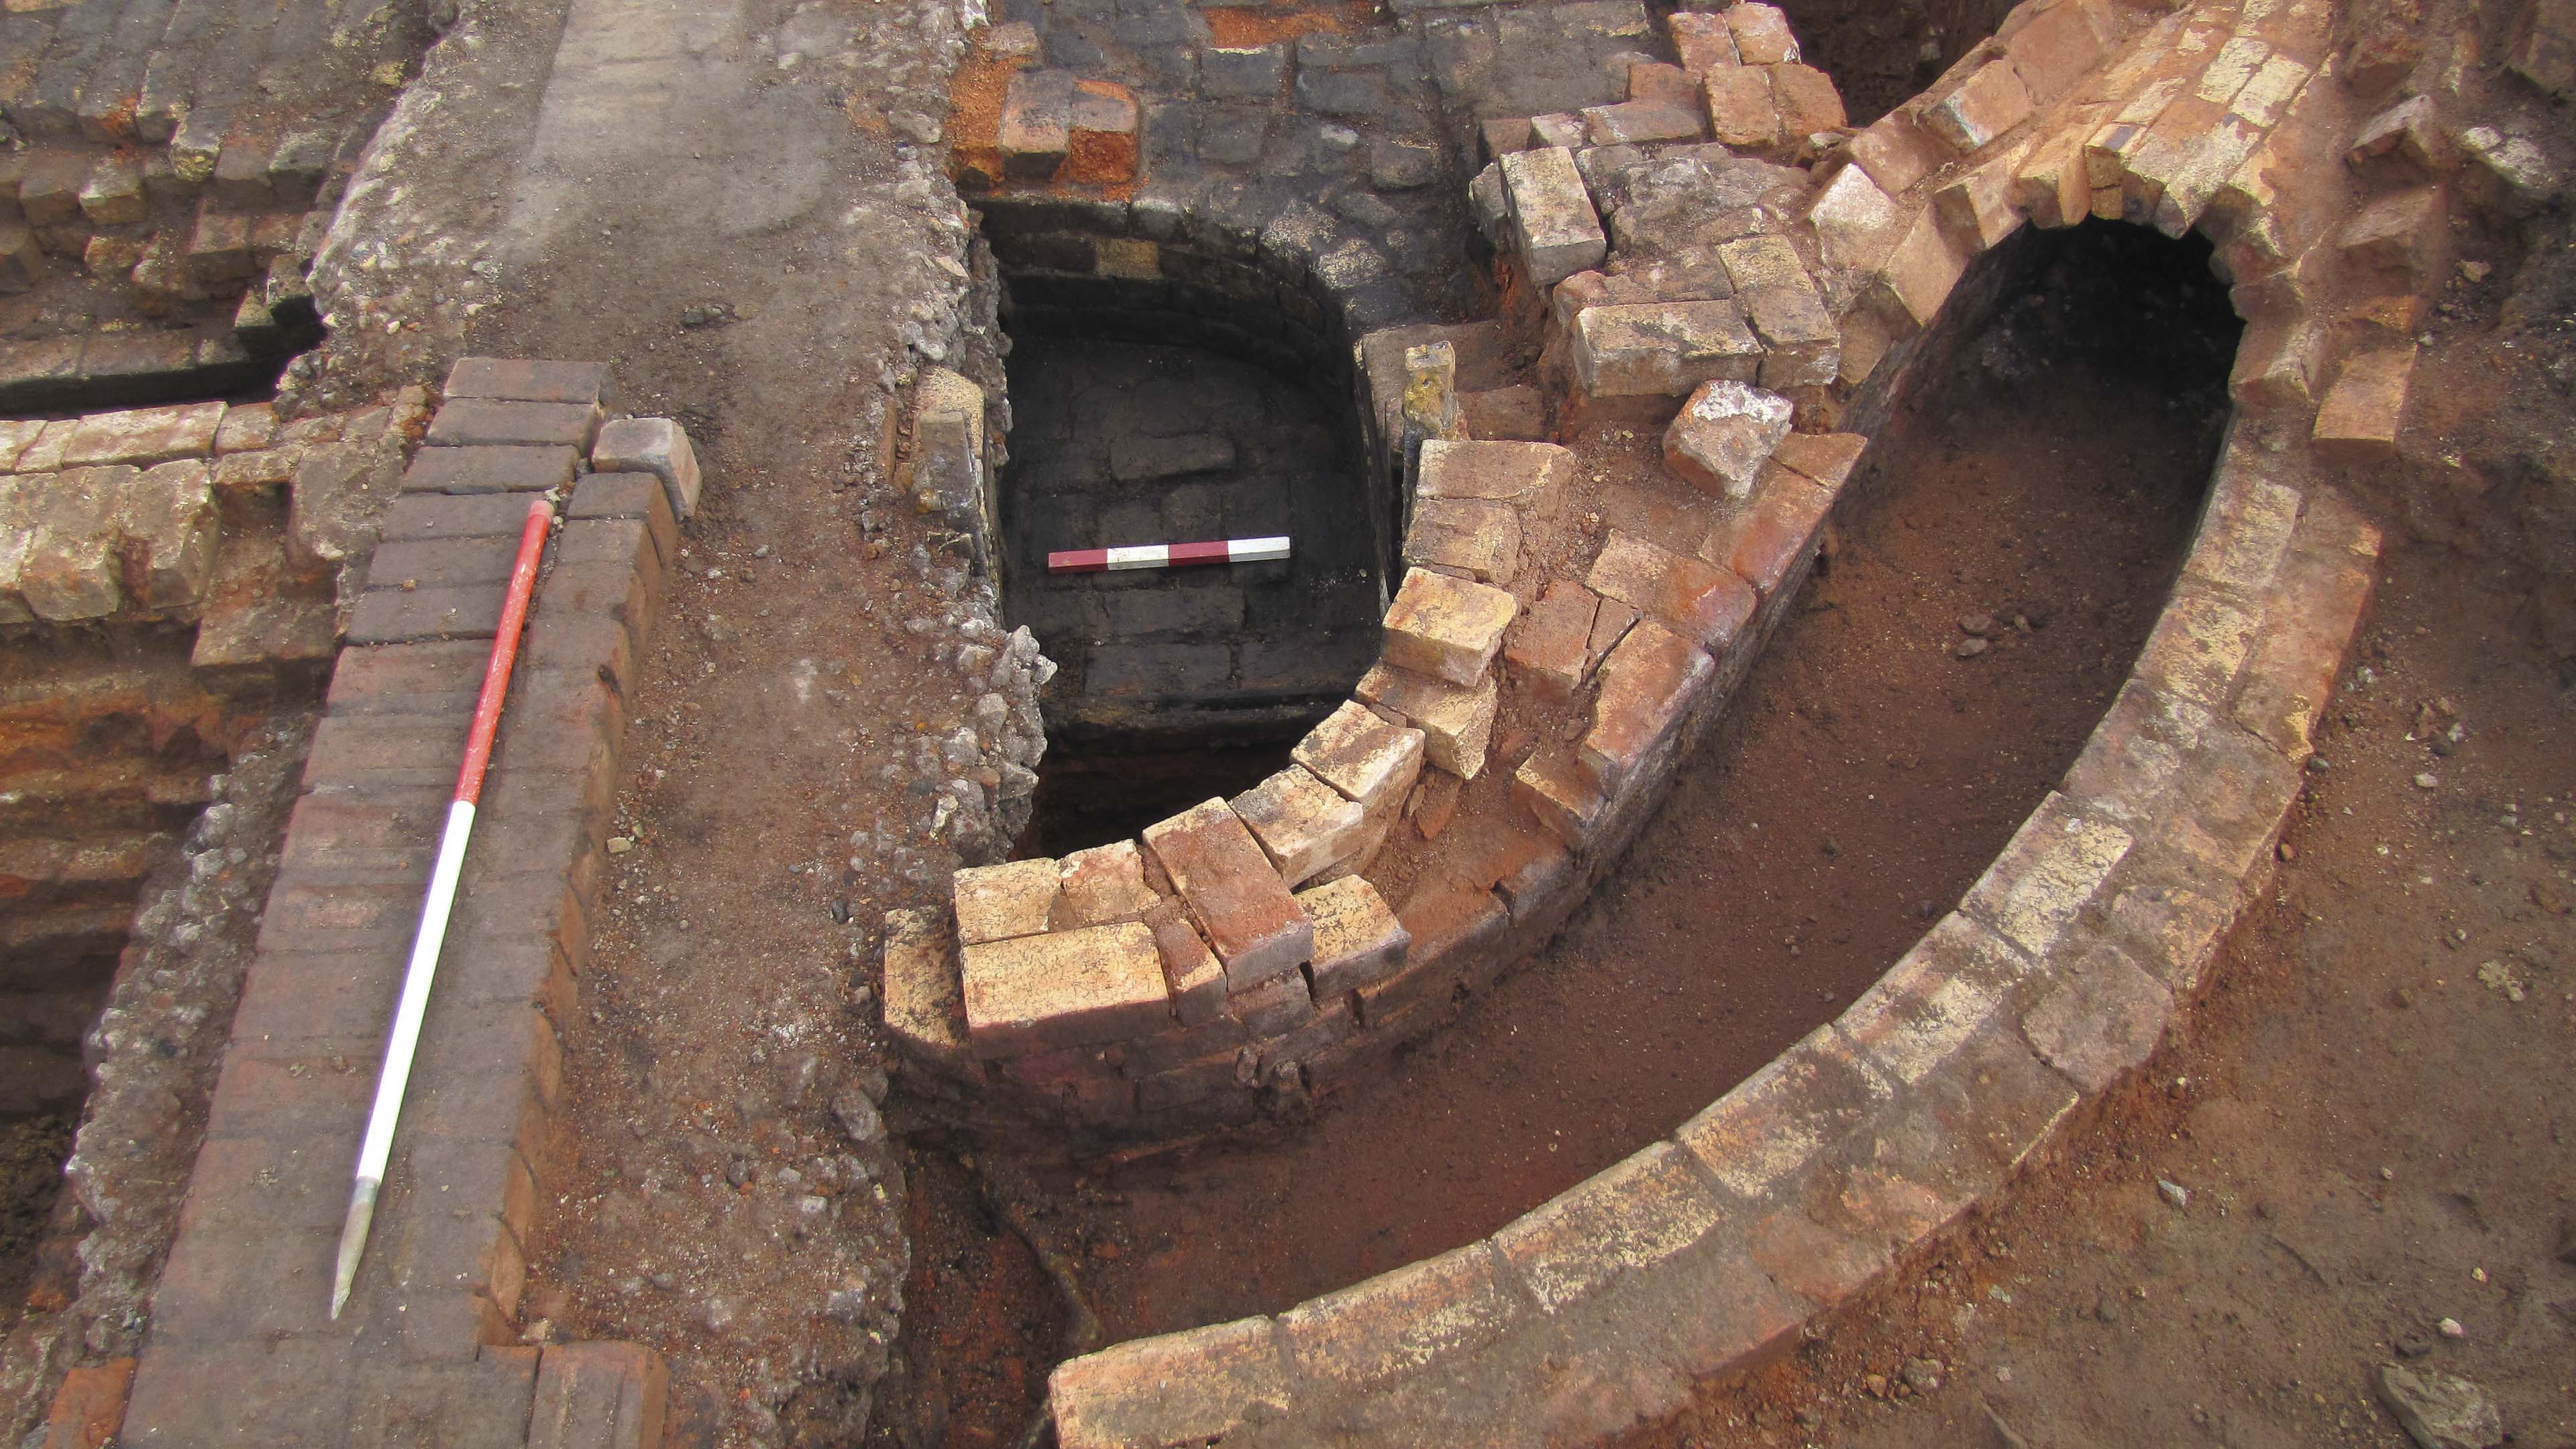
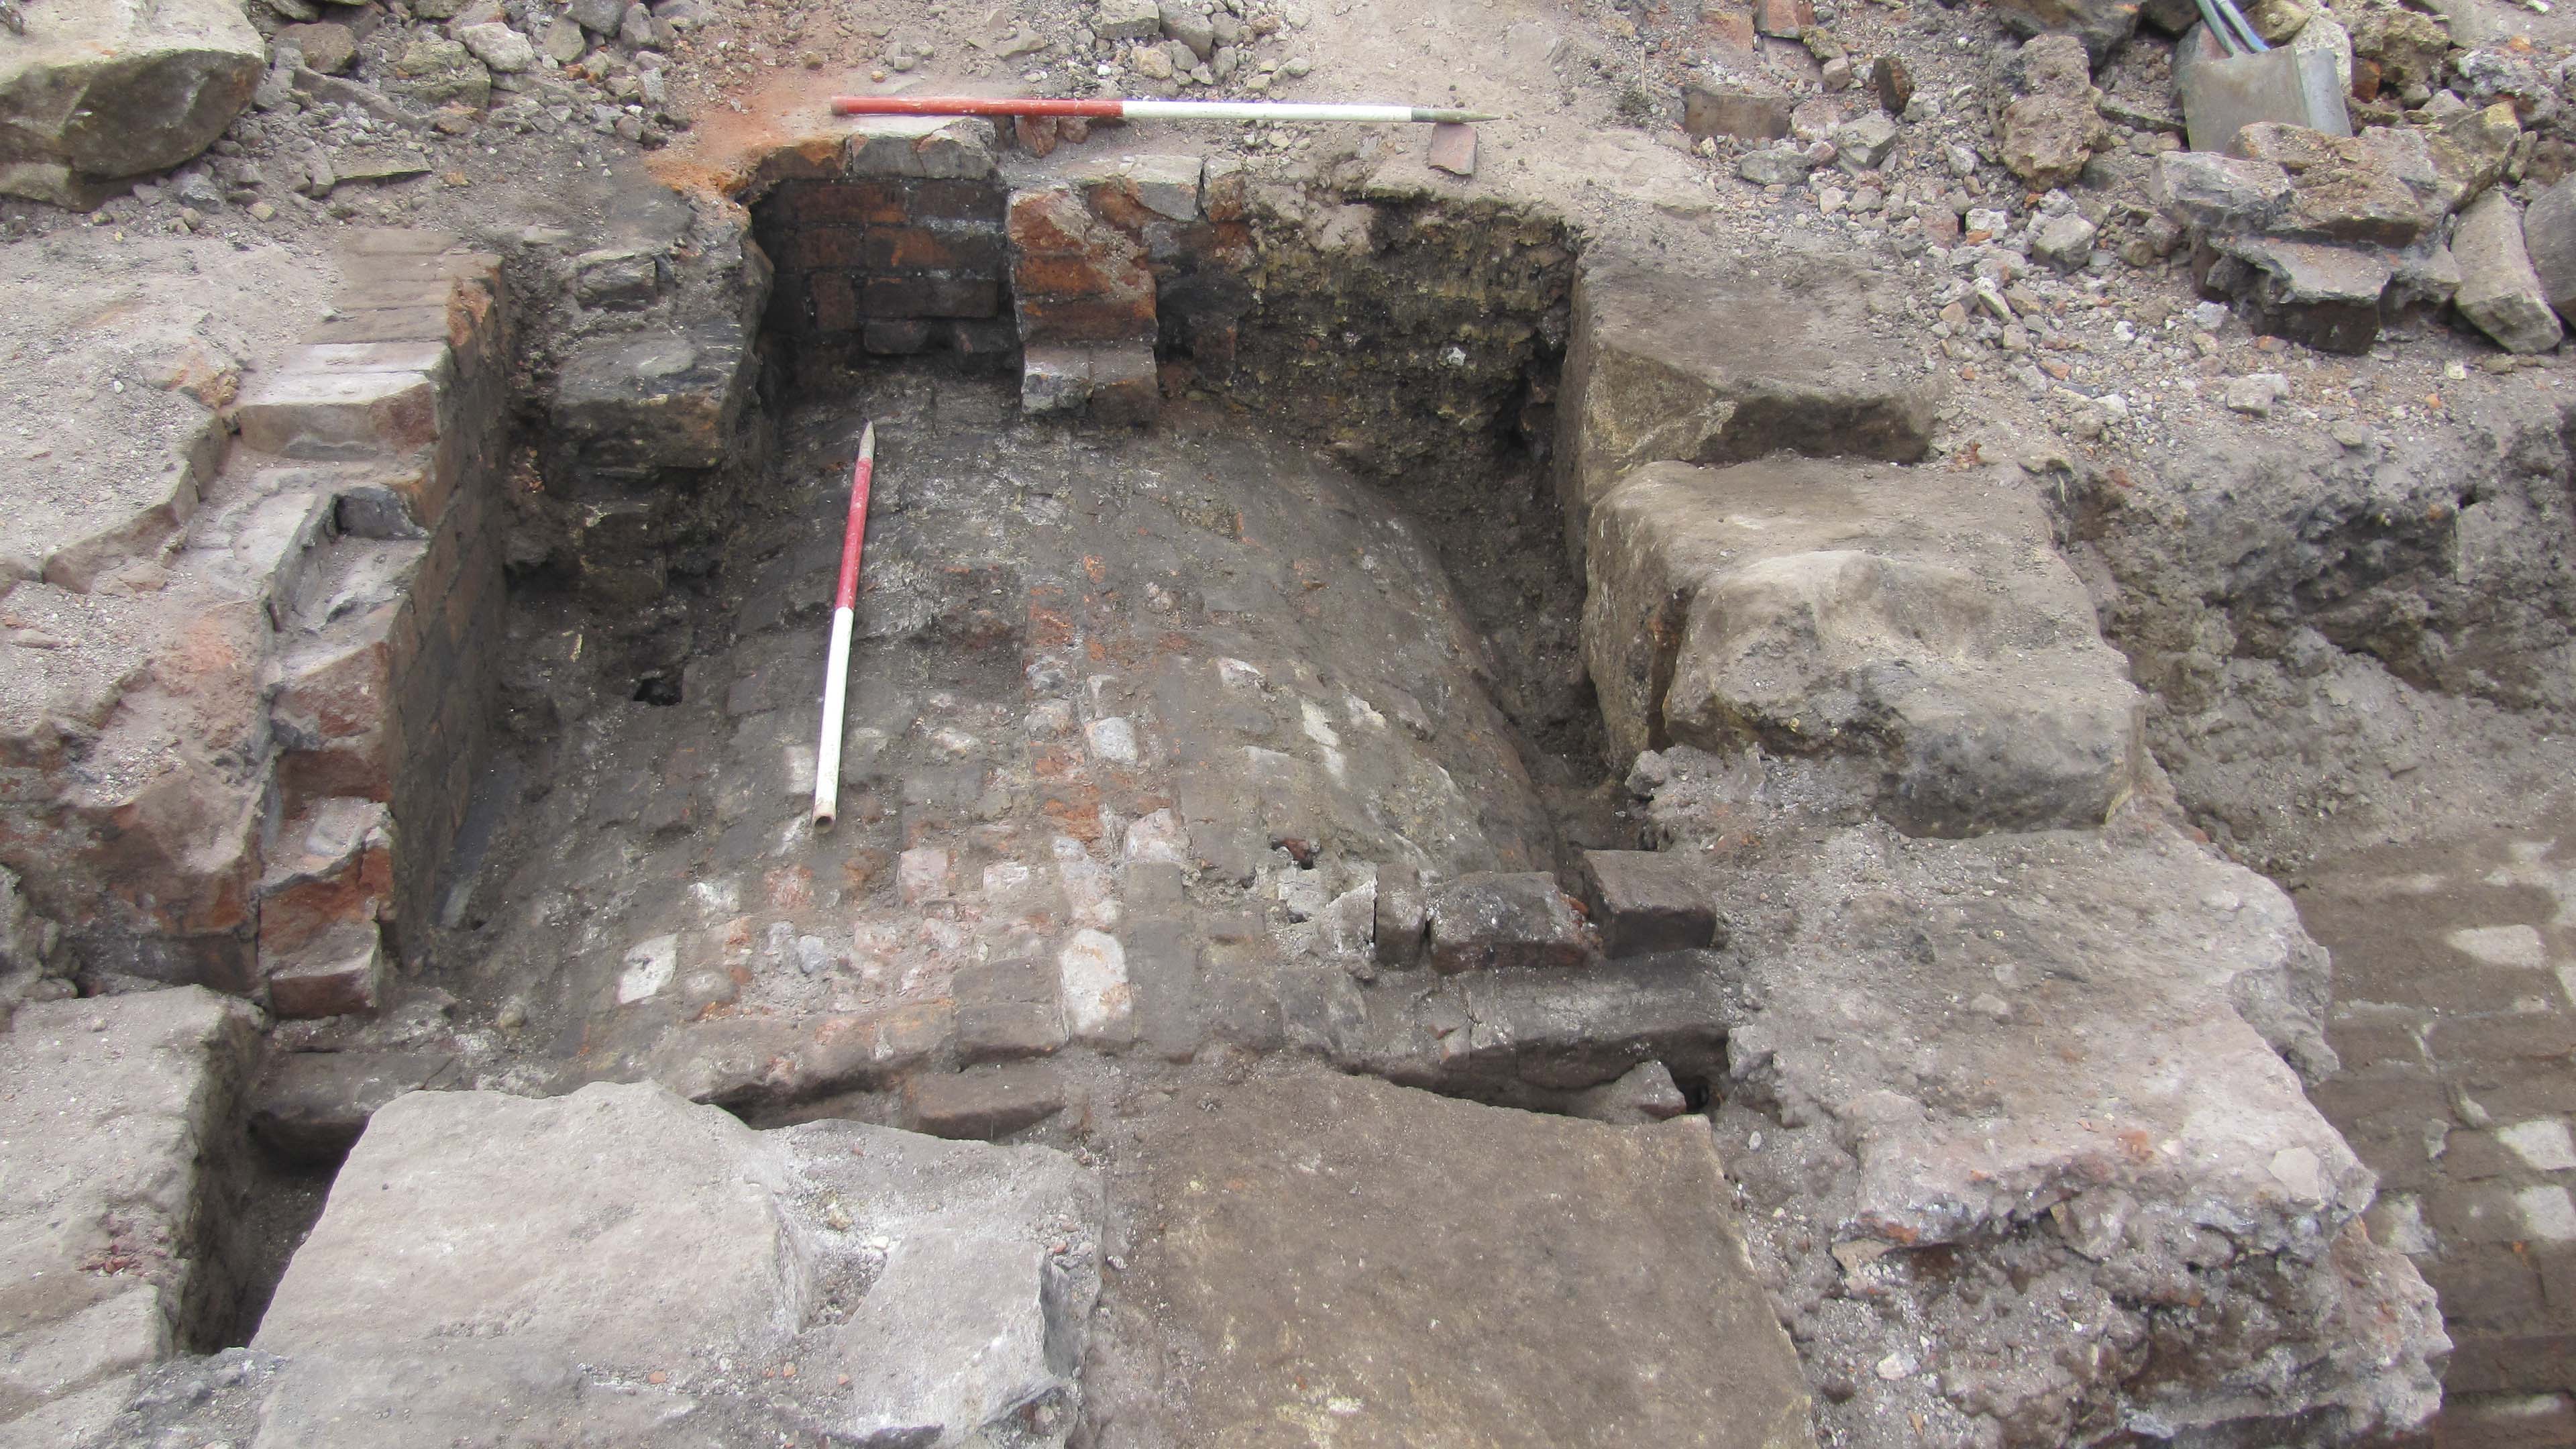
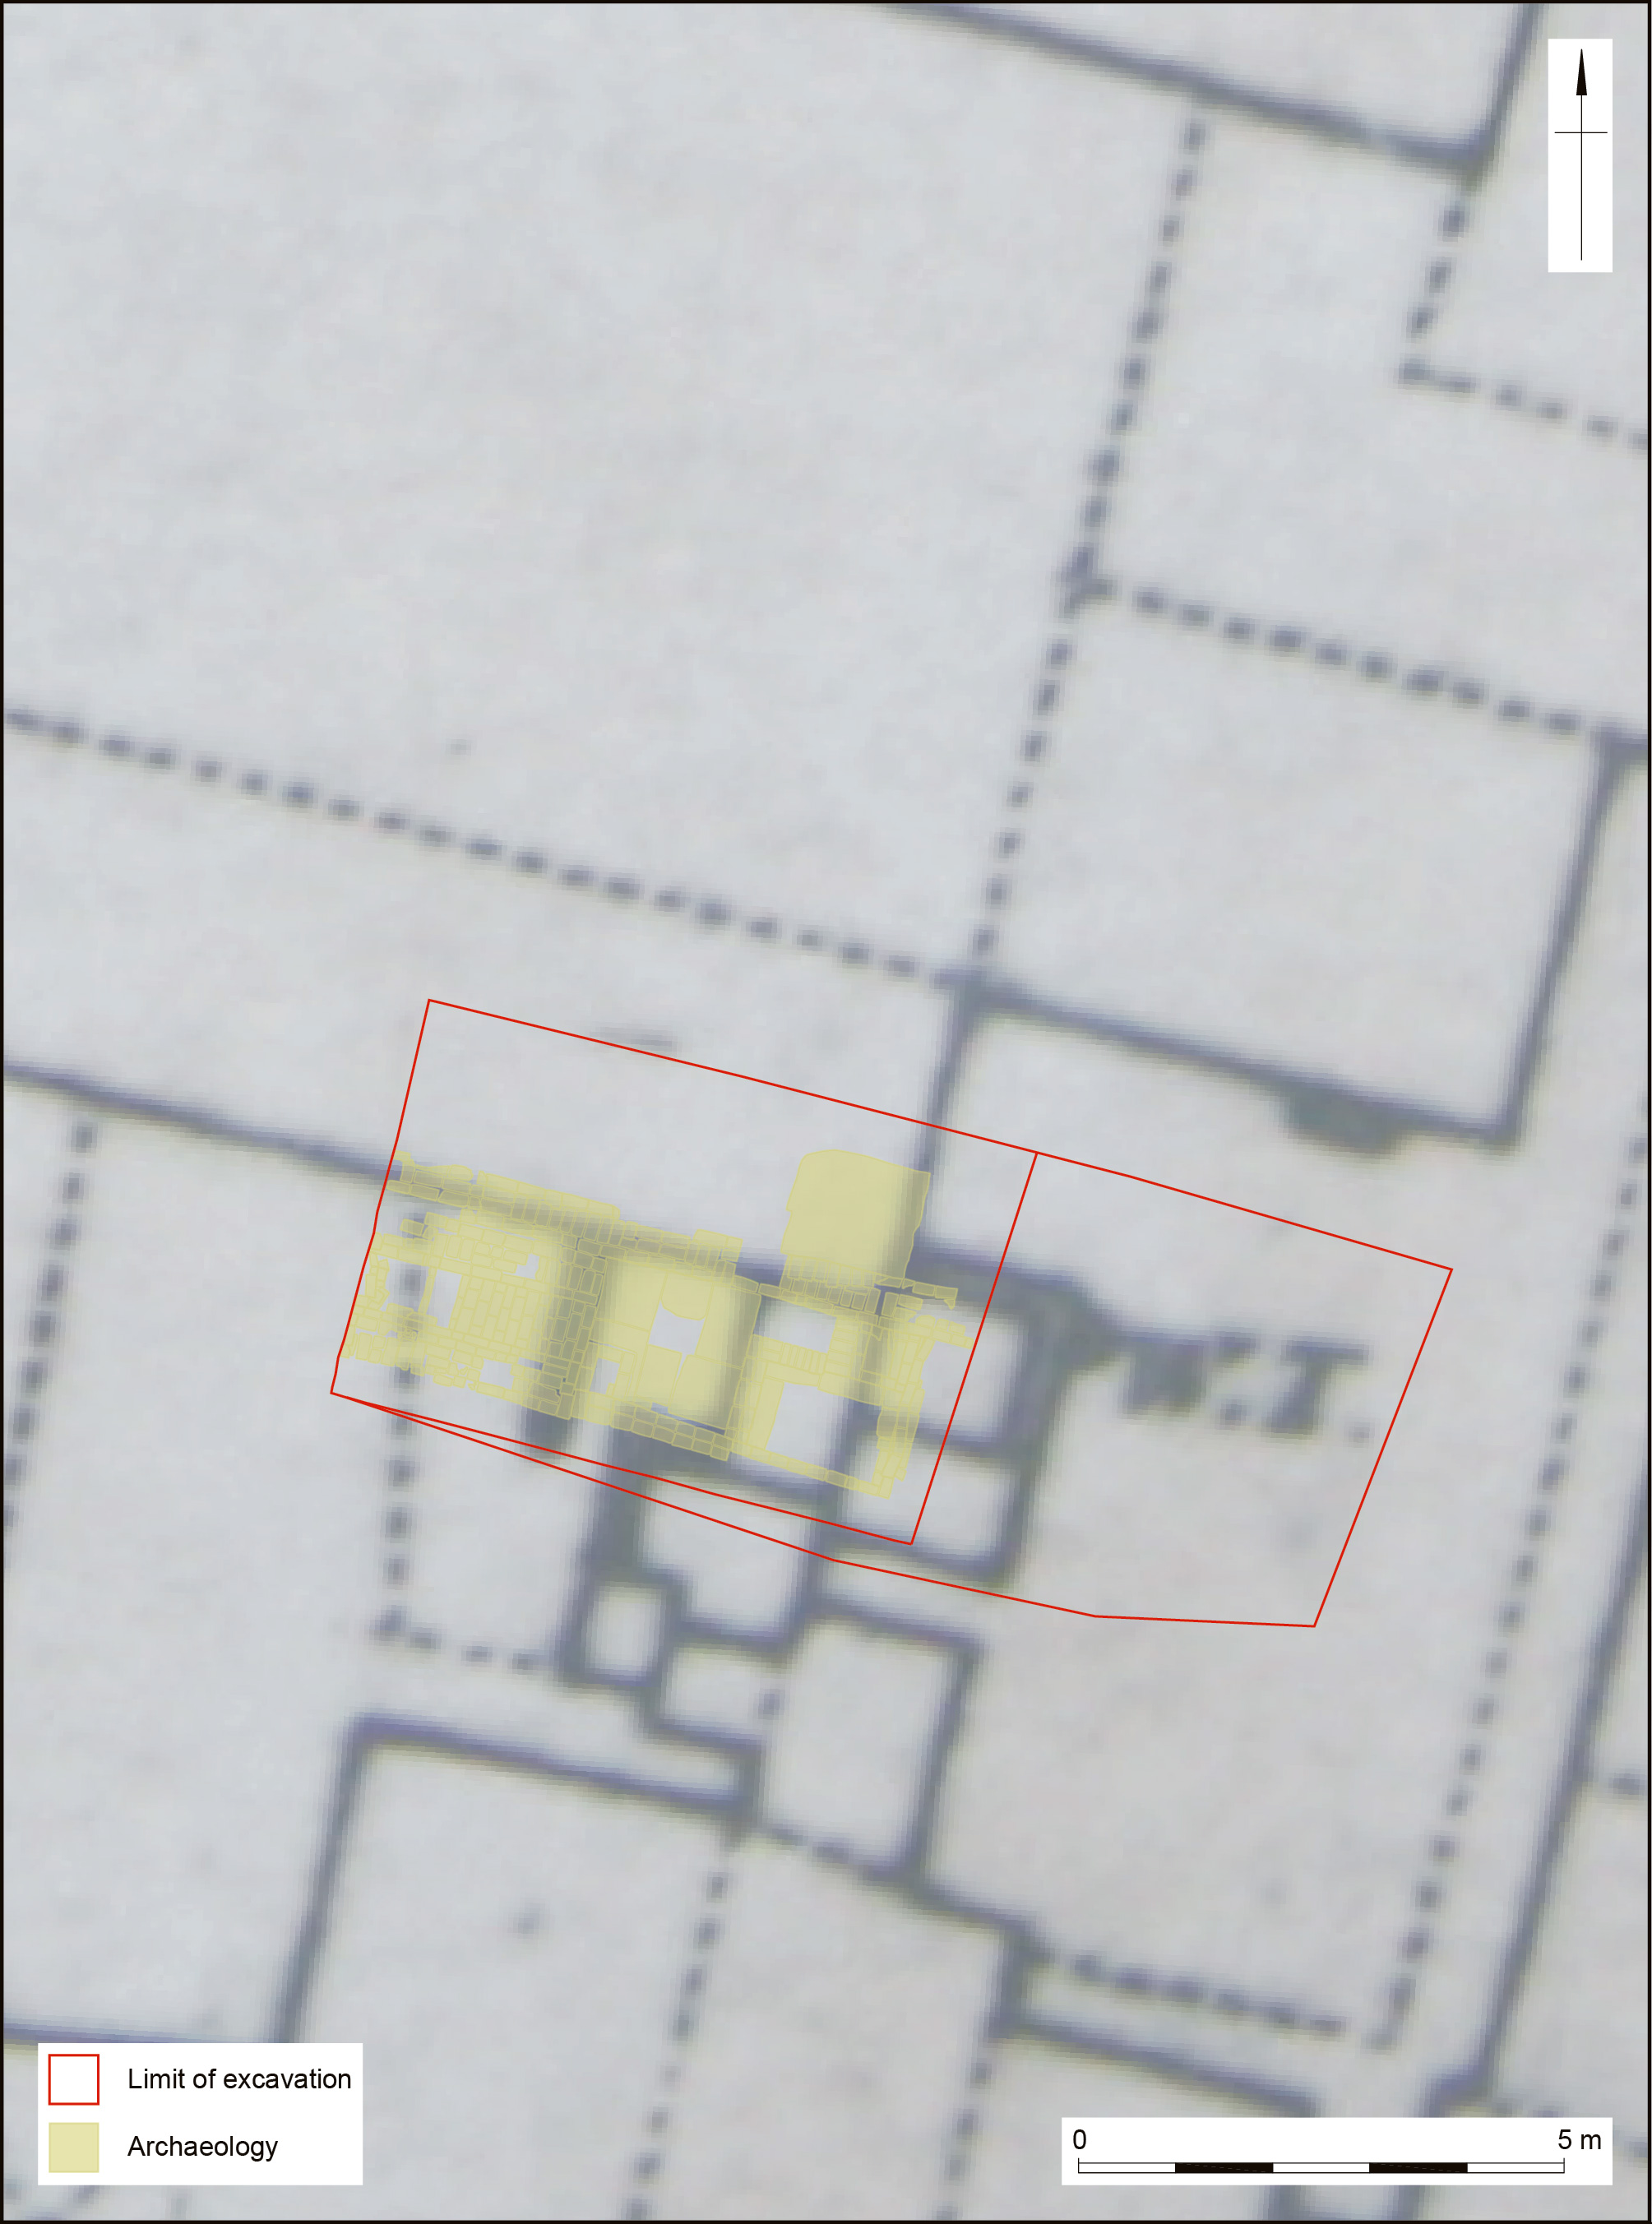
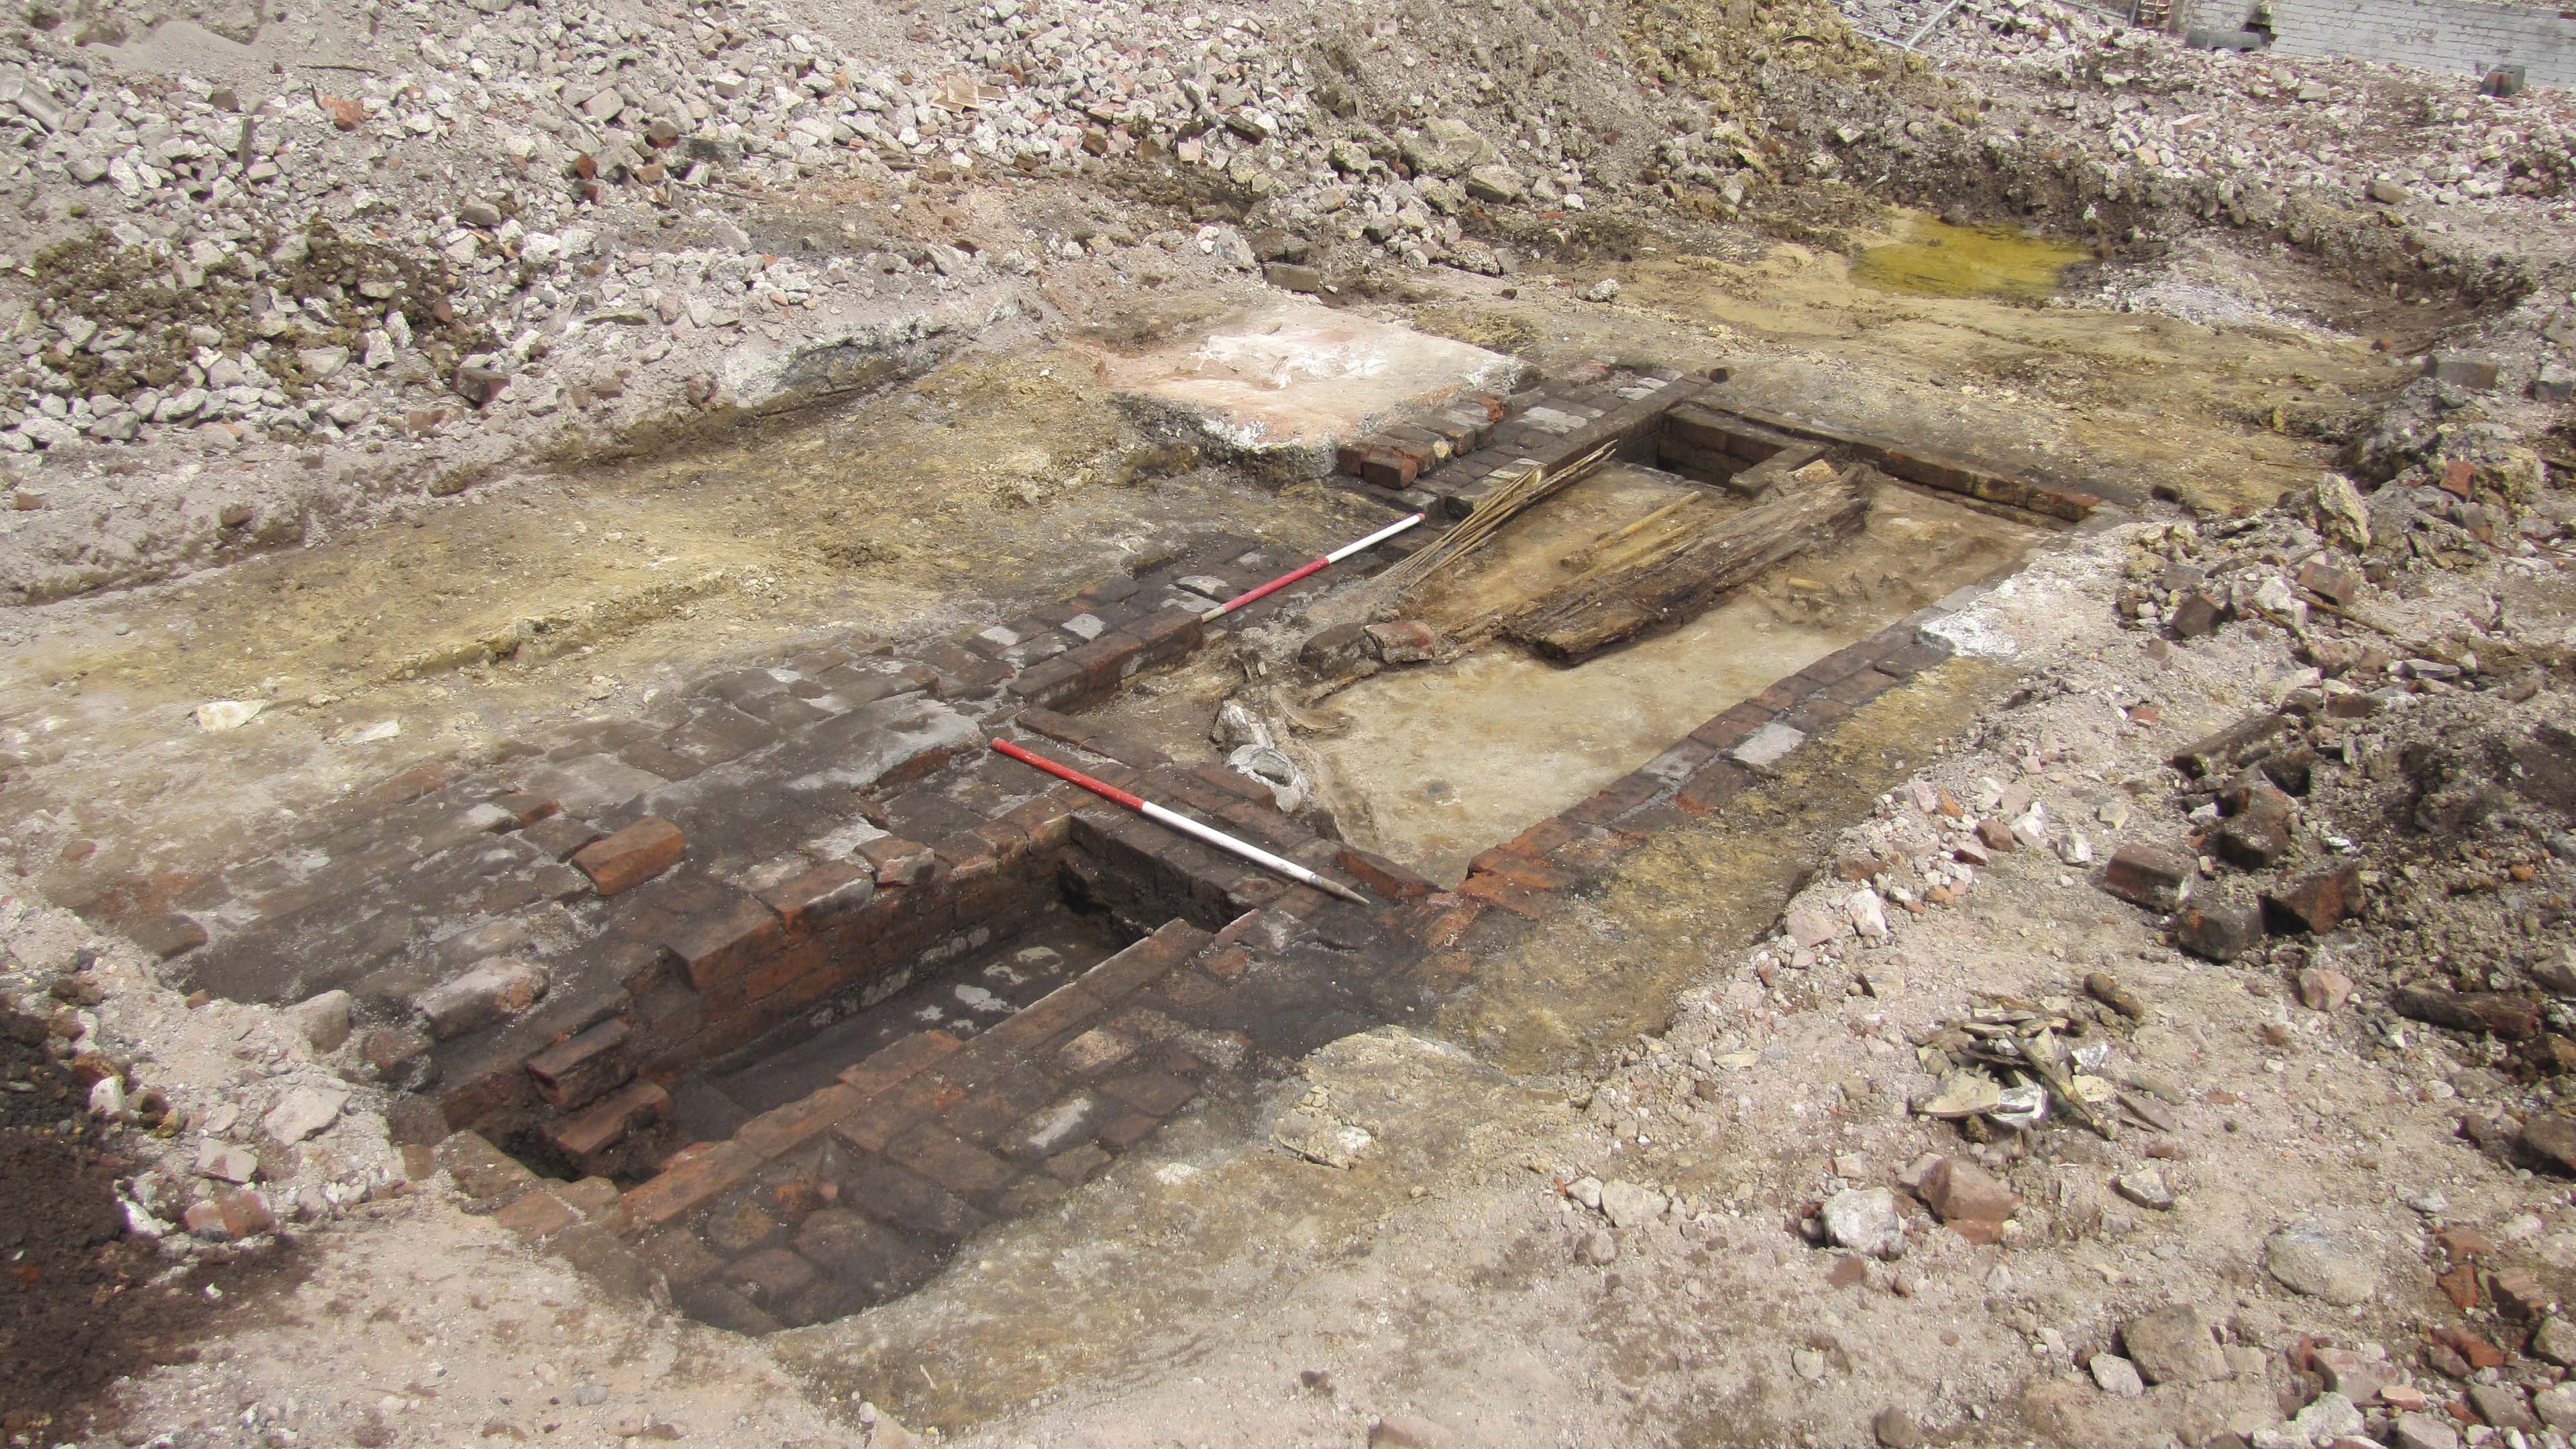
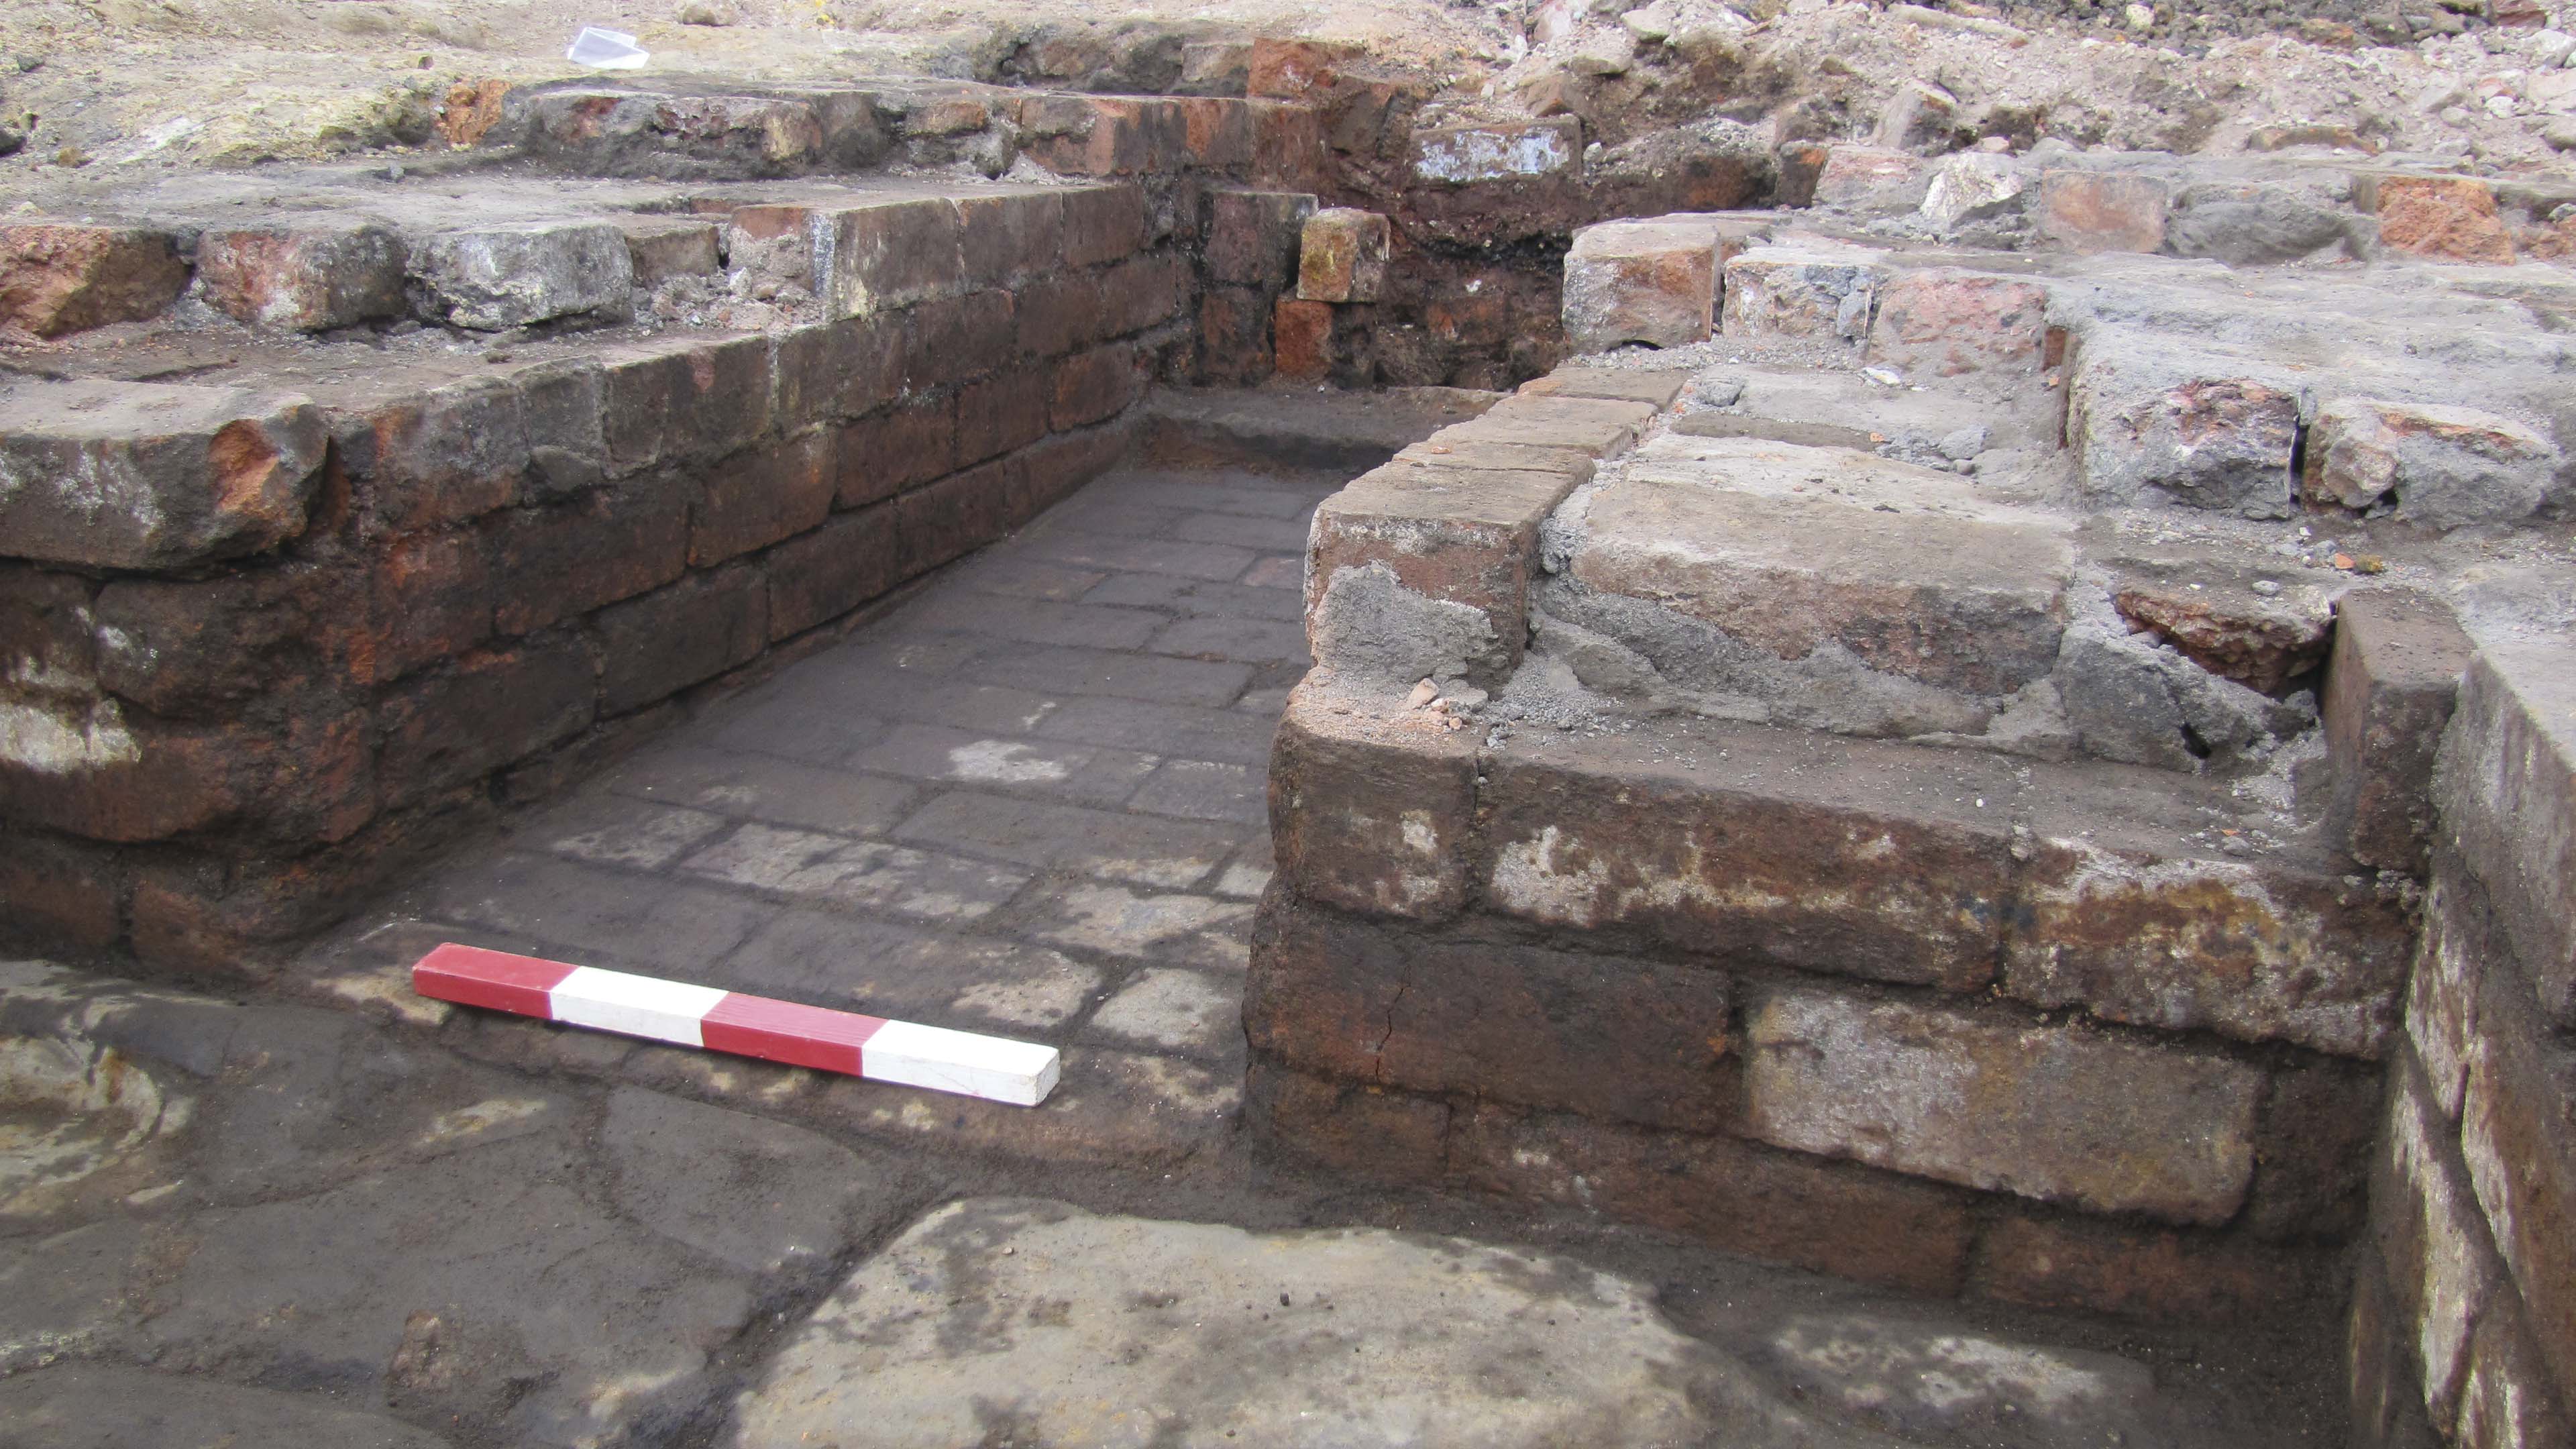
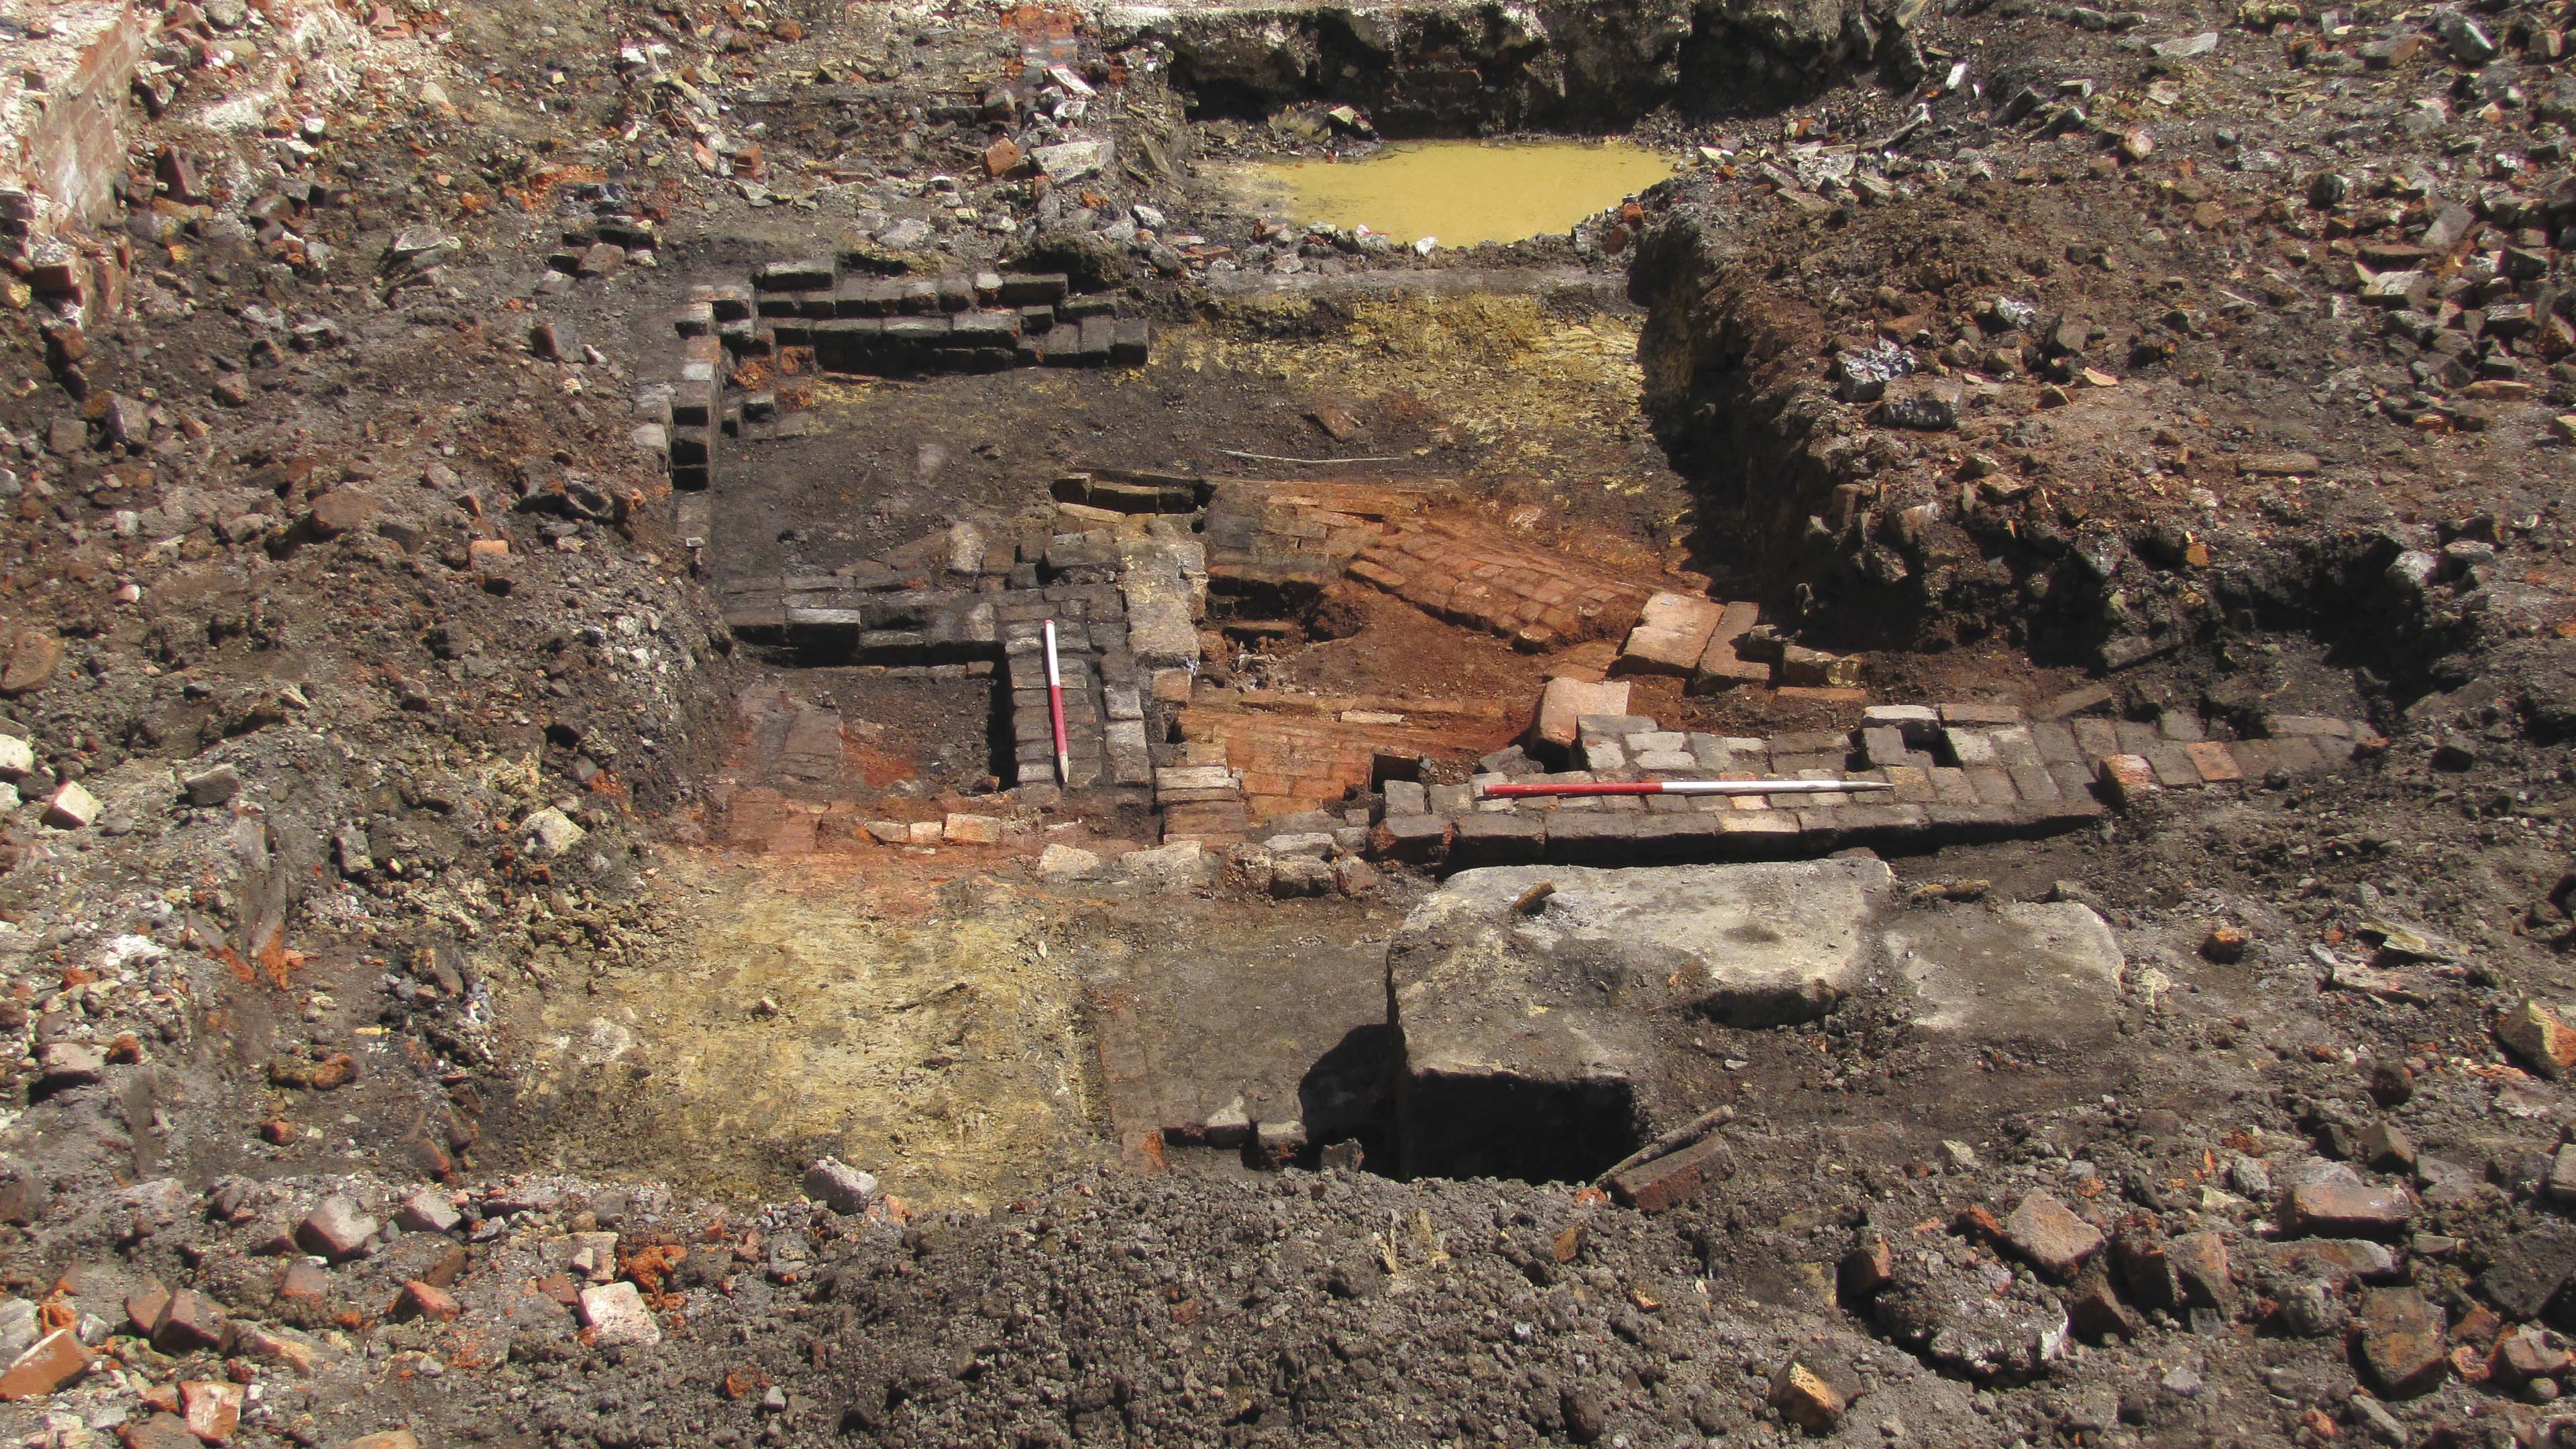
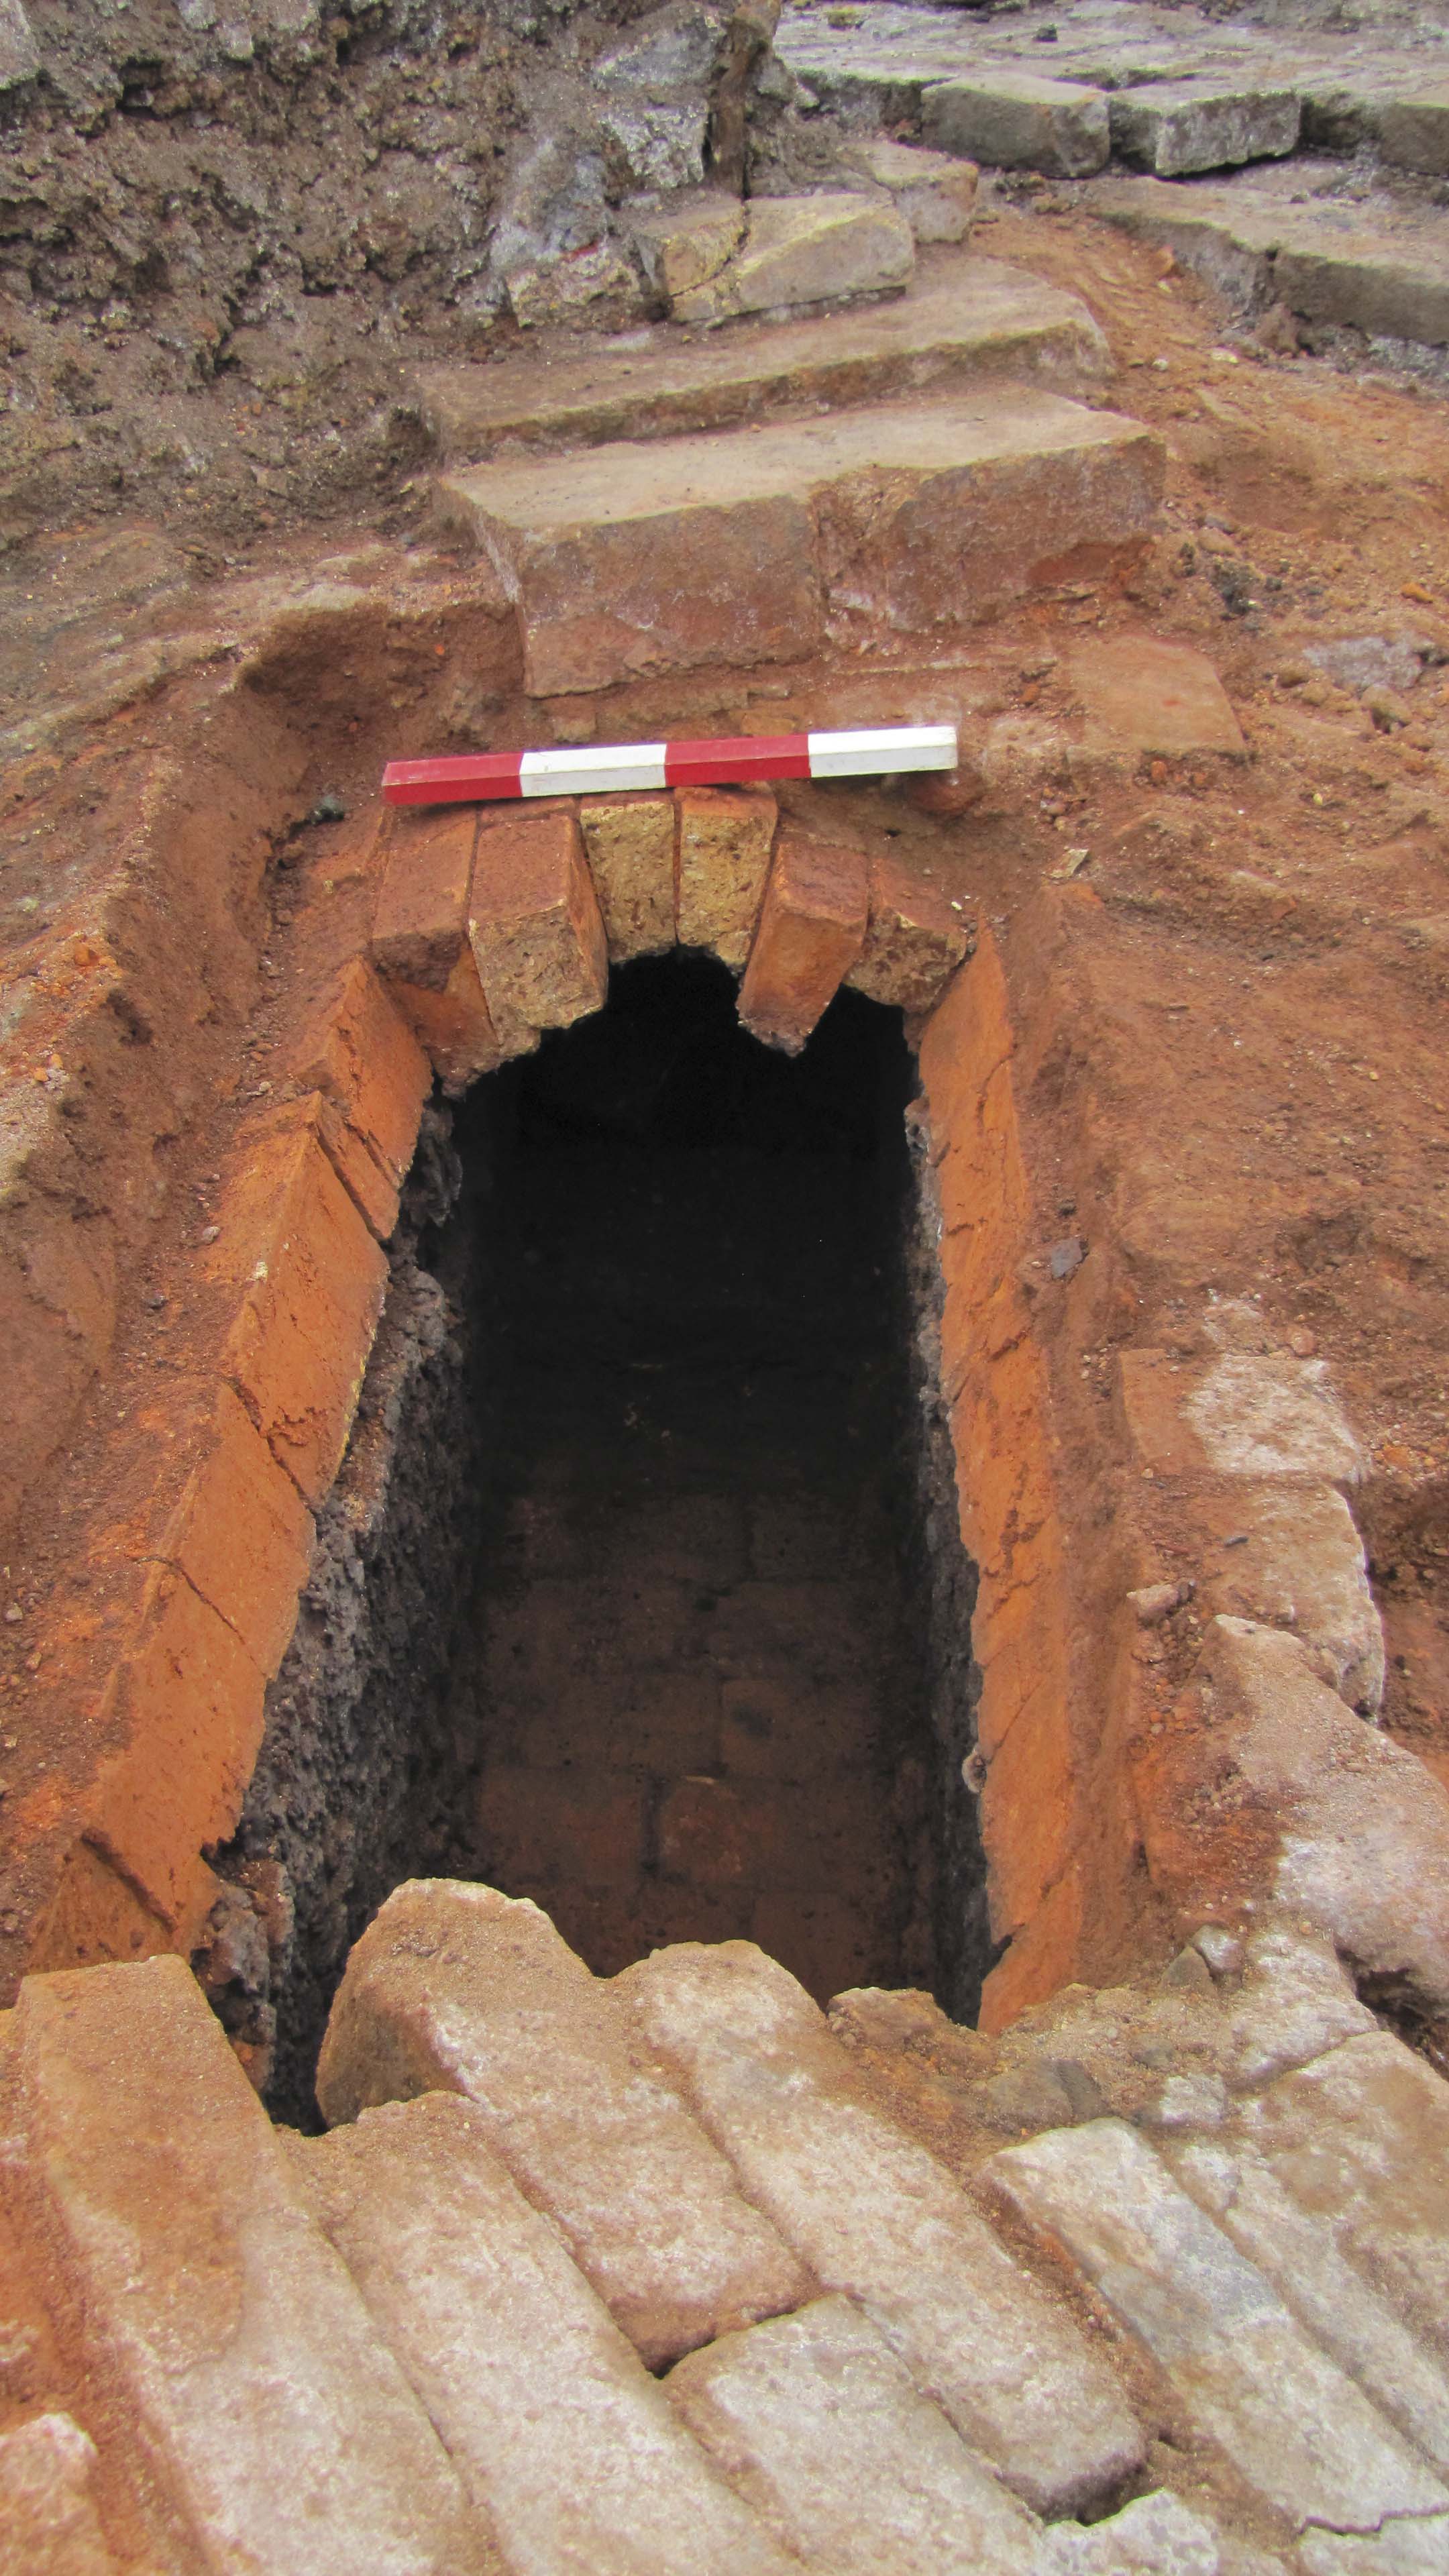
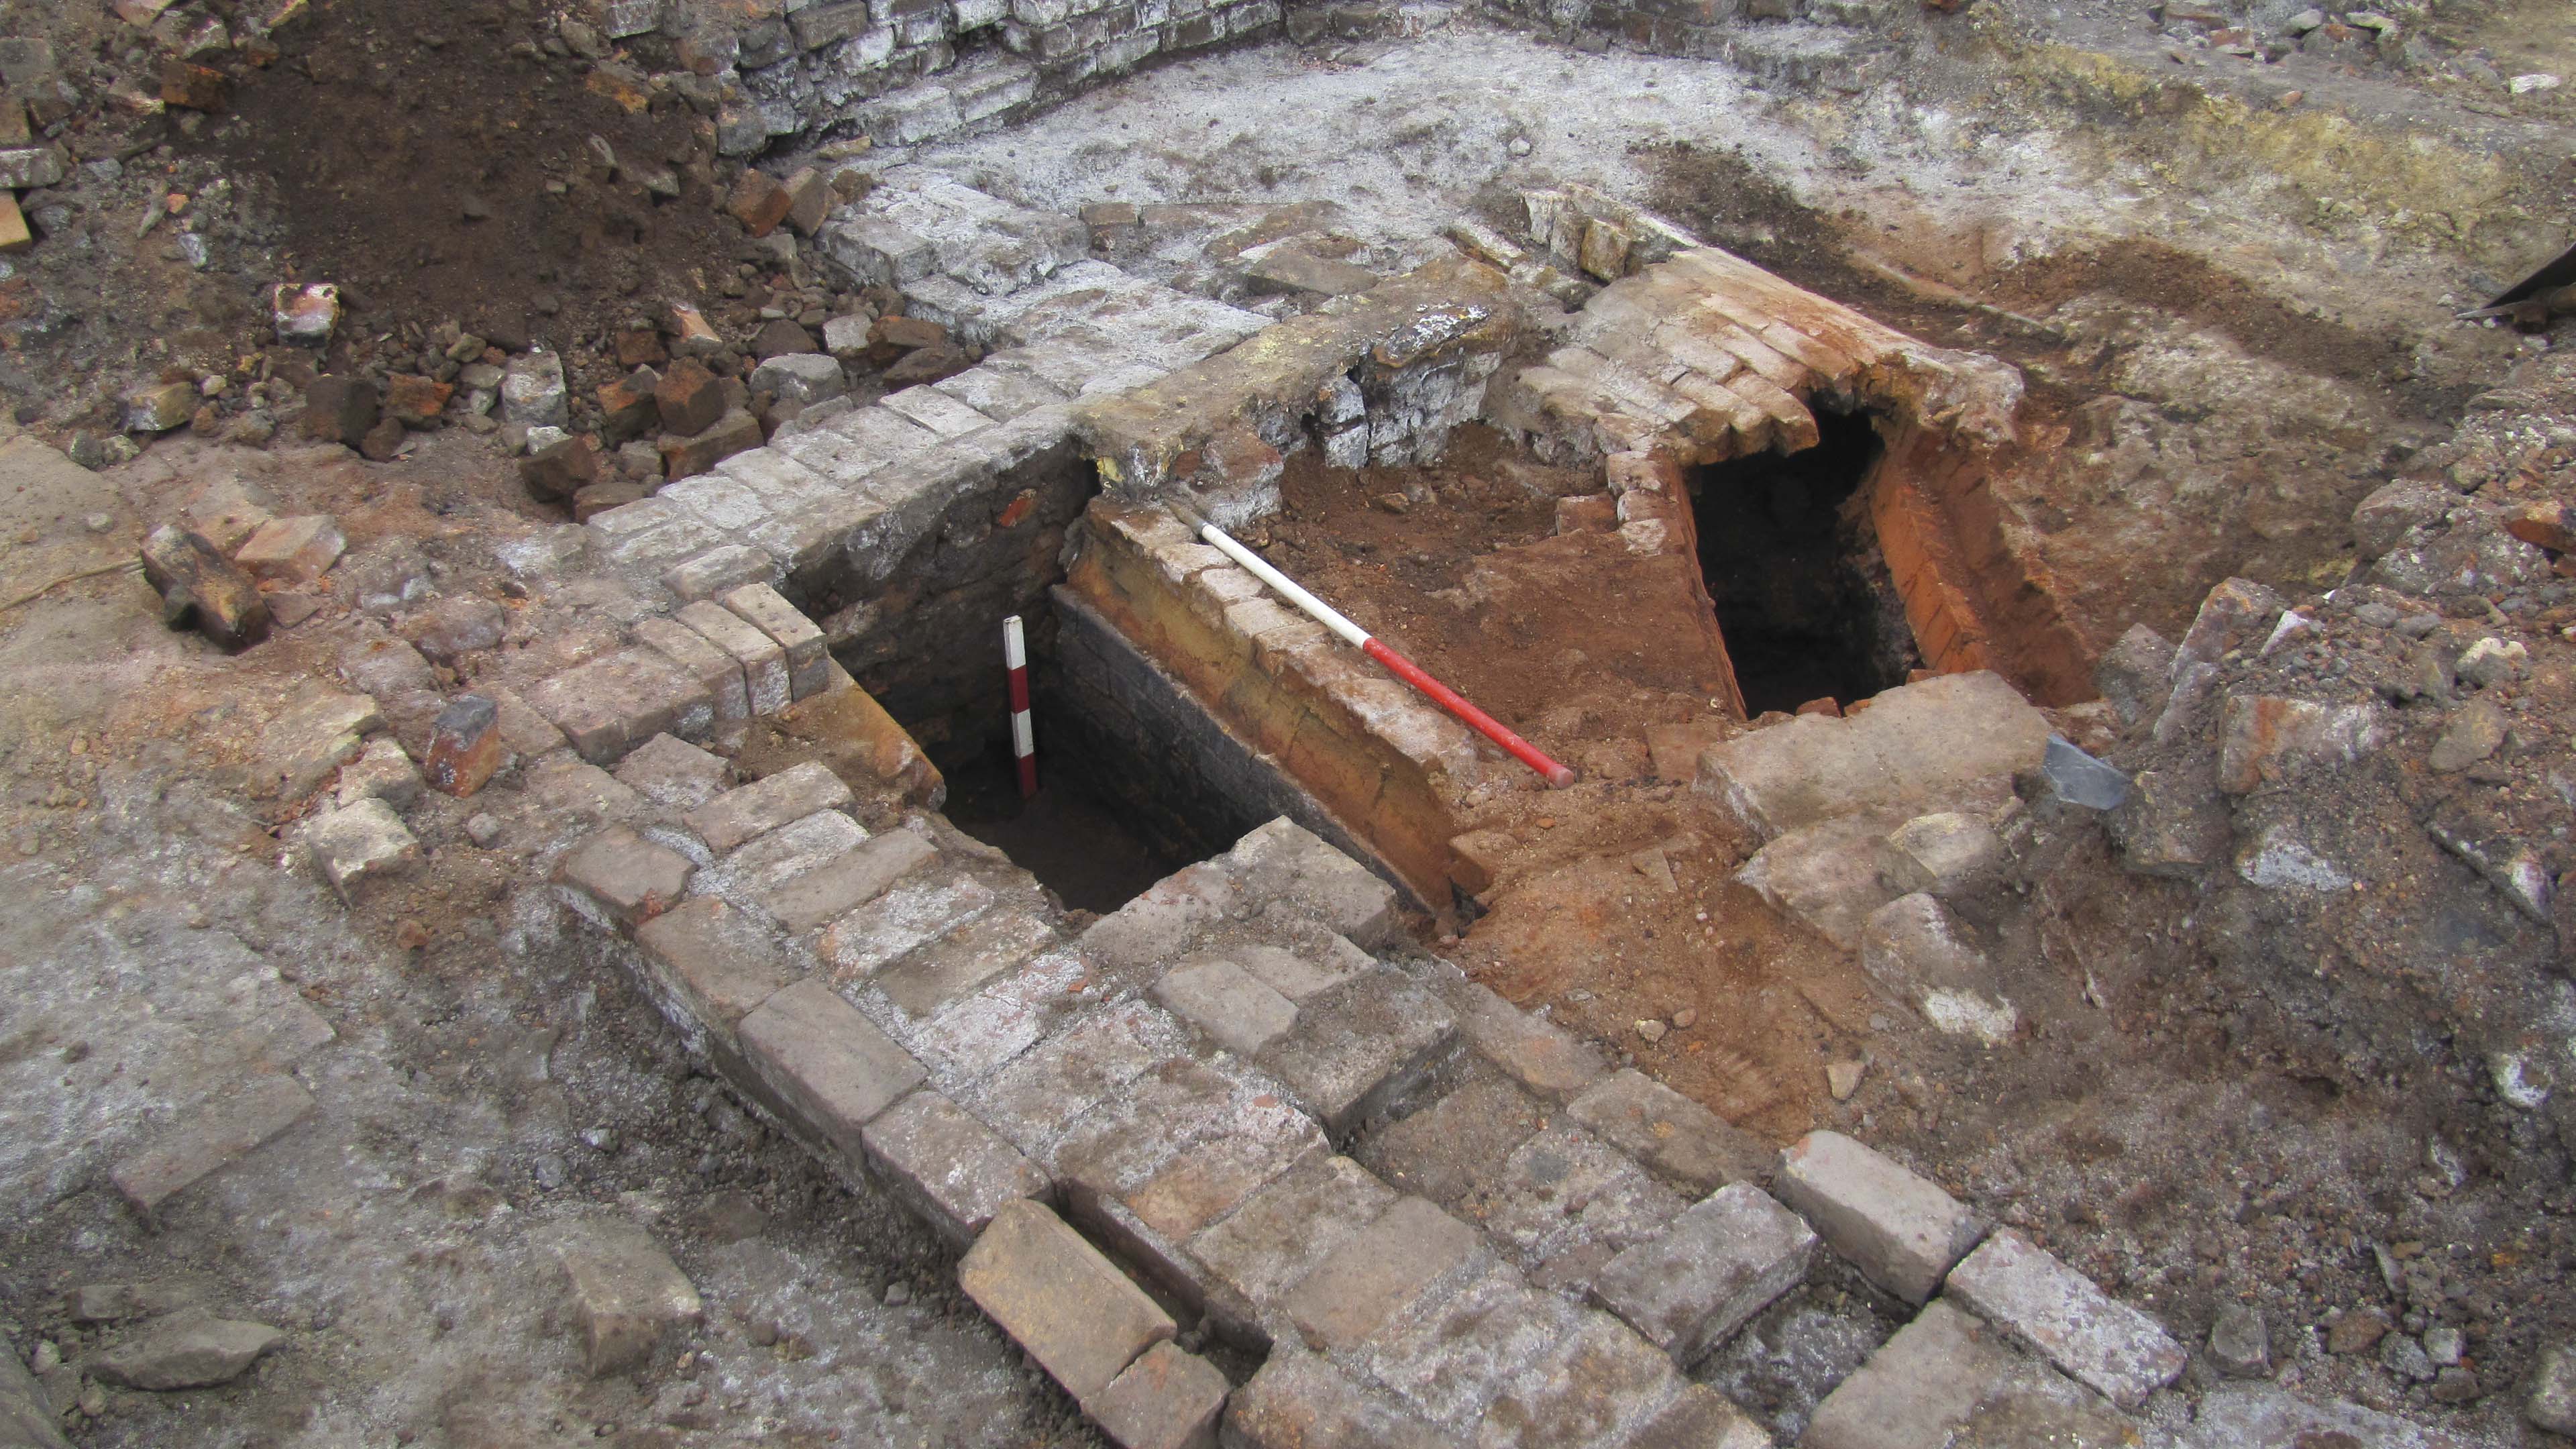
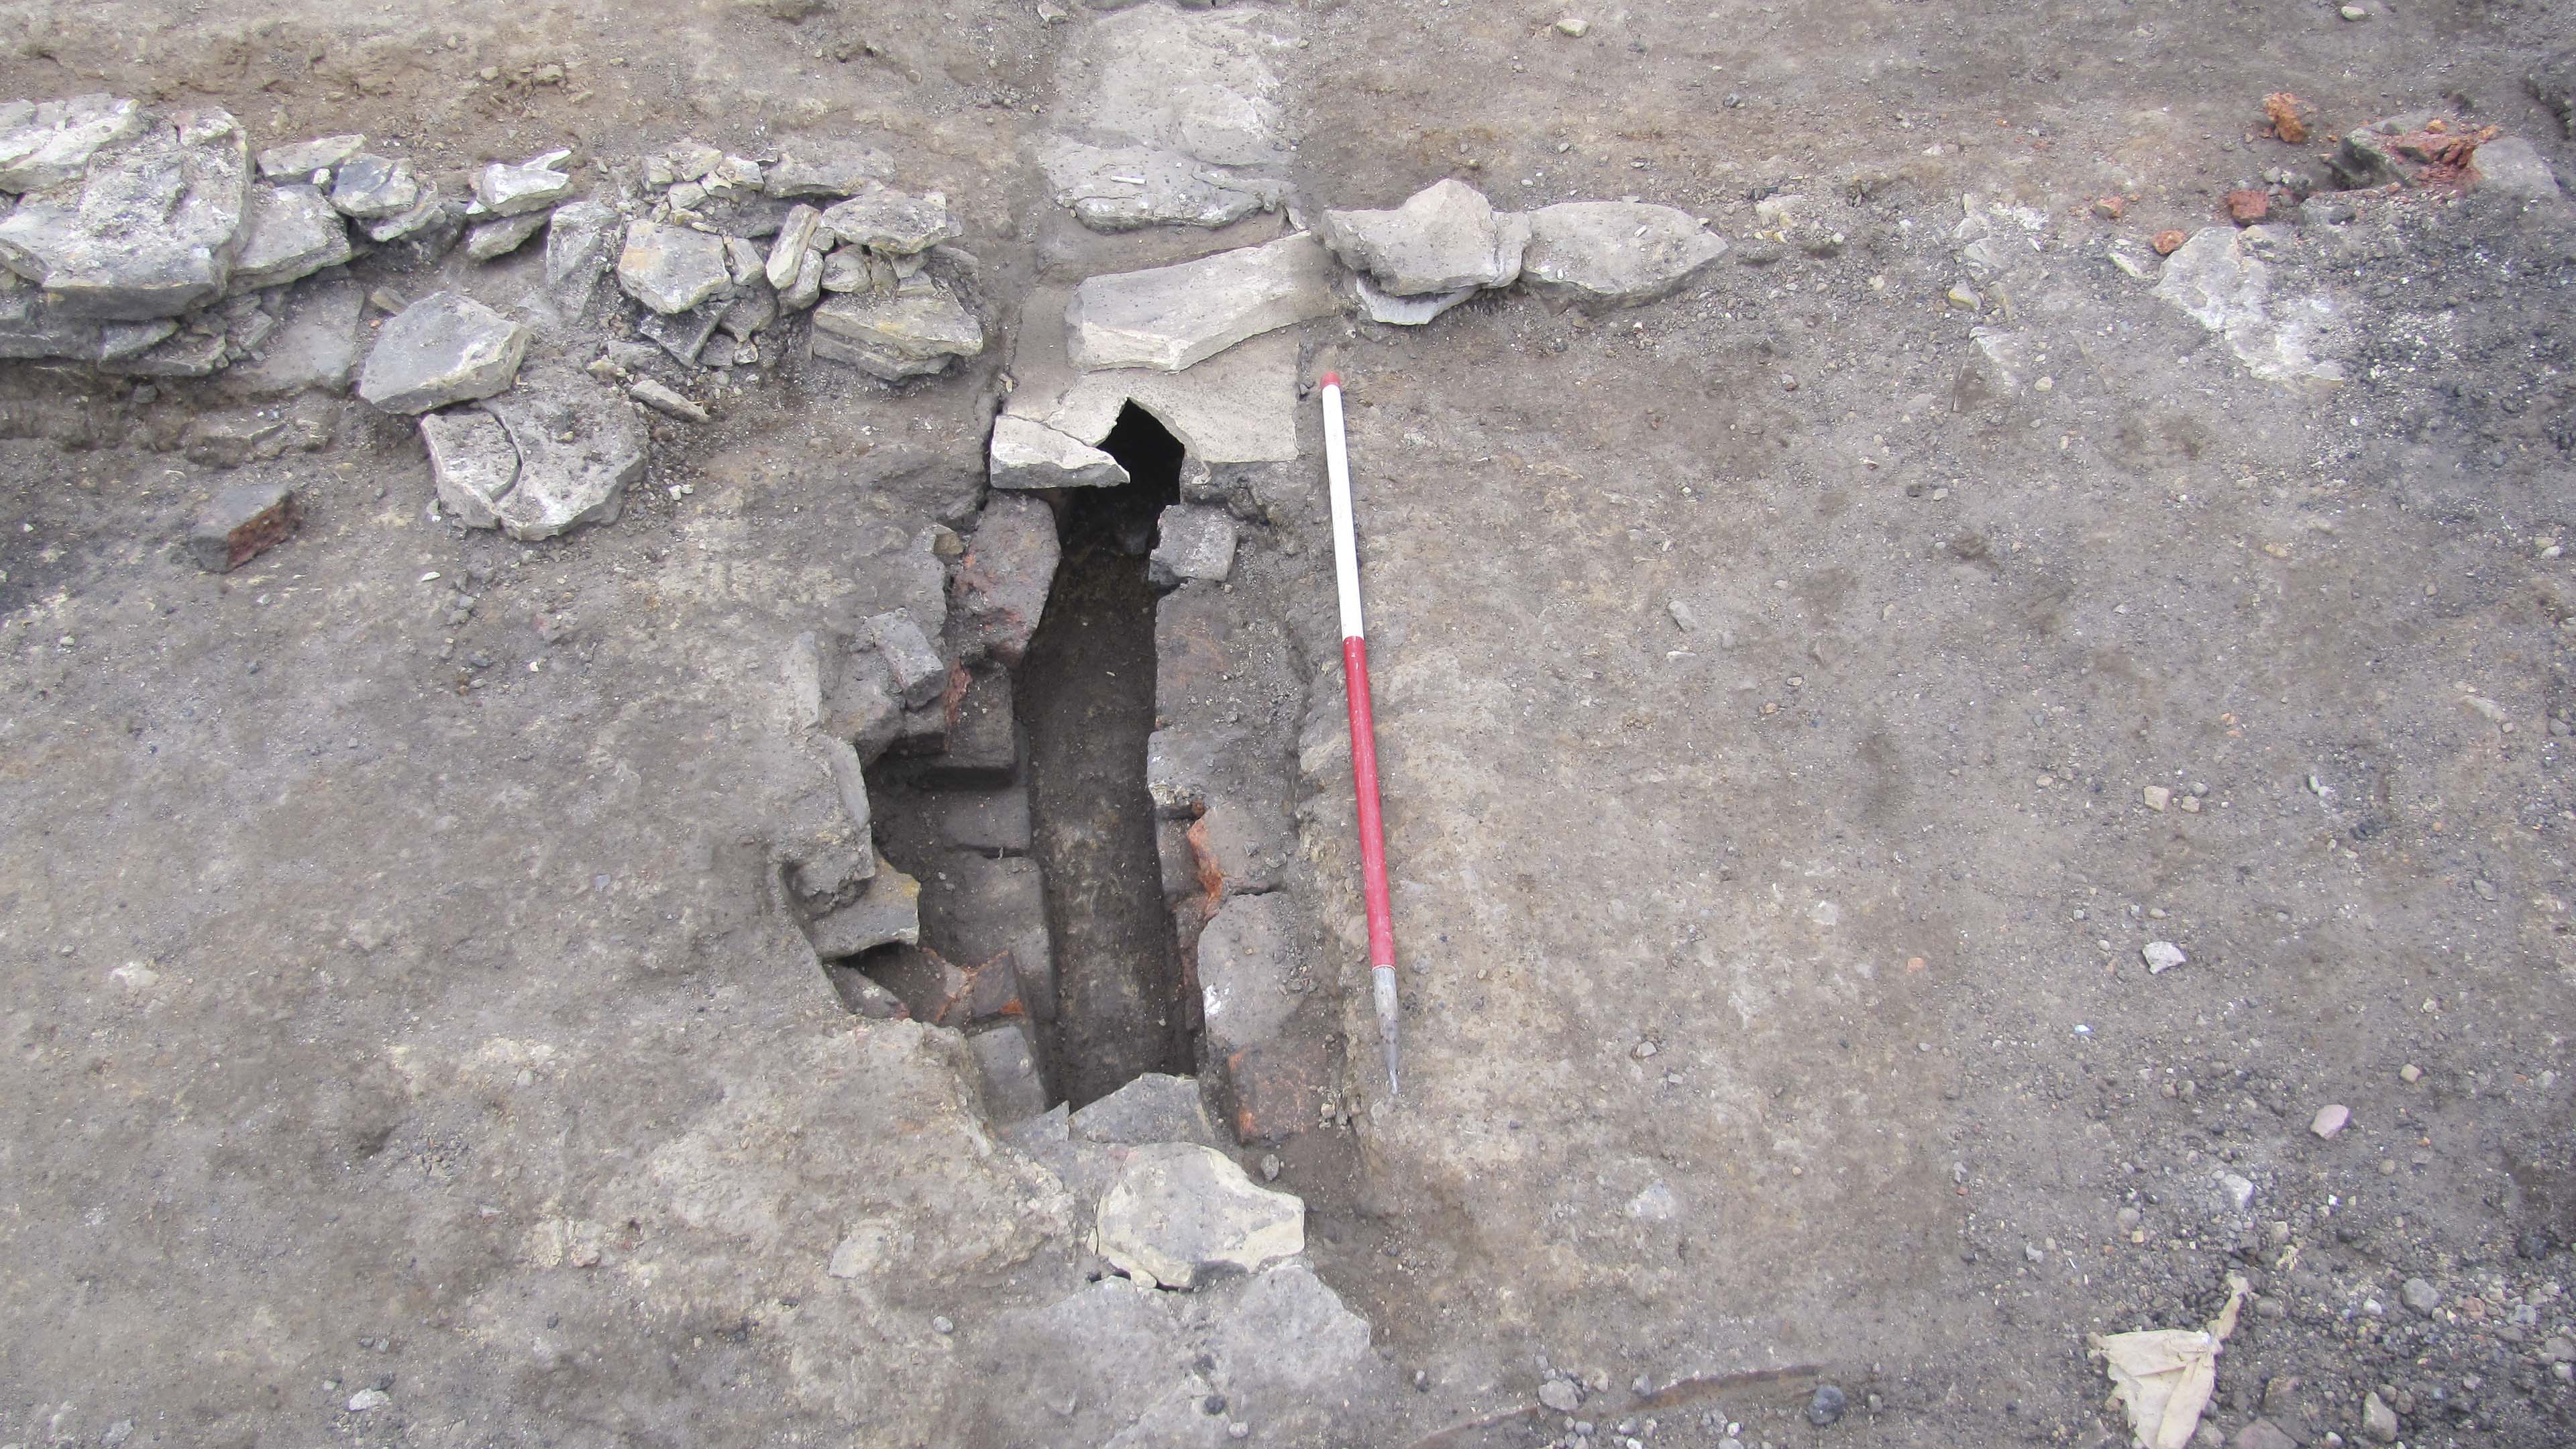
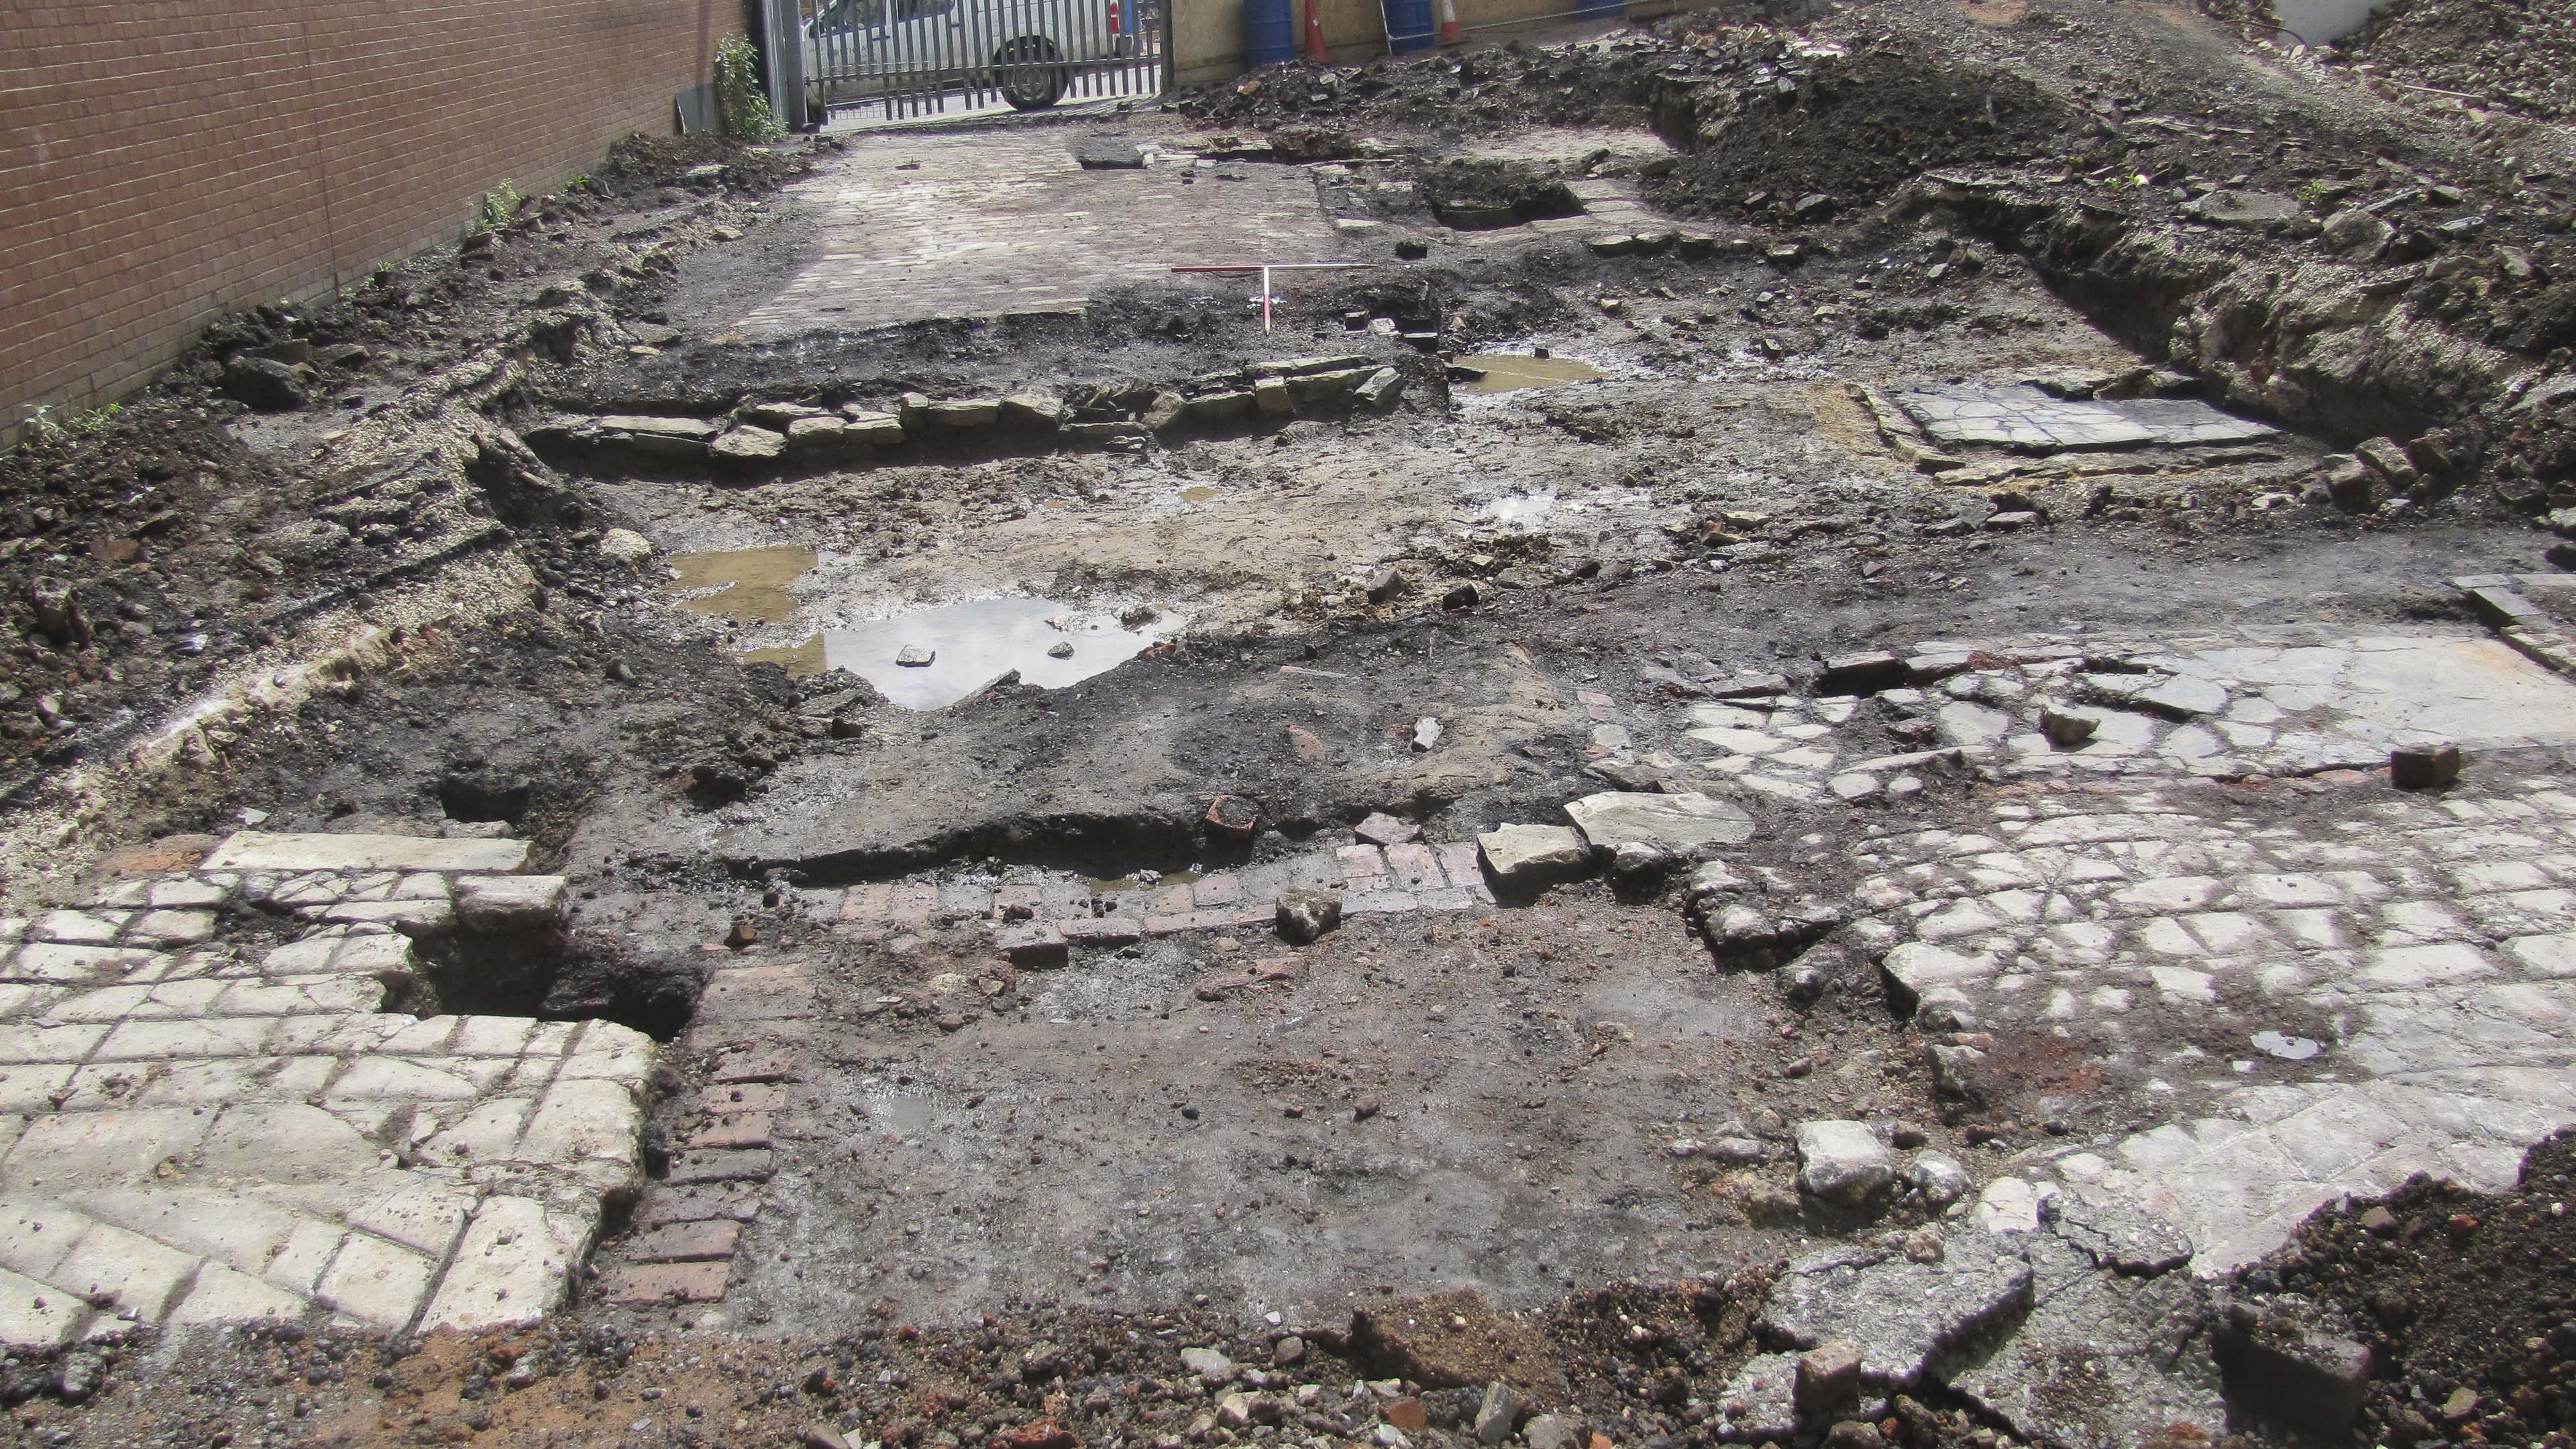
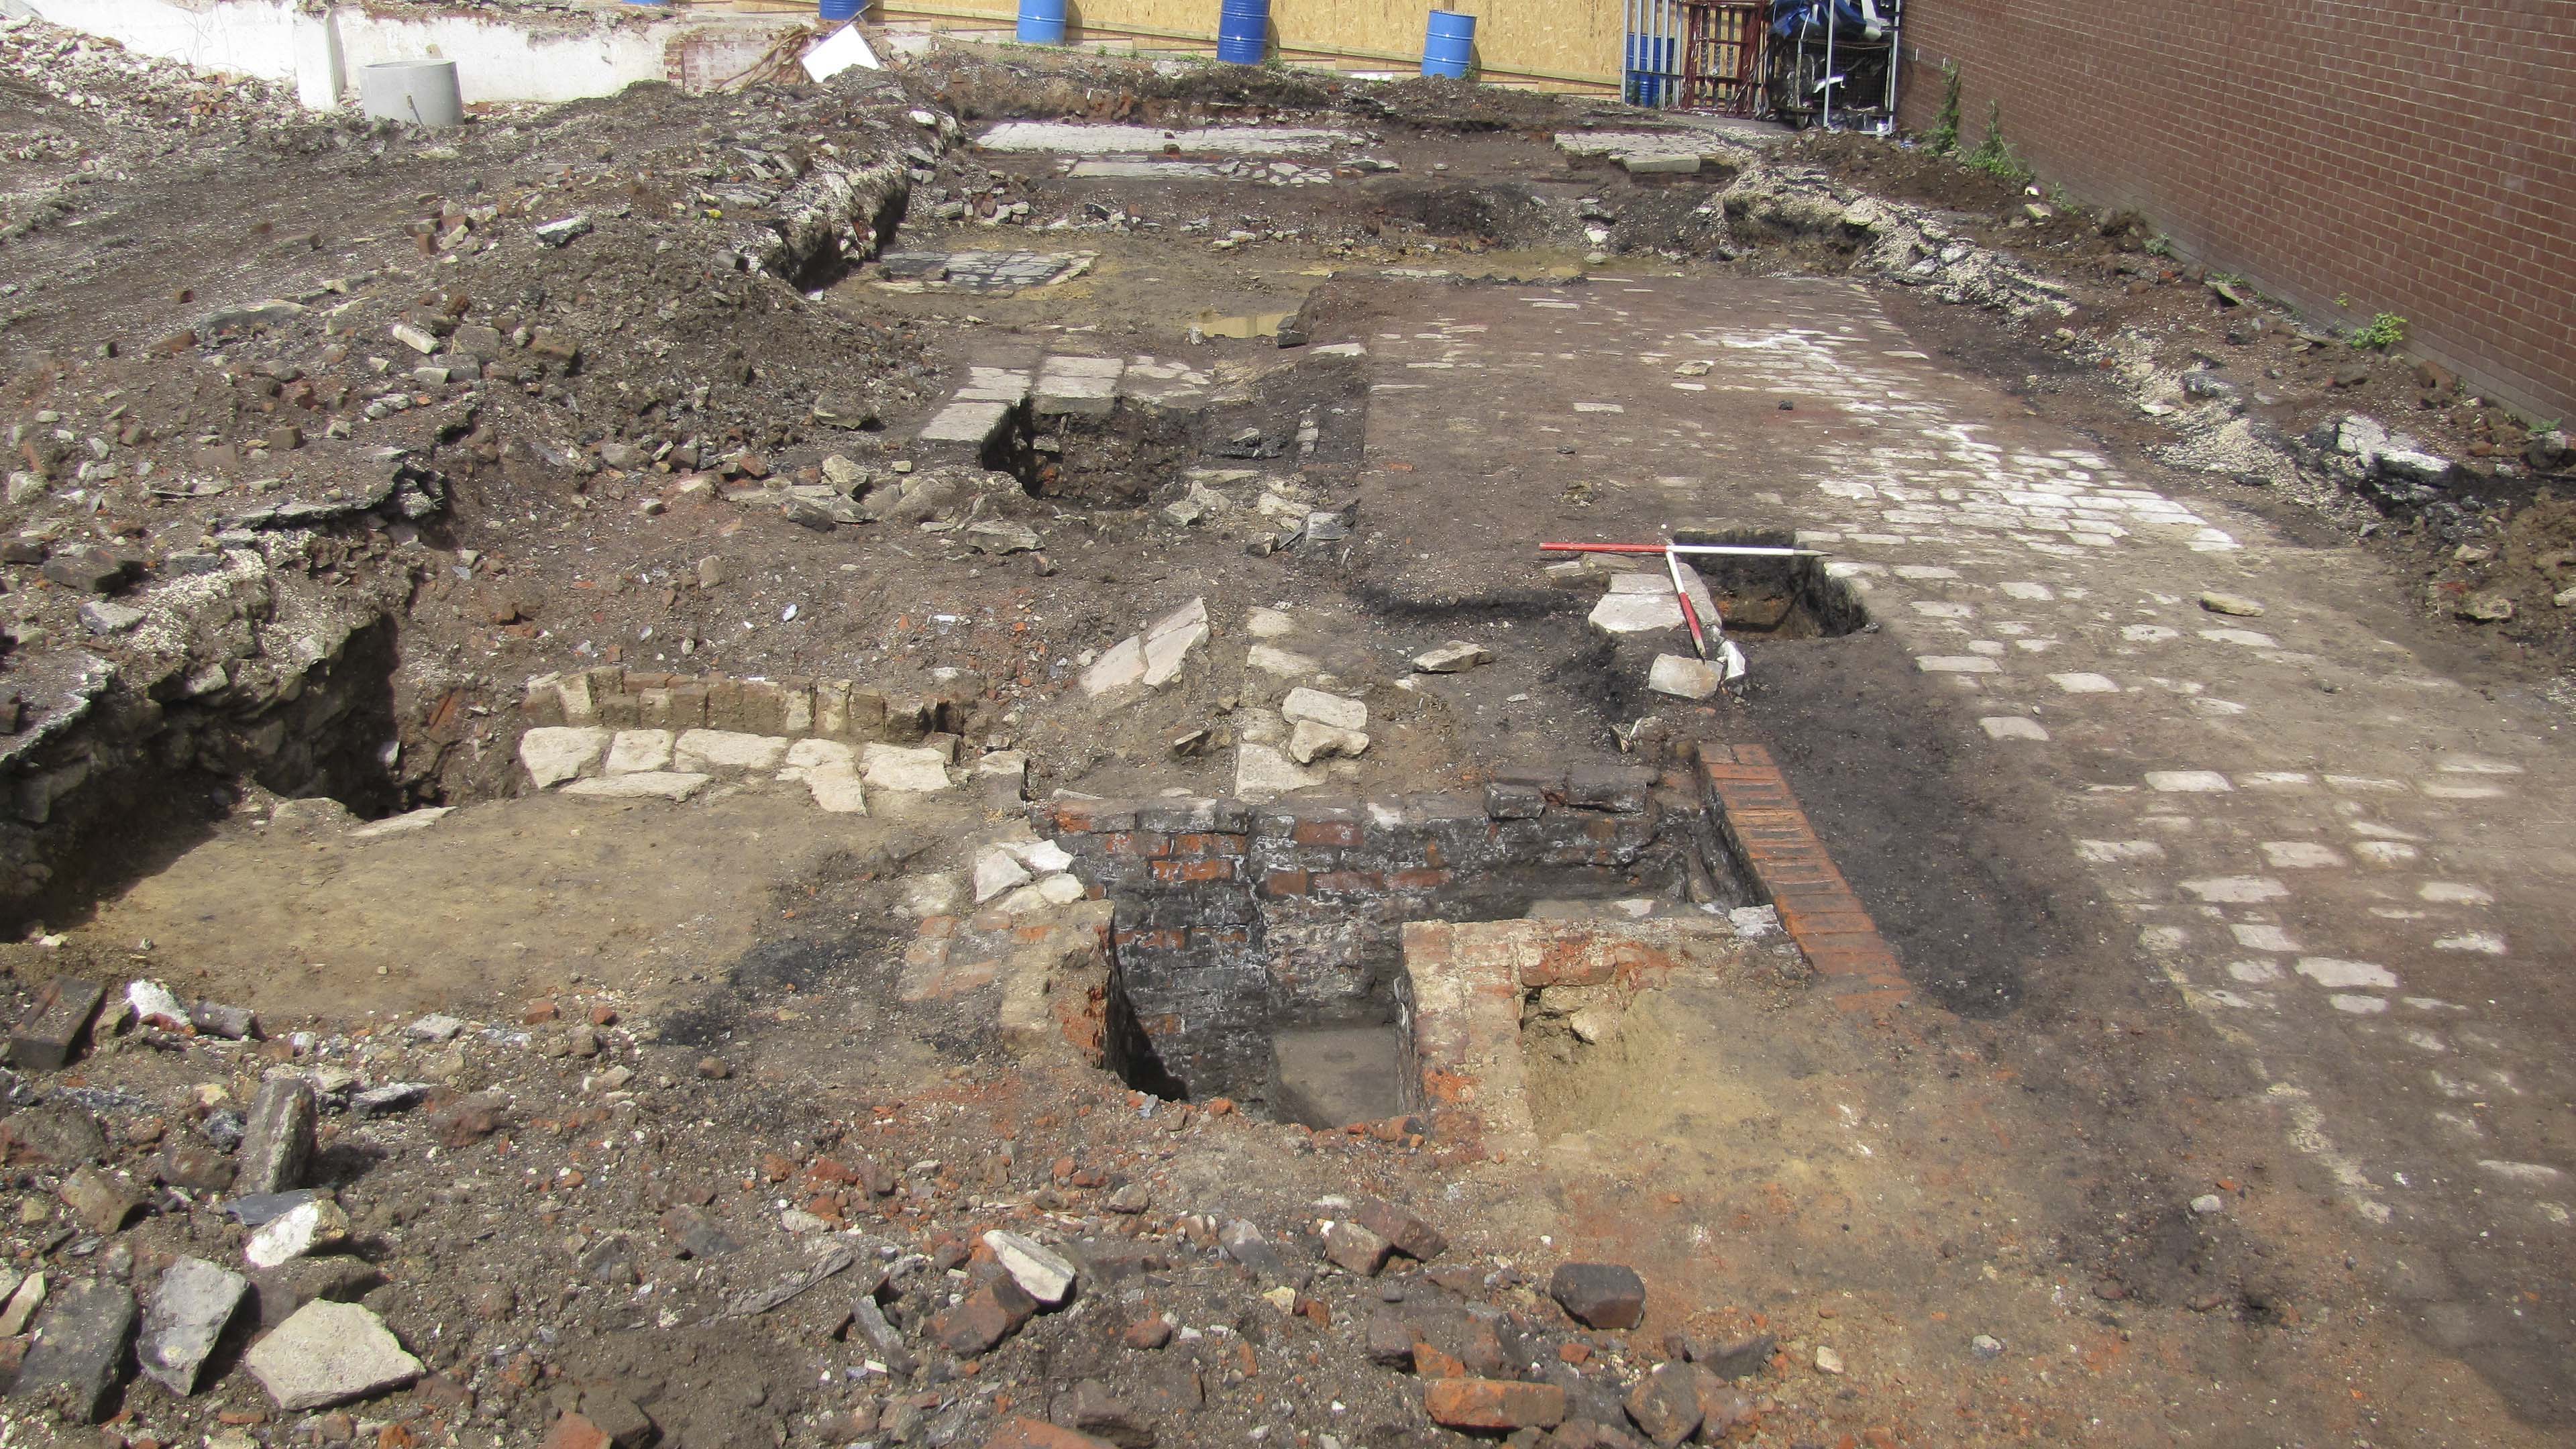
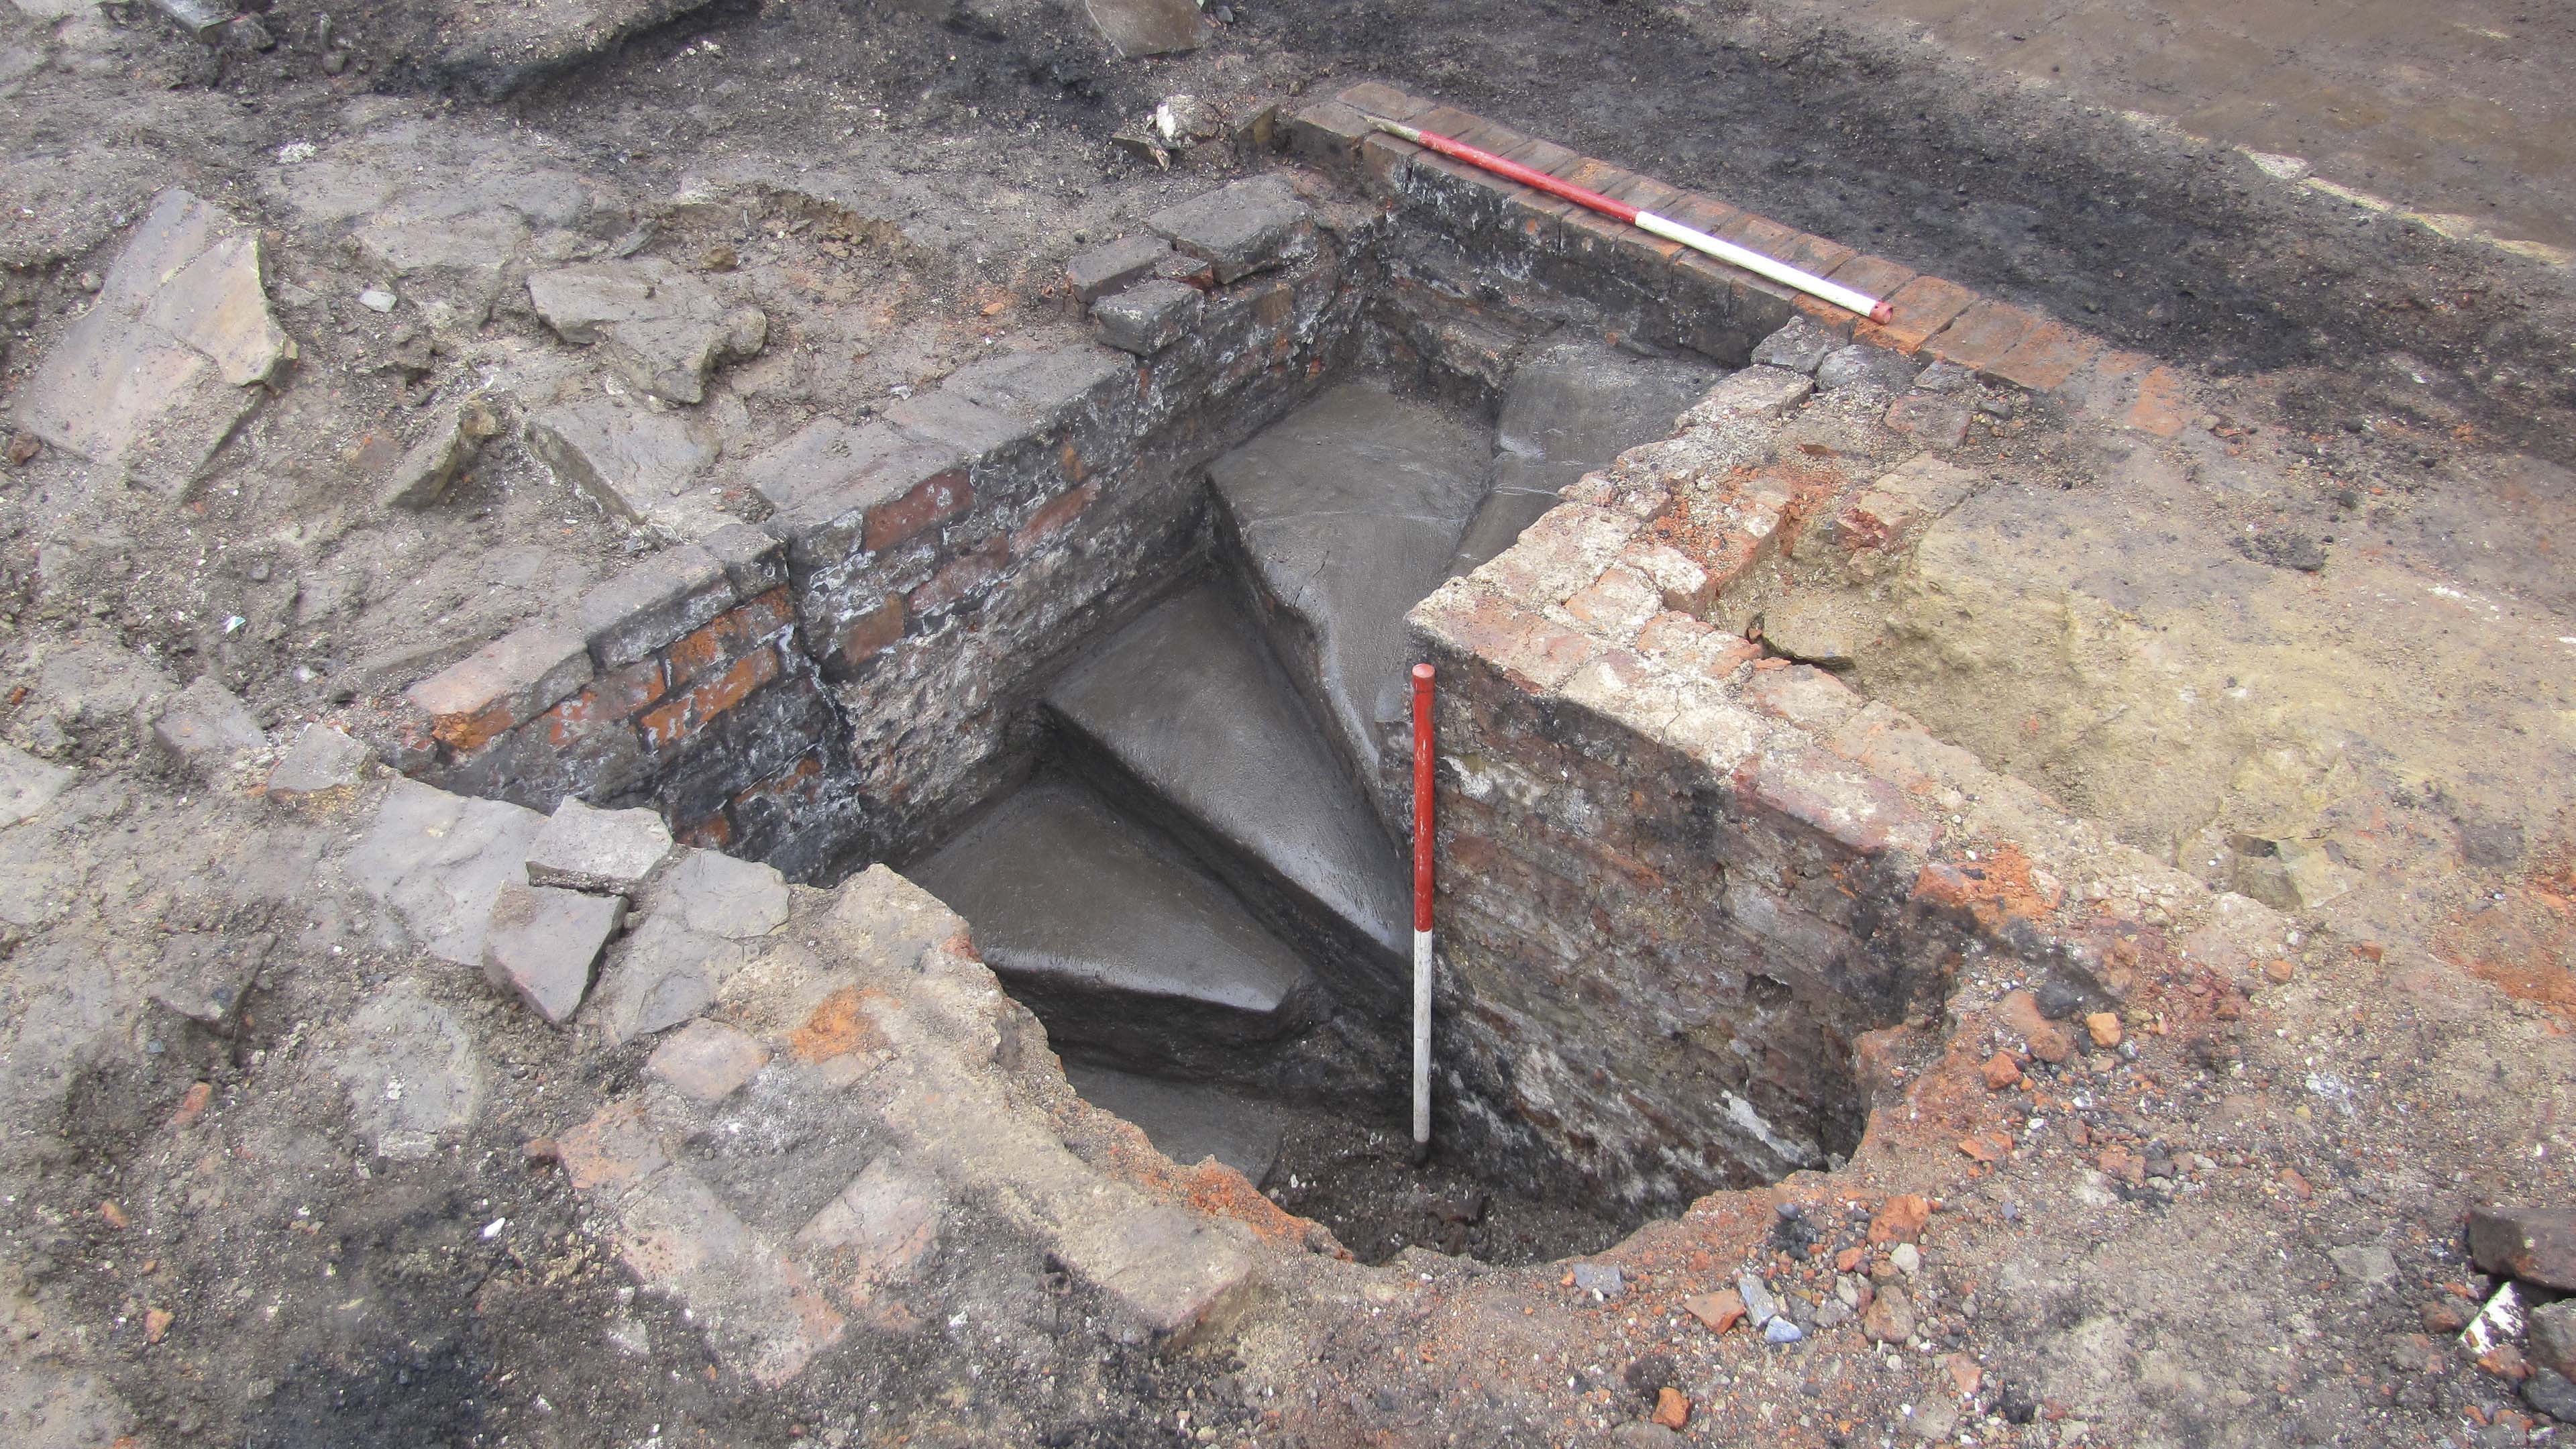
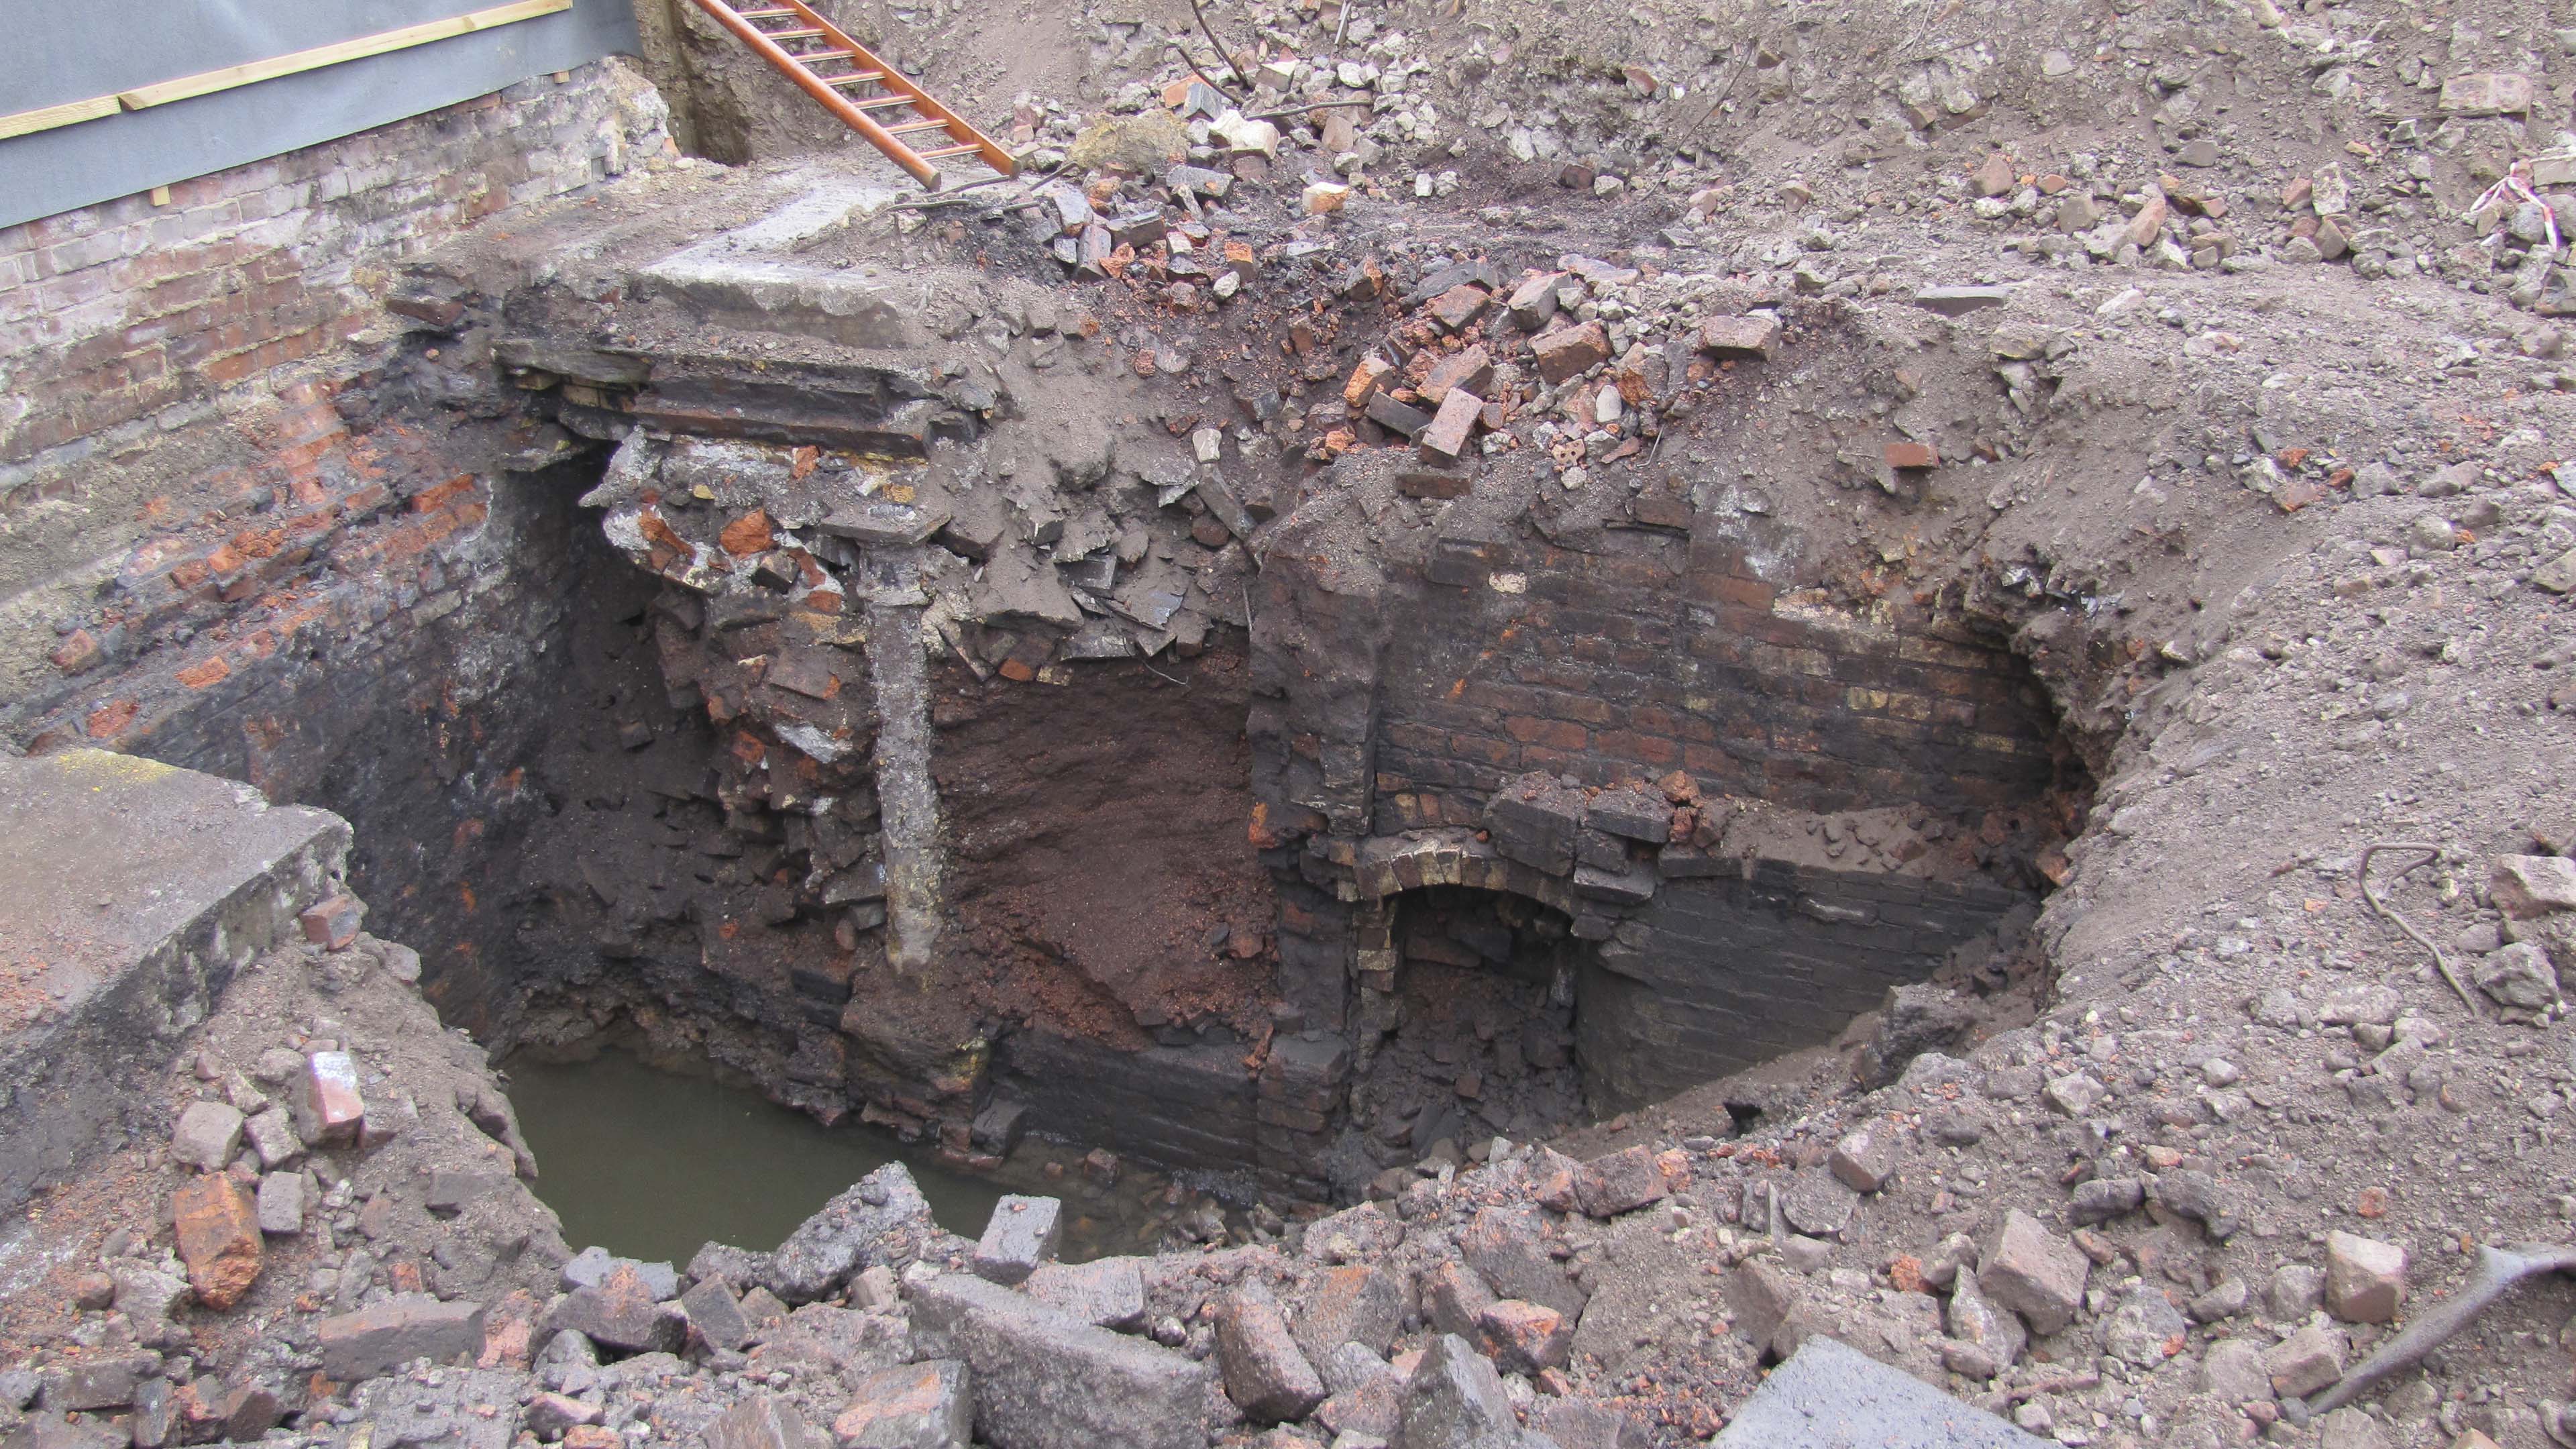
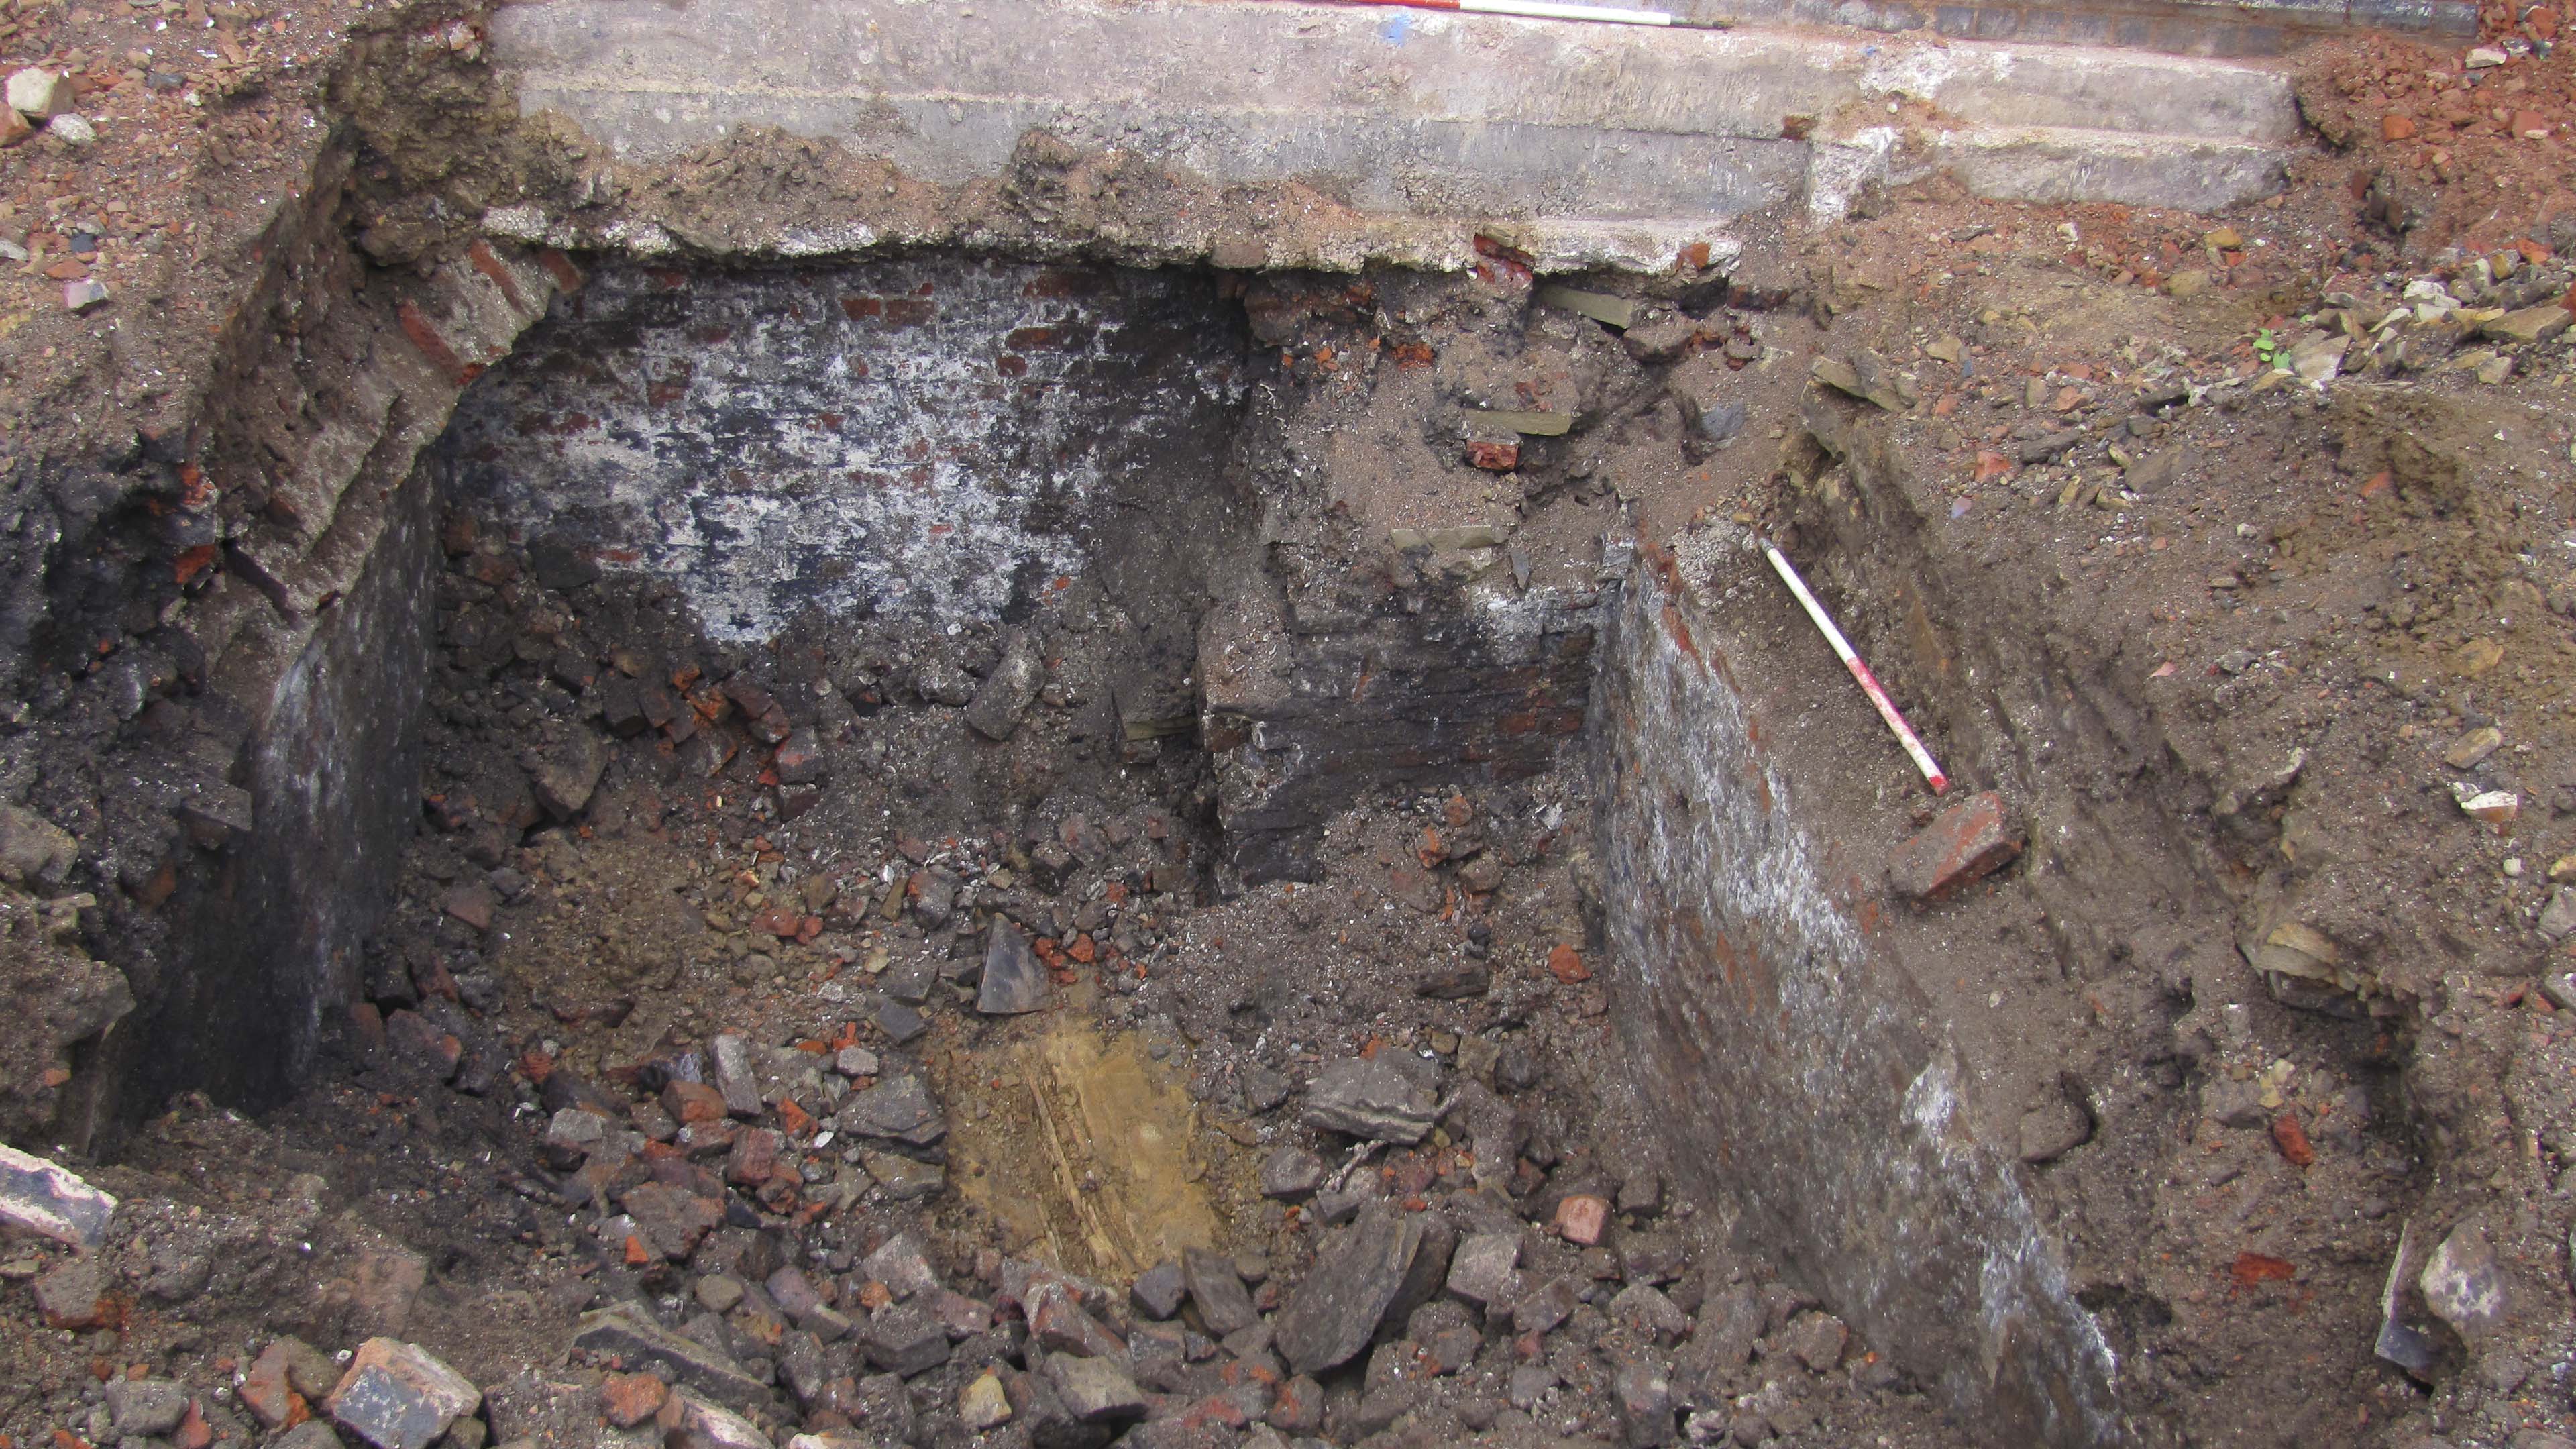